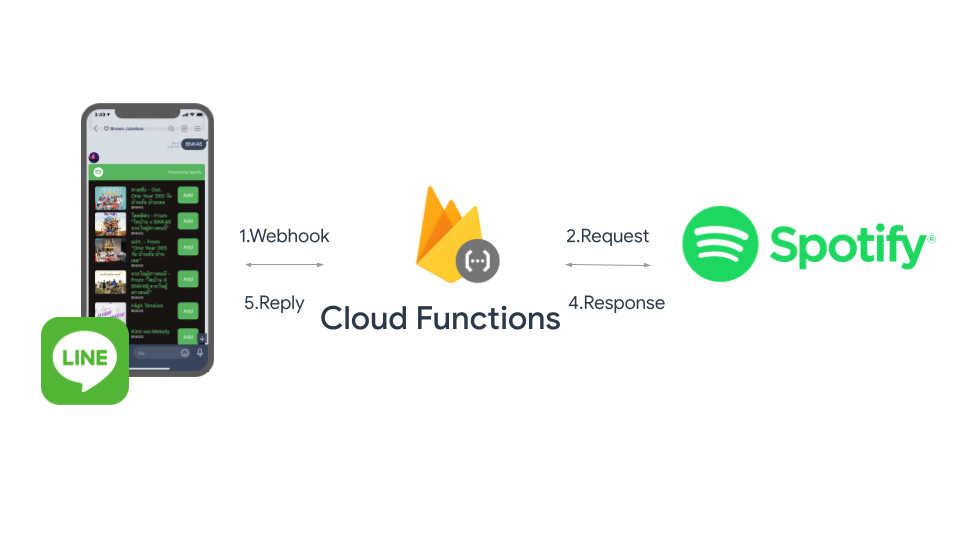
ใน Codelab นี้คุณจะได้เรียนรู้การสร้างตู้เพลง Jukebox Chatbot เท่ห์ๆใน LINE ผ่าน Spotify API เพื่อเอาไว้ฟังเพลงด้วยกันกับเพื่อนๆ โดยสามารถค้นหาและเพิ่มเพลงลงใน Playlist ซึ่งเมื่อเราเริ่มเล่นเพลงใน Playlist นี้เวลามีเพลงใหม่ๆที่ถูกเพิ่มเข้ามา มันก็จะไปลงในคิวและเล่นให้อัตโนมัติ
สิ่งที่คุณจะได้เรียนรู้
- การสร้าง LINE Chatbot
- การสร้างแอปใน Spotify Developer Portal
- การสร้าง Class ที่จัดการส่วนที่ต่อกับ Spotify API
- การสร้างโปรเจคใน Firebase
- การติดตั้ง Firebase CLI และ Cloud Functions for Firebase
- จัดการ Webhook โดยใช้ Cloud Functions และส่งผลลัพธ์เป็น Flex message กลับไปหาผู้ใช้
สิ่งที่คุณต้องเตรียมพร้อมก่อนเริ่ม Codelab
สร้าง LINE Official Account
จุดเริ่มต้นของการพัฒนา LINE Chatbot คือคุณจะต้องสร้าง LINE OA(LINE Official Account) และเปิดใช้งาน Messaging API
- เข้าไปที่ https://manager.line.biz แล้วเลือก Log in with LINE account(สีเขียว) เพื่อเข้าสู่ระบบ
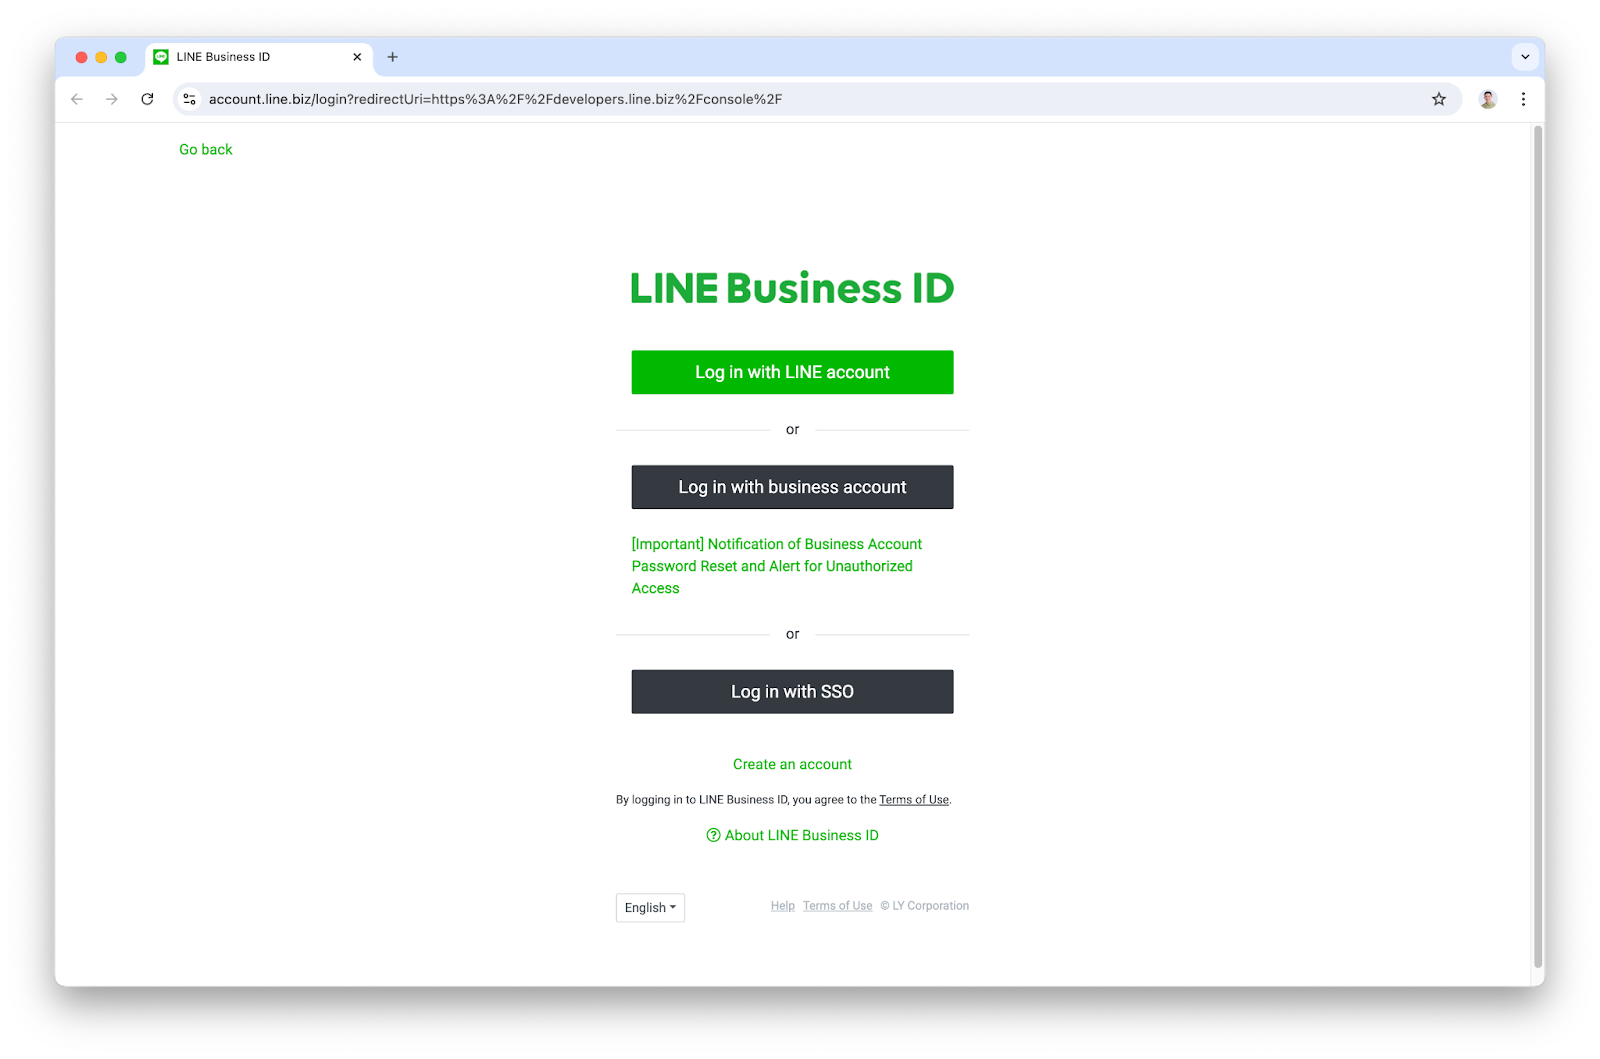
- เข้าสู่ระบบด้วยบัญชี LINE ของคุณให้เรียบร้อย
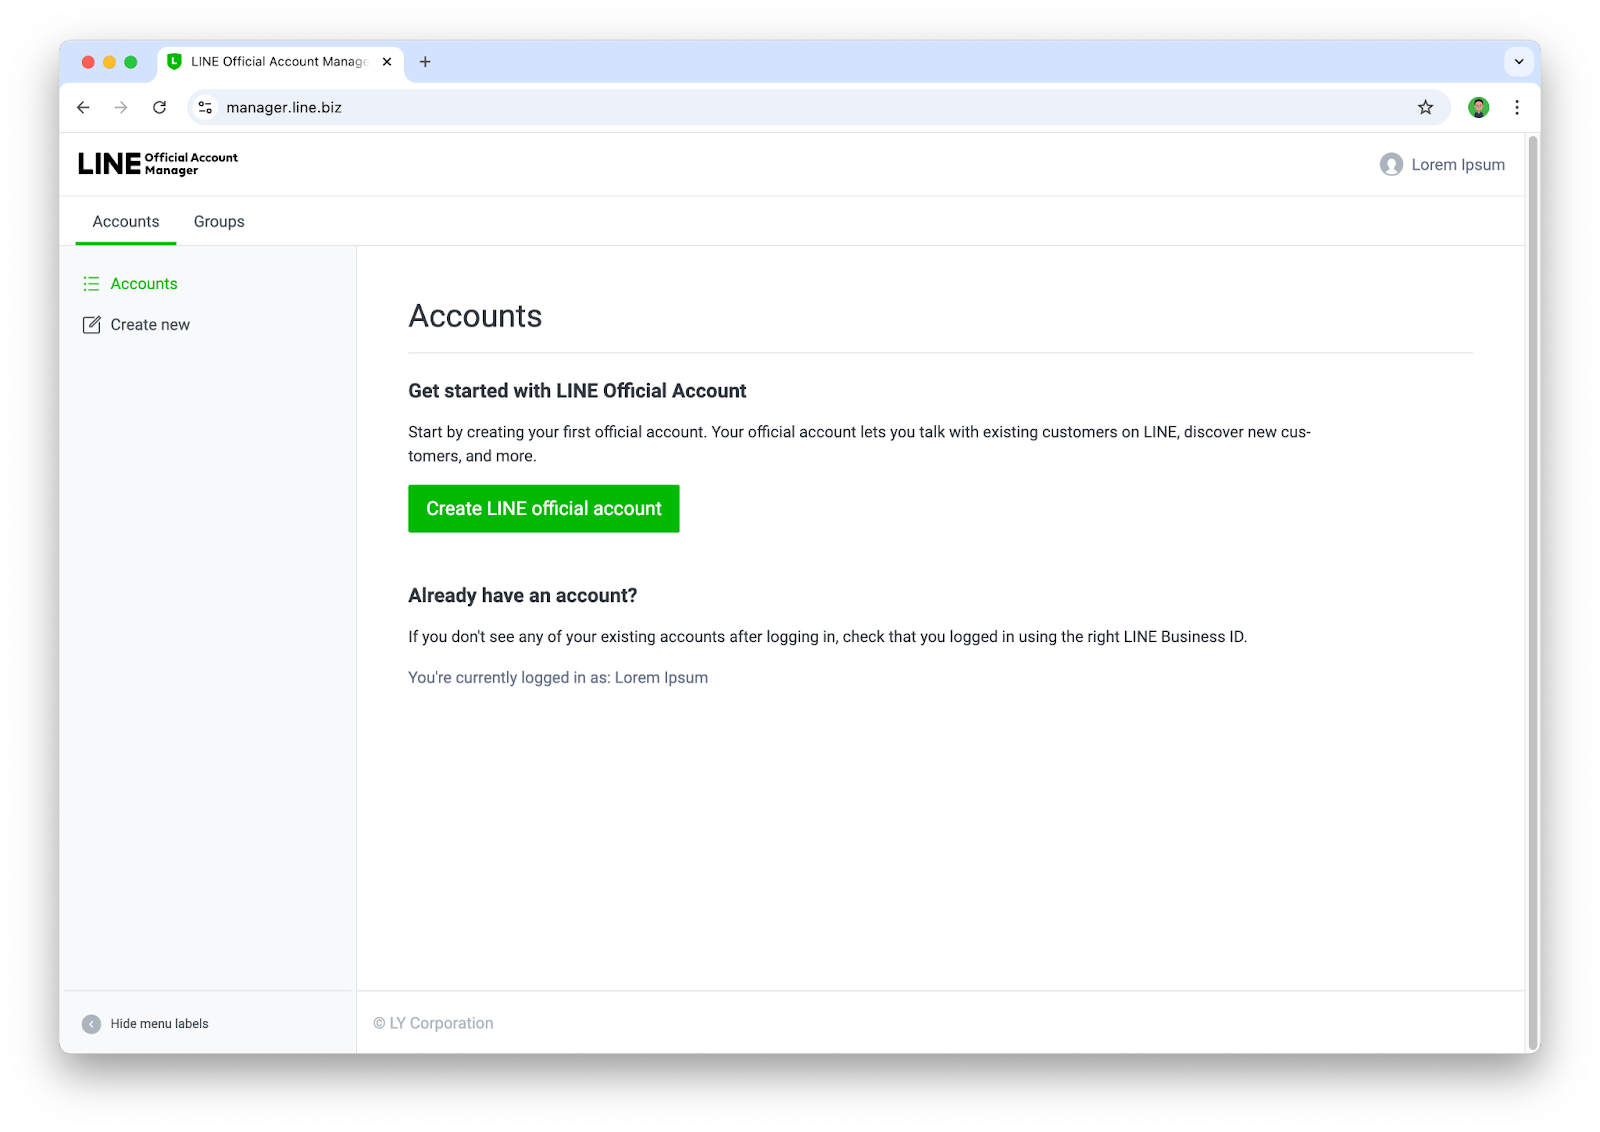
- กดสร้าง LINE OA จากปุ่ม Create LINE official account สำหรับผู้ทีสร้าง LINE OA ครั้งแรก หรือกด Create new ทางด้านซ้ายสำหรับผู้ที่เคยสร้าง LINE OA แล้ว
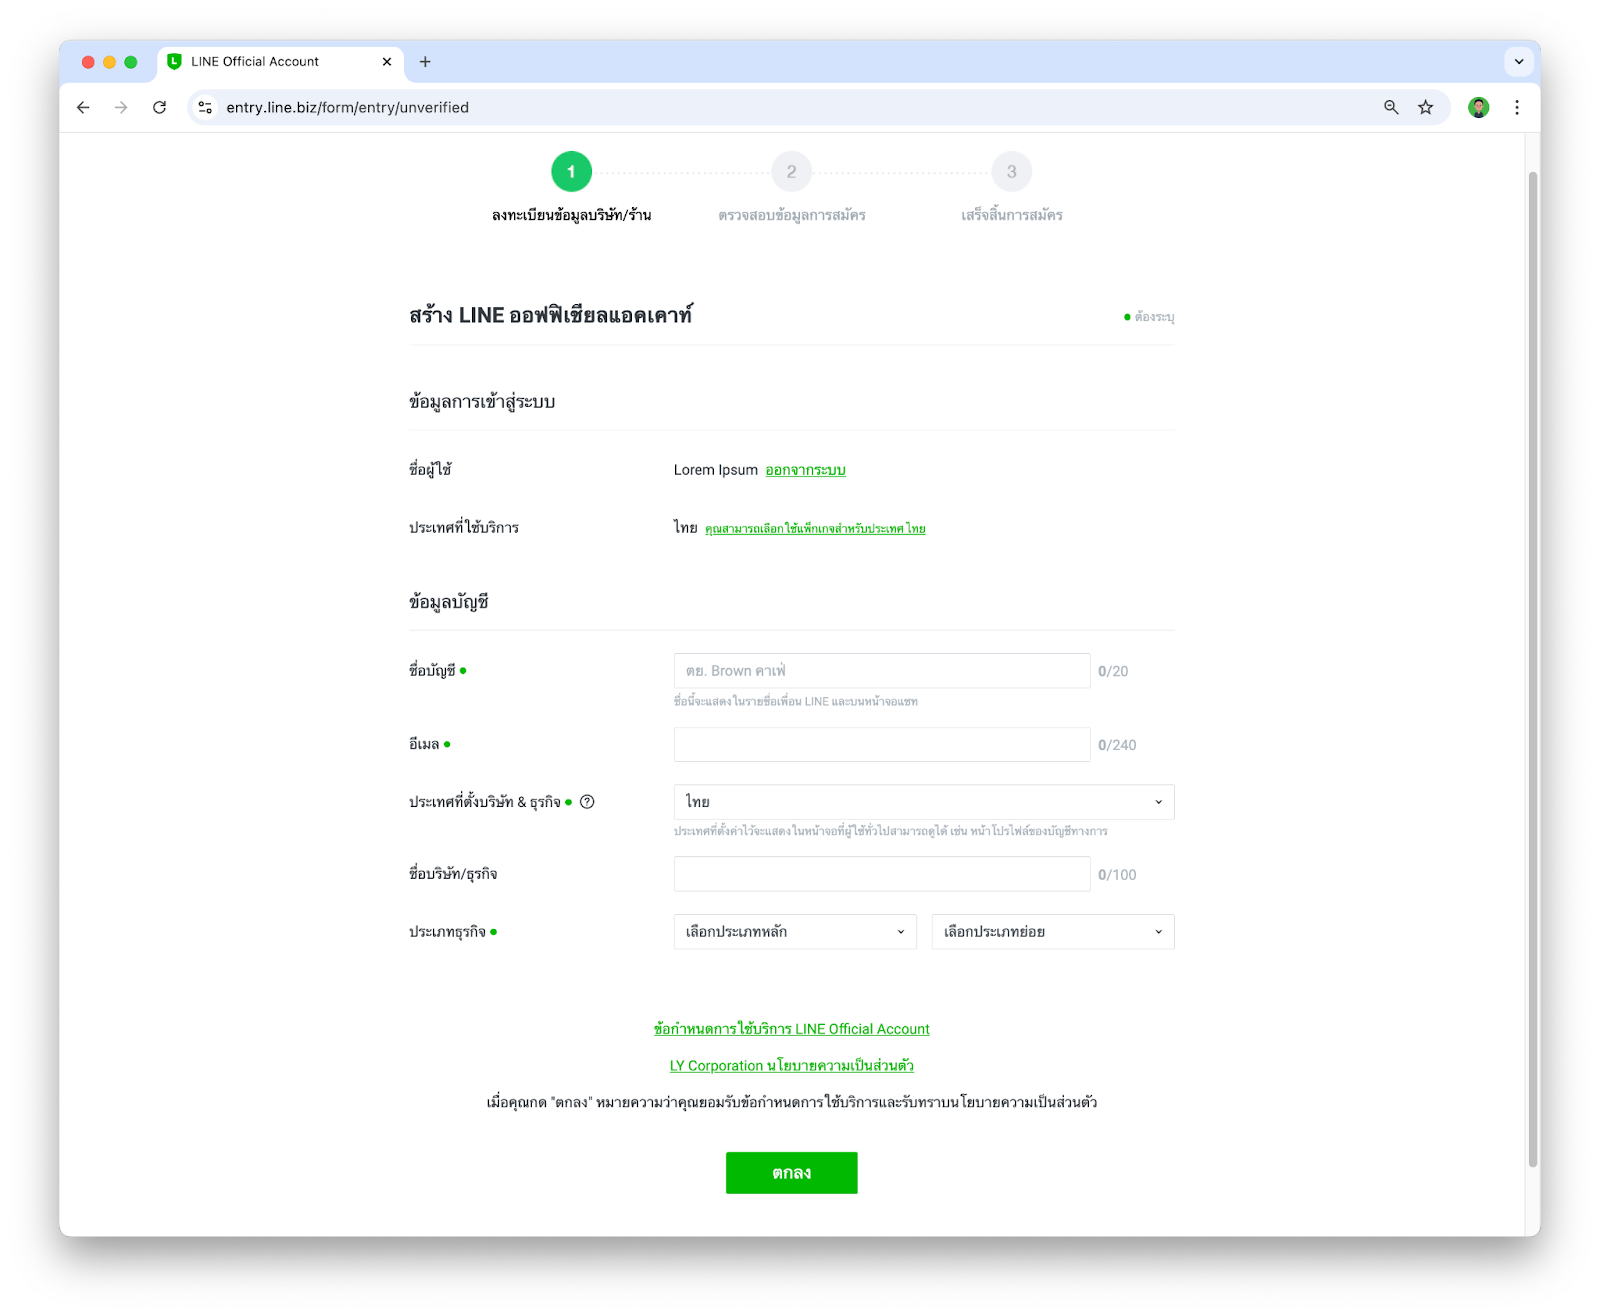
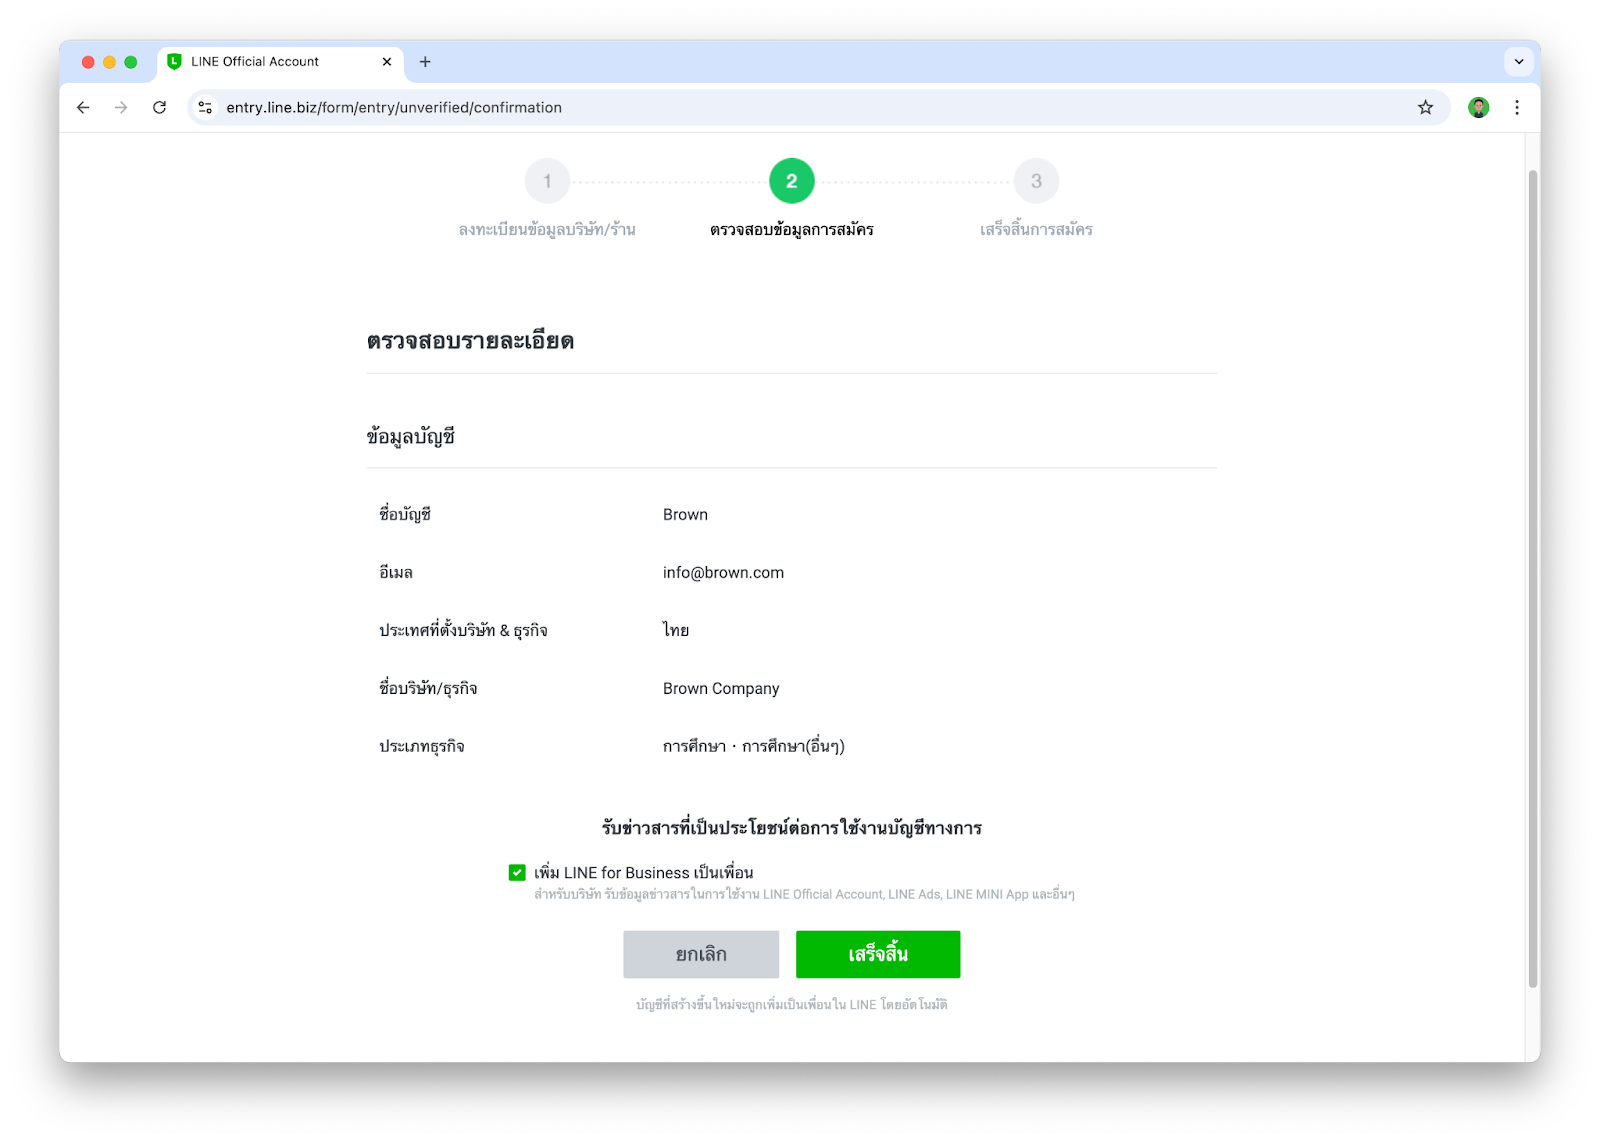
- ให้ระบุข้อมูลต่างๆลงไปในฟอร์ม แล้วกด ตกลง
- จากนั้นให้ยืนยันรายละเอียดในการสร้าง LINE OA เป็นอันเสร็จสิ้น
เปิดใช้งาน Messaging API
หลังจากที่เรามี LINE OA เรียบร้อยแล้ว ขั้นตอนนี้จะพาทุกคนไปเพิ่มความสามารถให้ LINE OA ของเรากลายเป็น LINE Chatbot ได้
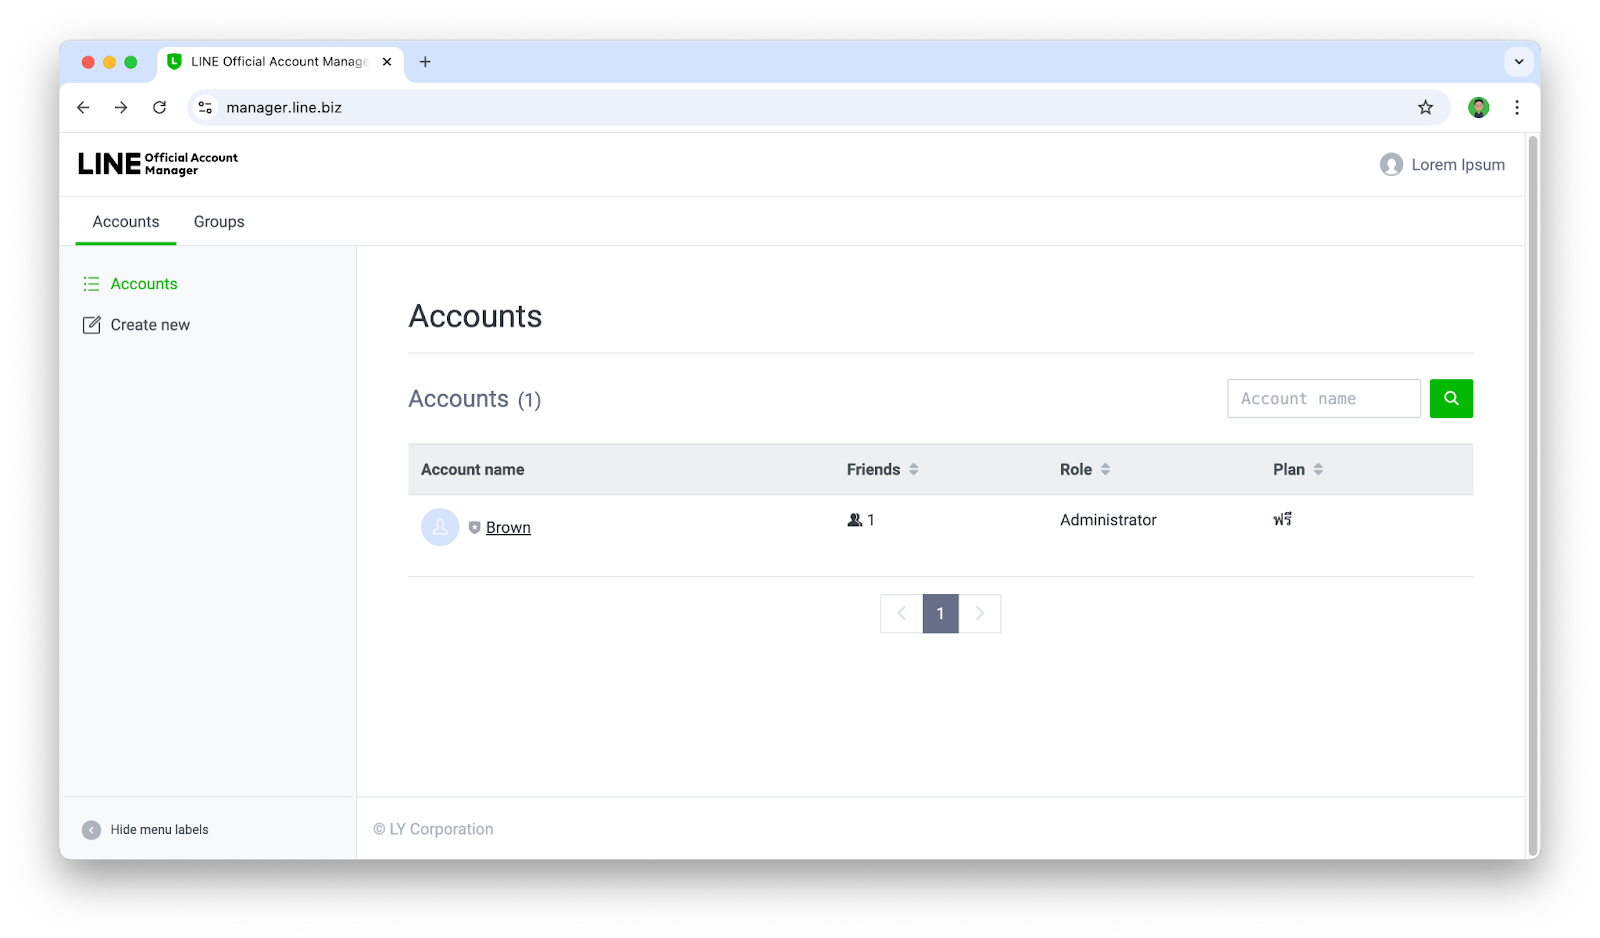
- เข้าไปที่ https://manager.line.biz ในกรณีที่เรามีบัญชี LINE OA ที่สร้างไว้แล้ว หน้านี้จะแสดงบัญชี LINE OA ต่างๆที่เรามี ก็ให้เรากดเลือกบัญชี LINE OA ที่เราต้องการ
- ให้เราไปทีเมนู Settings > Messaging API แล้วให้กดปุ่ม Enable Messaging API
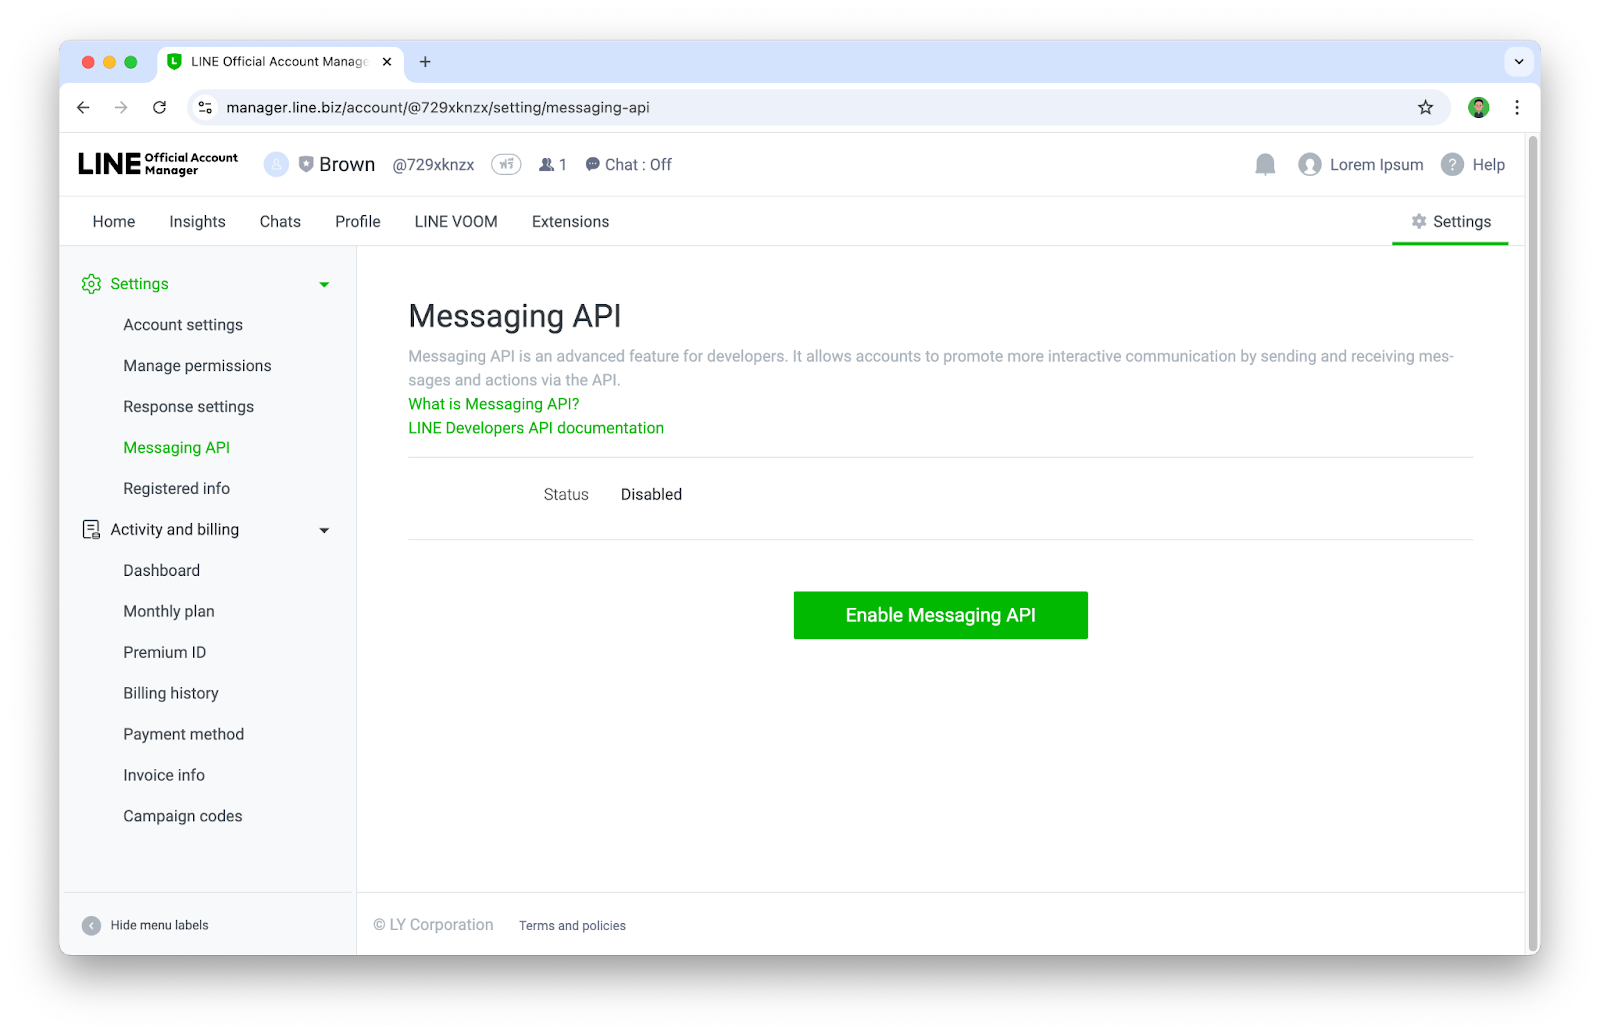
- หากเป็นการ Enable Messaging API ครั้งแรกของบัญชี LINE Business ID จะเจอหน้าให้ลงทะเบียน Developer info ก็ให้กรอก ชื่อ และ อีเมล
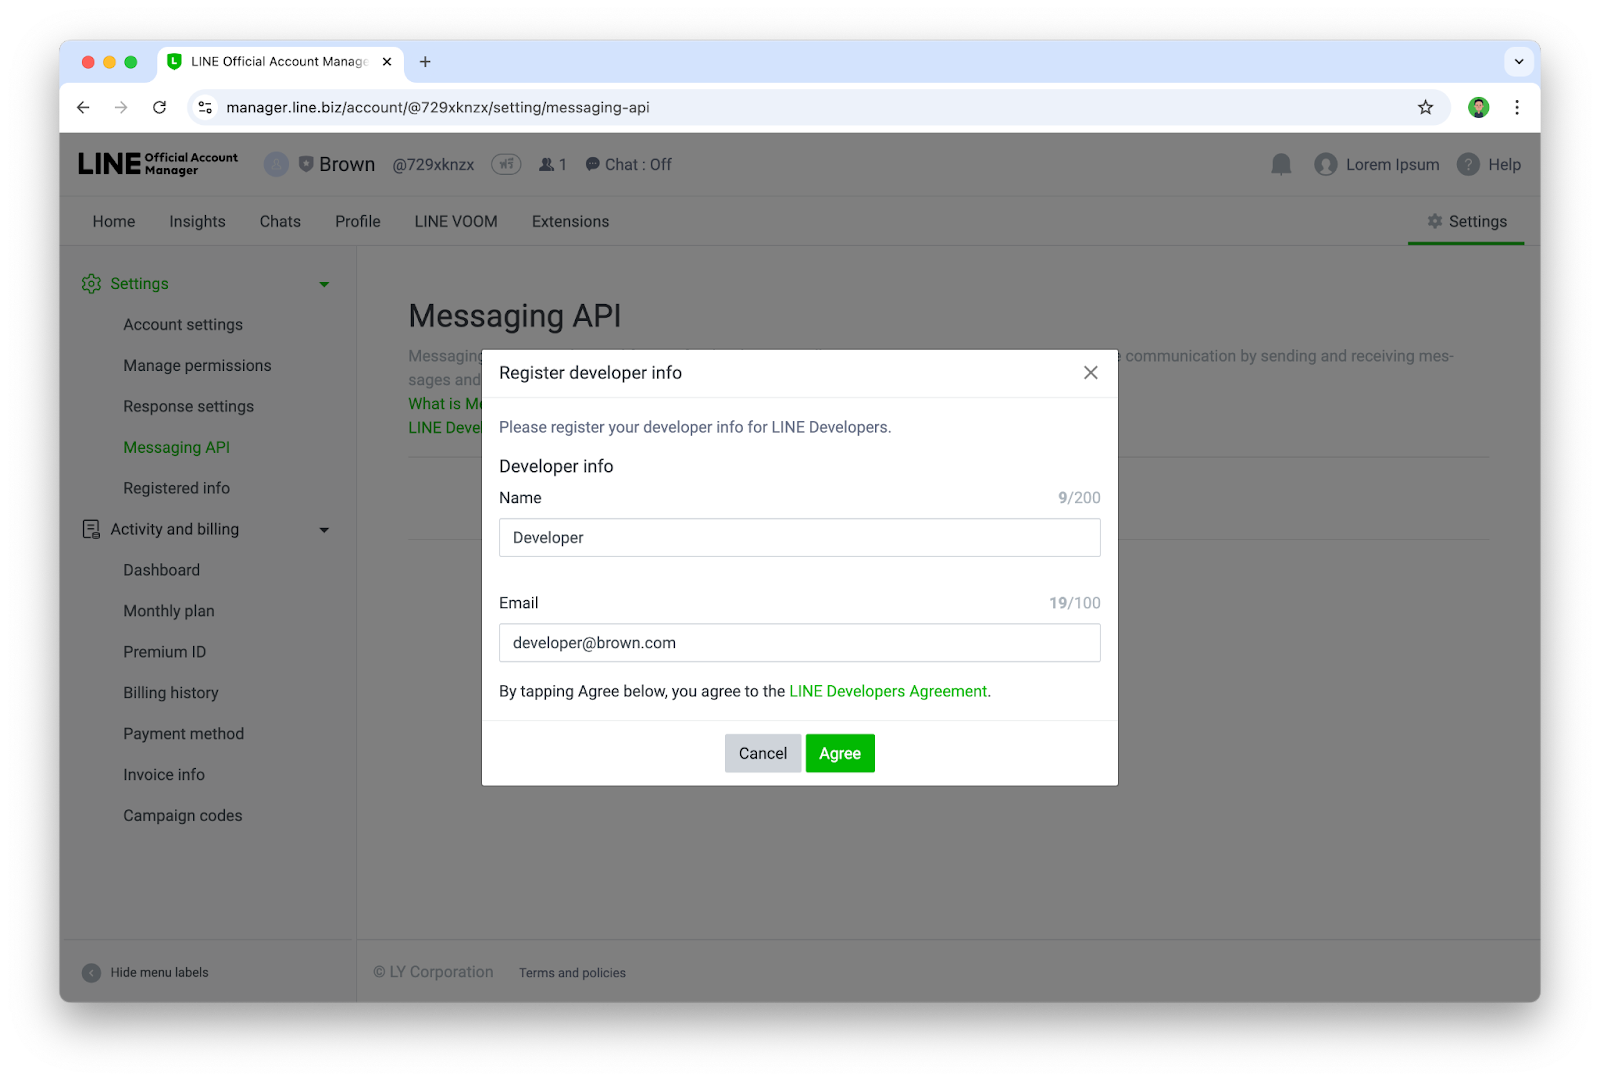
- จากนั้นให้สร้าง Provider ใหม่ หรือเลือก Provider เดิมกรณีที่เคยสร้างไปแล้ว
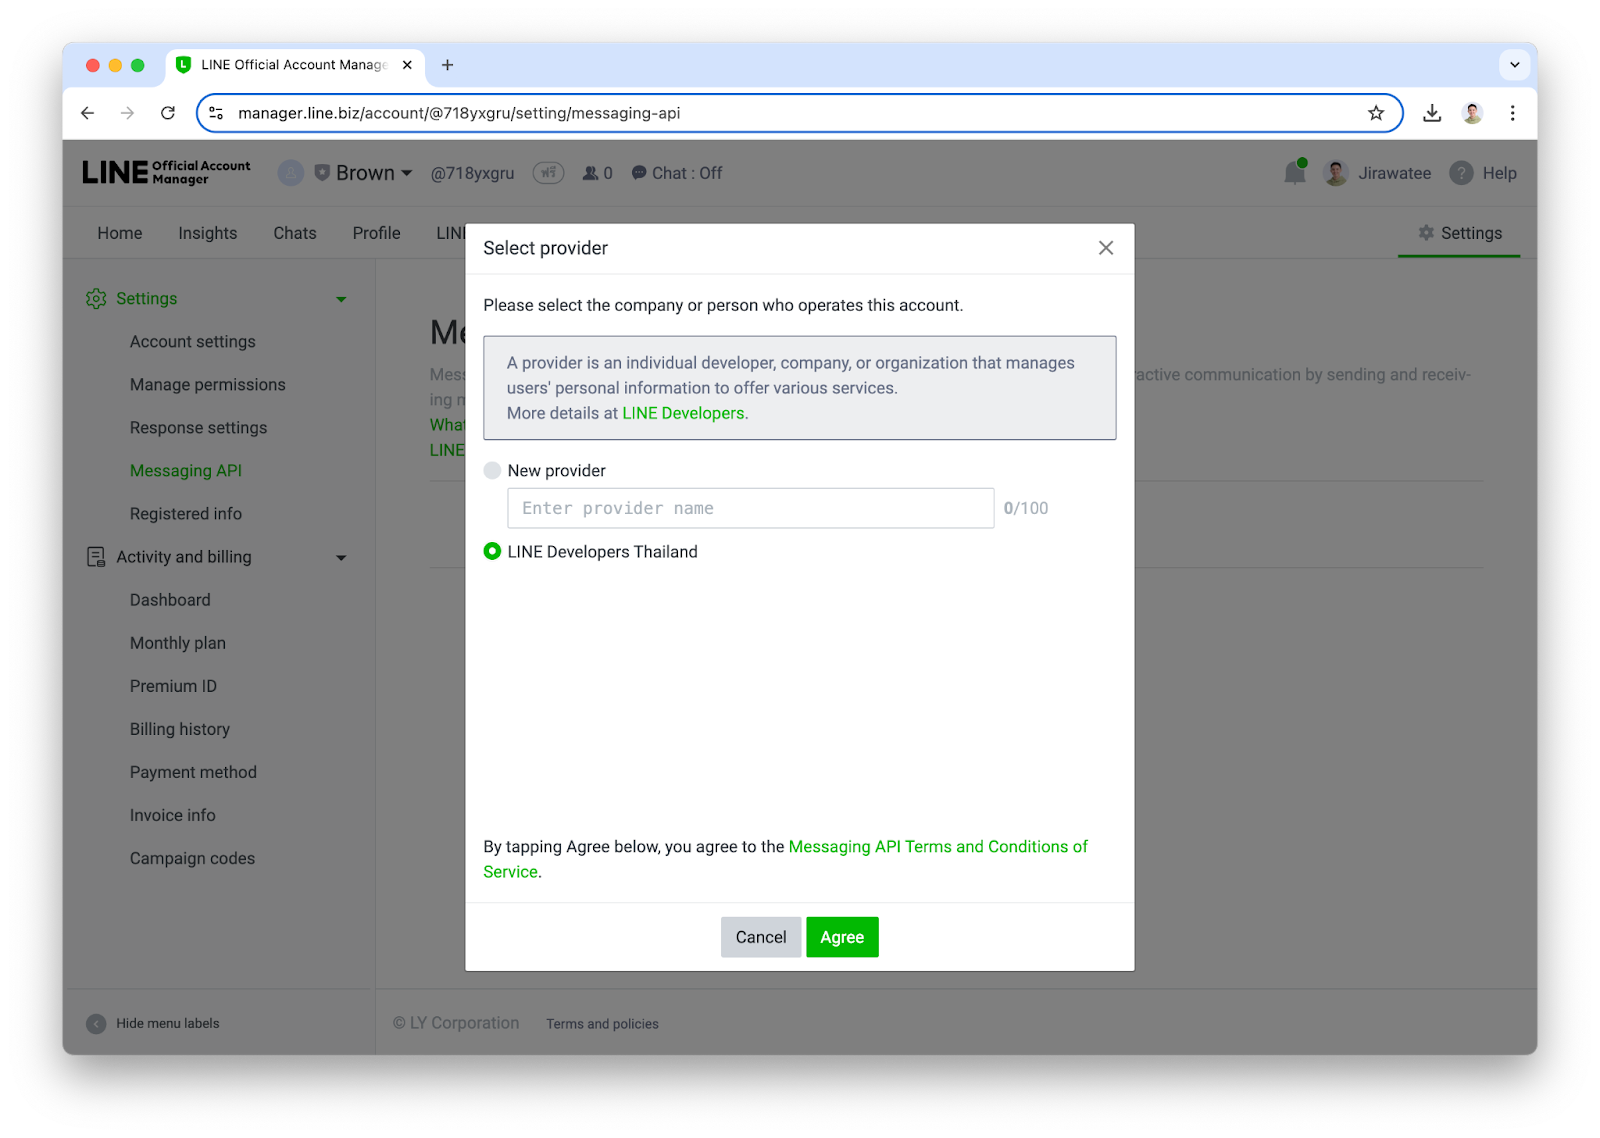
- ระบุ URL ของ Privacy Policy และ Terms of Use (ถ้ามี) หากยังไม่มีก็สามารถกดปุ่ม ok ข้ามไปได้

- ยืนยันการเปิดใช้งาน Messaging API ด้วยการกด Ok
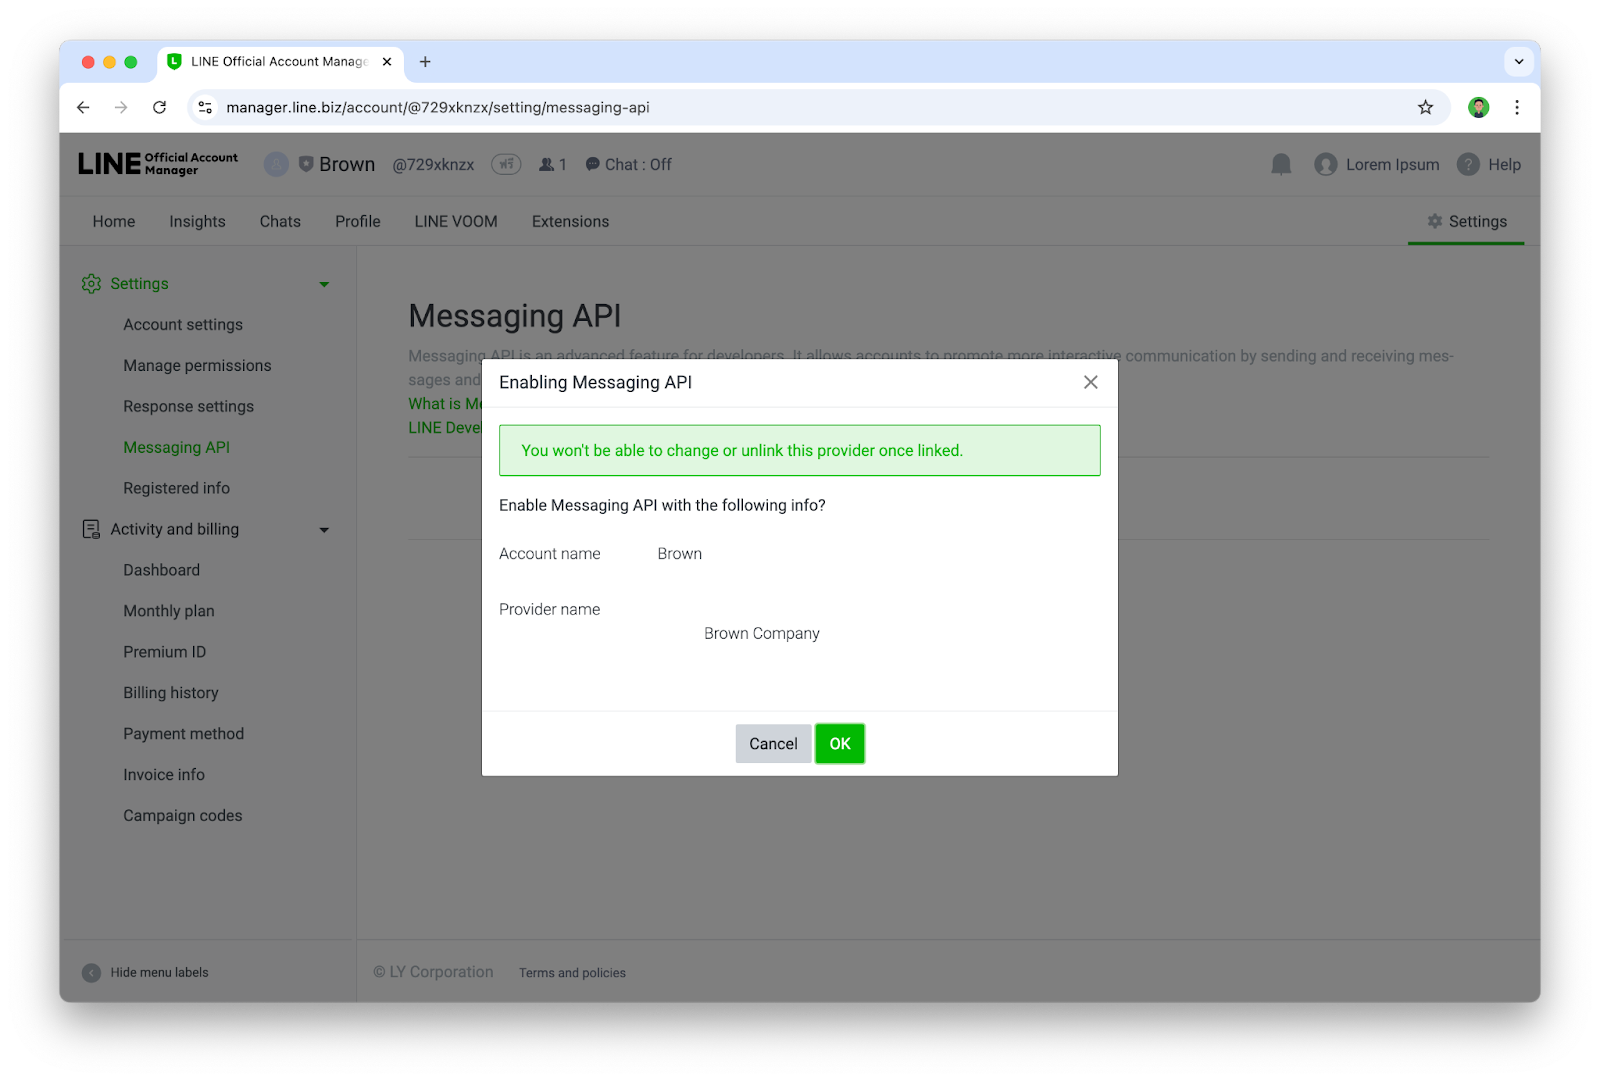
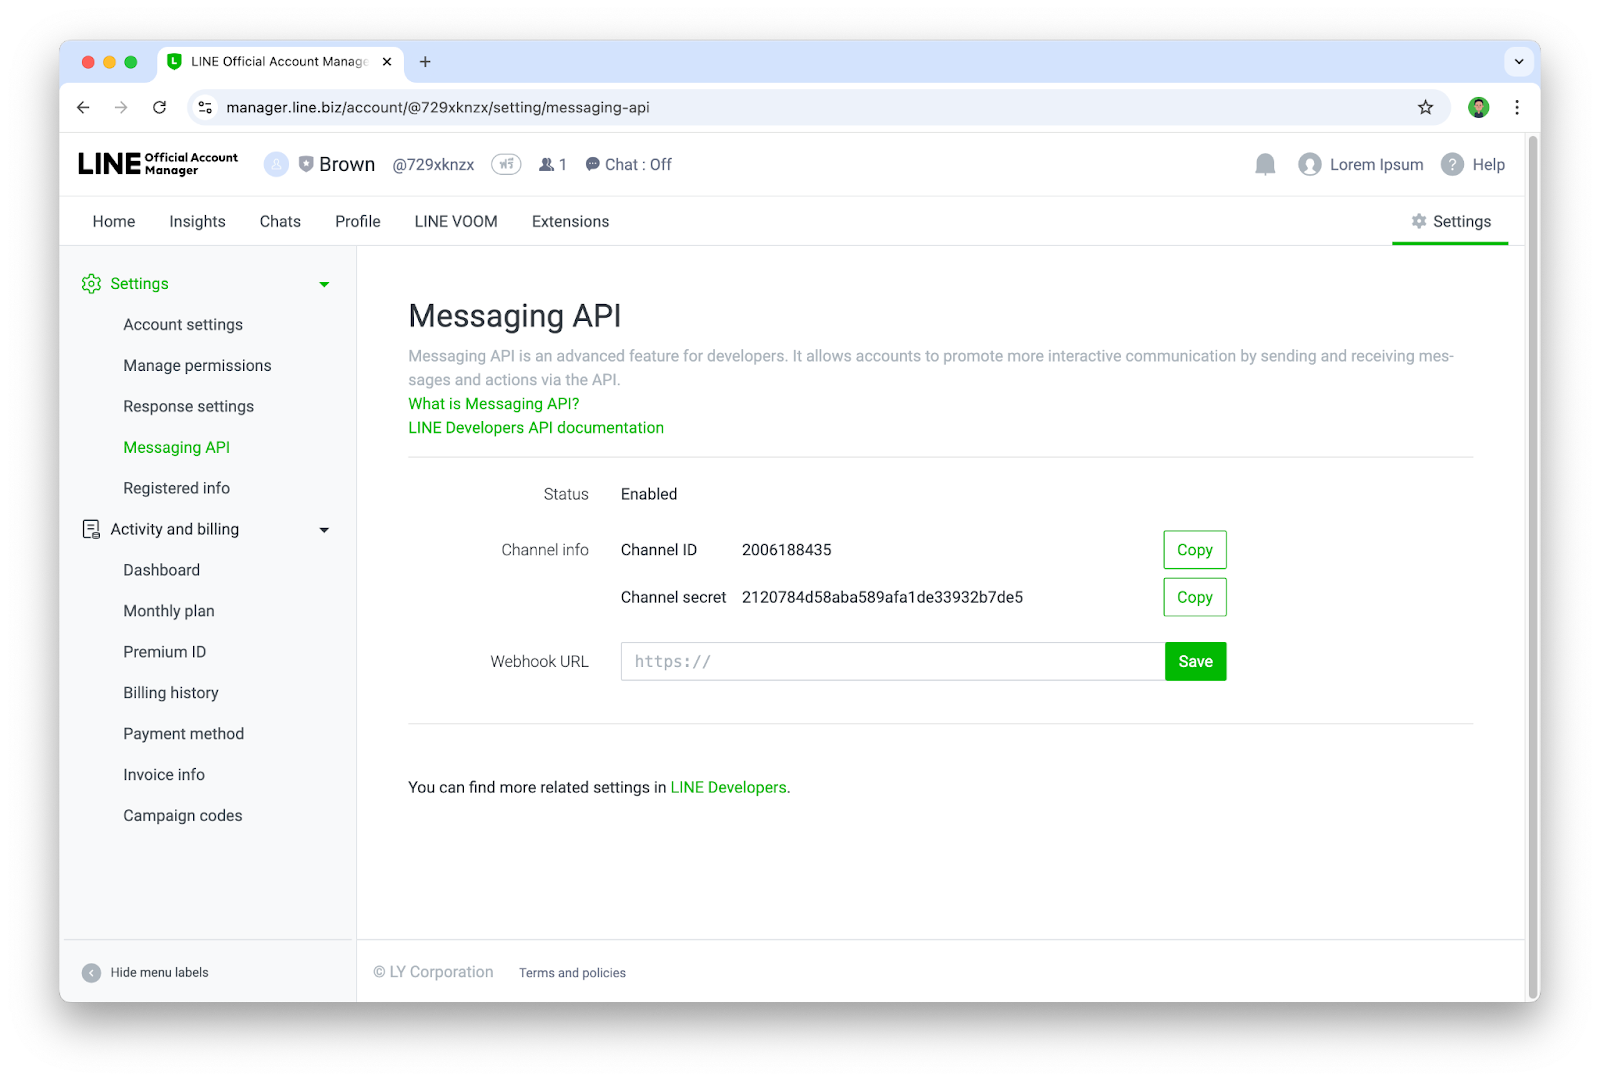
- เมื่อเจอหน้านี้ ก็แปลว่าคุณได้เปิดใช้งาน Messaging API ให้กับบัญชี LINE OA เรียบร้อยแล้ว
เพิ่ม Chatbot เป็นเพื่อนและตั้งค่า Channel
ขั้นตอนนี้เราจะเข้าไปใช้งาน LINE Developers Console ซึ่งเป็นเว็บไซต์สำหรับการบริหารจัดการ LINE Chatbot(LINE OA ที่เปิดใช้งาน Messaging API แล้ว) ในส่วนของนักพัฒนา
- เข้าไปที่ https://developers.line.biz/console/
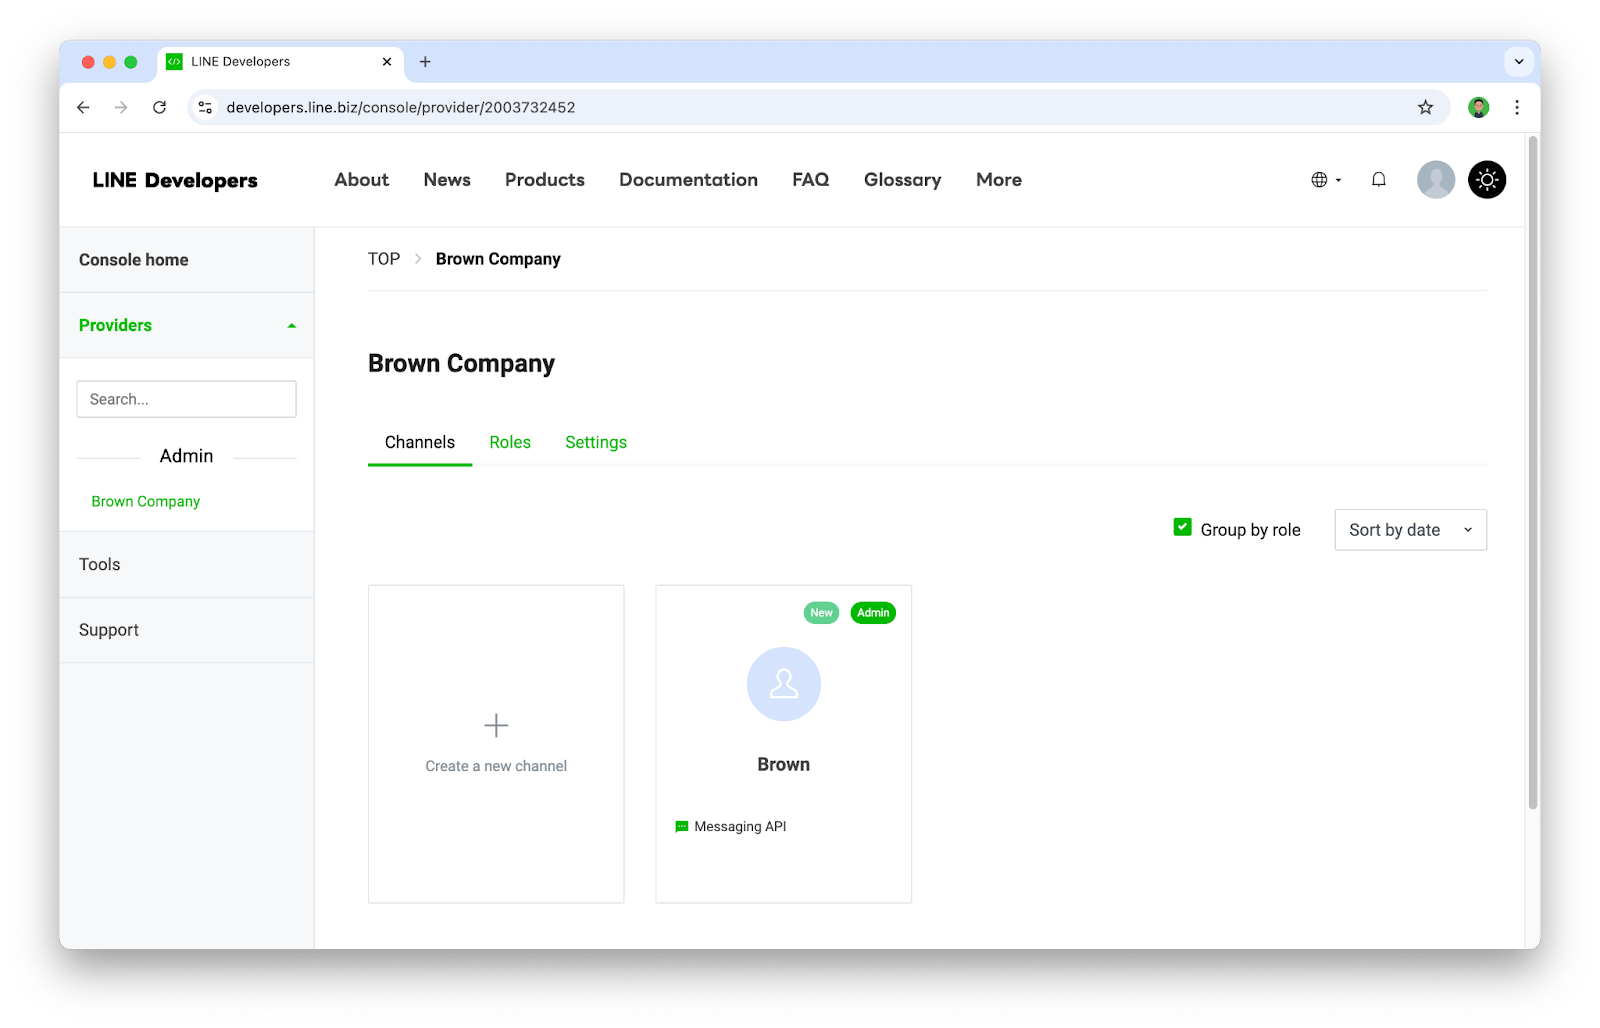
- ให้กดเลือก Provider ที่ต้องการ
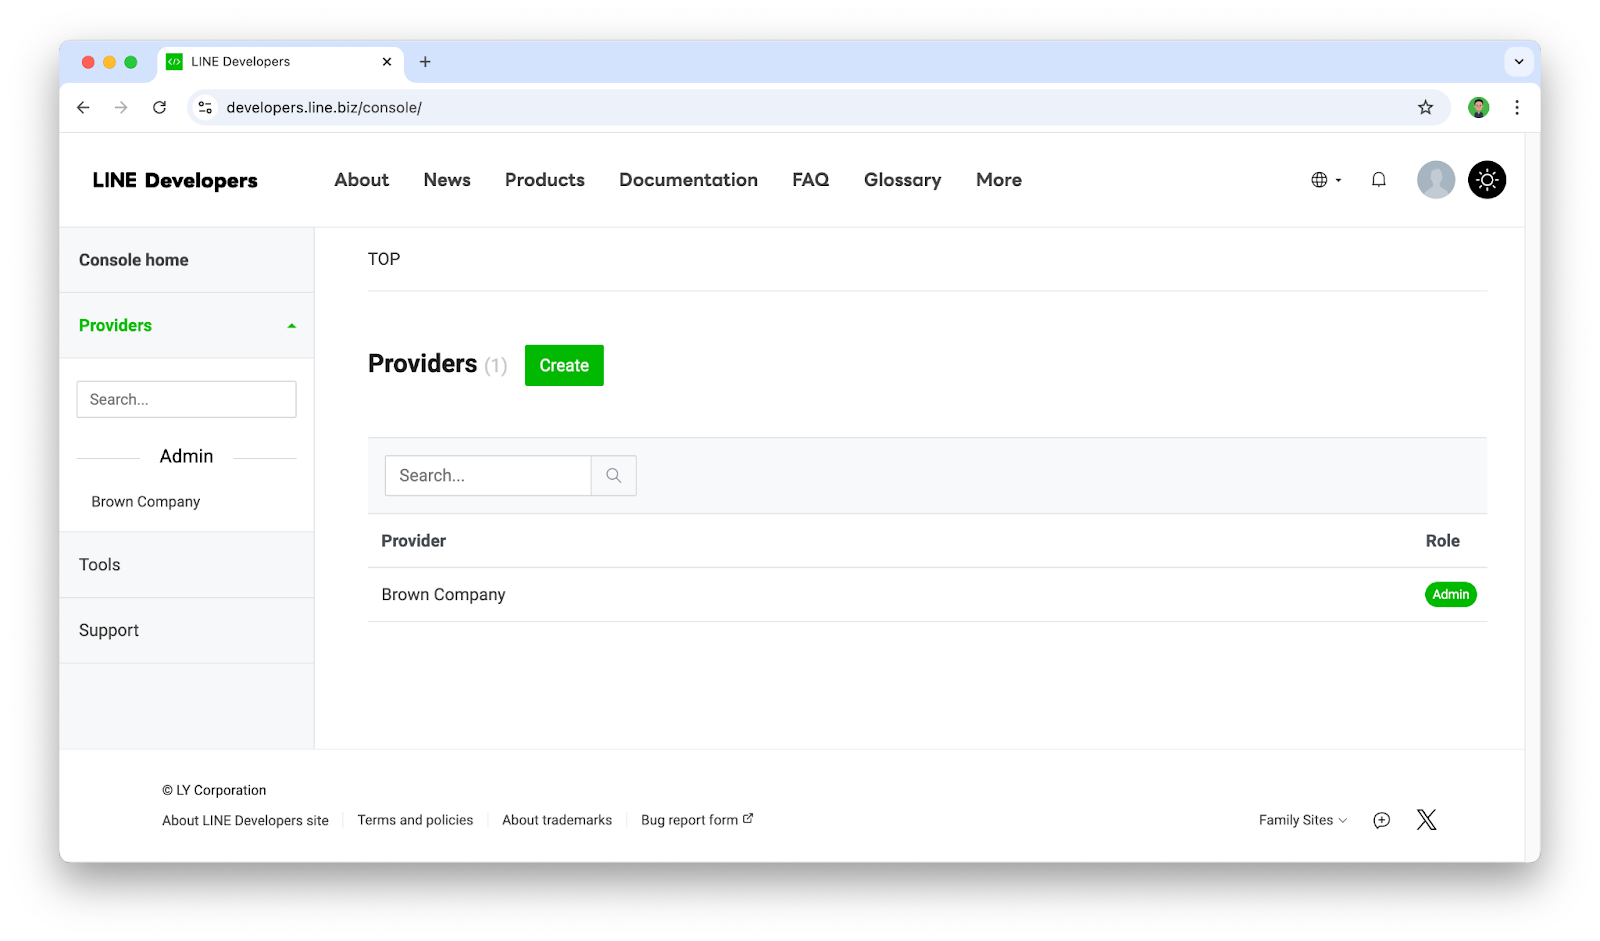
- เราจะพบกับบัญชี LINE OA ที่เราได้เปิดใช้งาน Messaging API ไว้ ซึ่งในที่นี้เราจะเรียกมันว่า Channel(Channel จะเปรียบเสมือน Chatbot หรือ App) ก็ให้กดเลือก Channel ที่ต้องการ
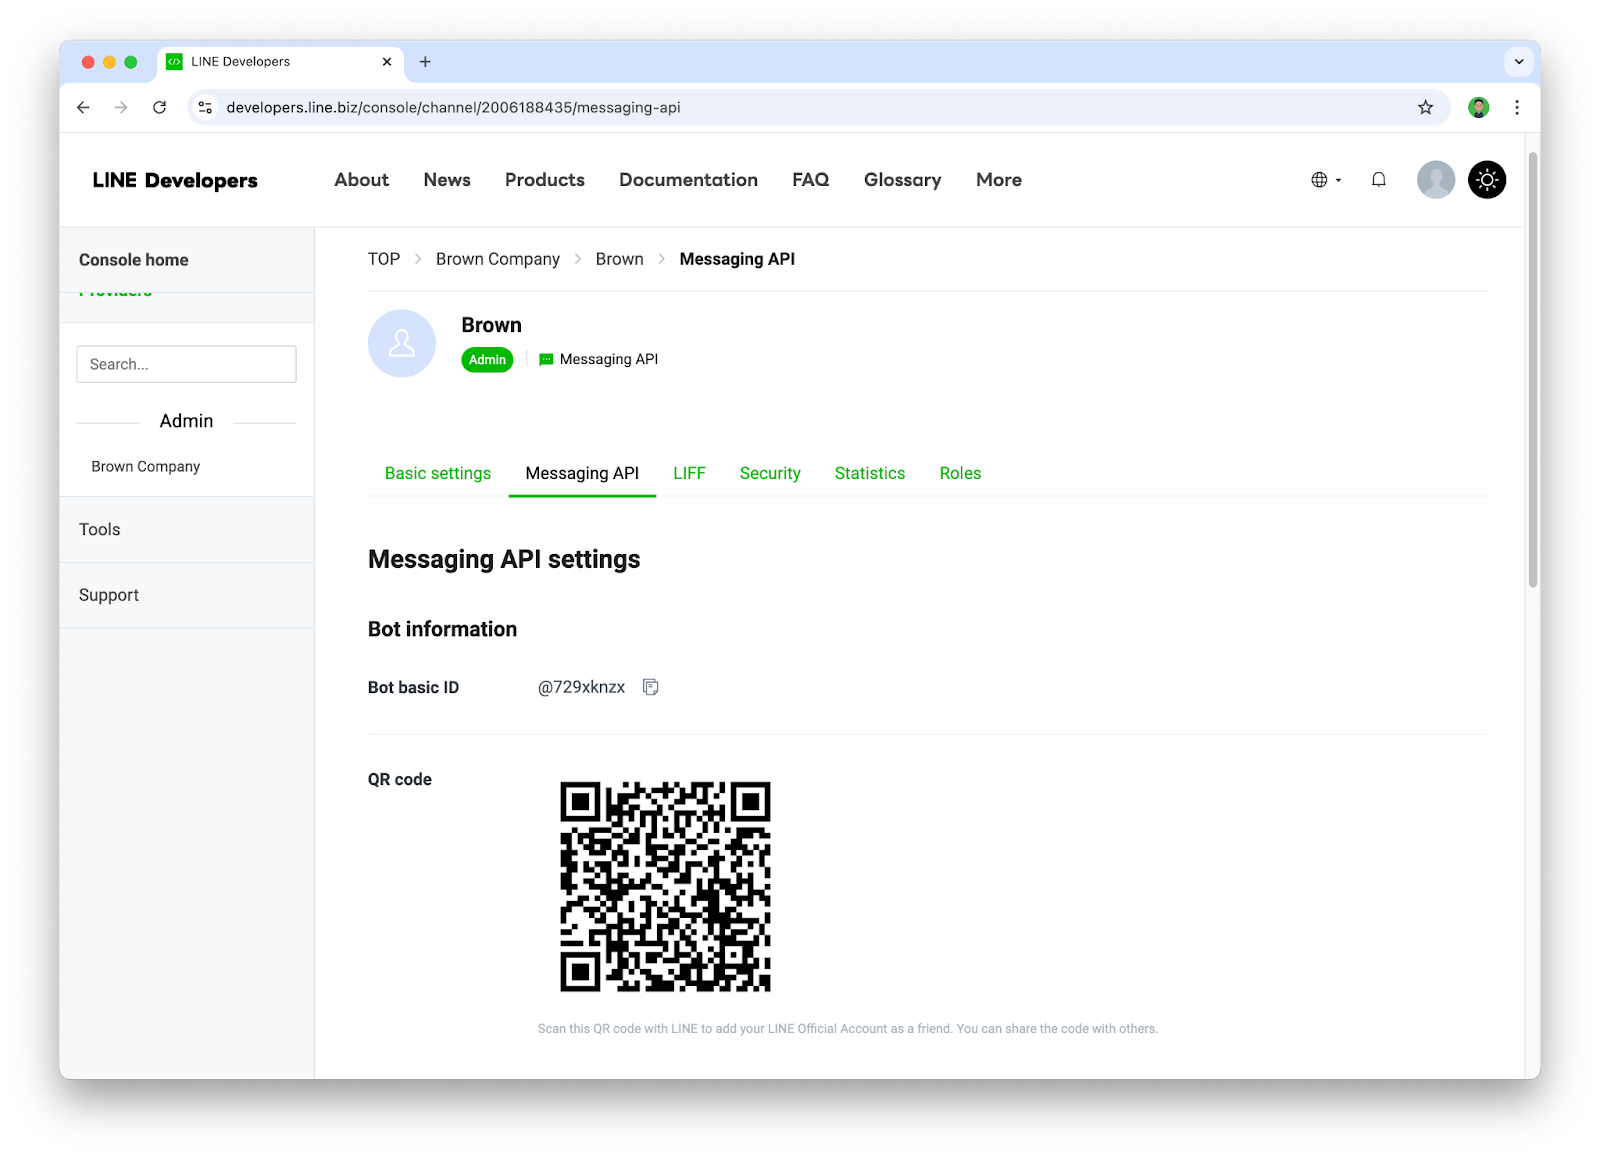
- ให้ไปที่ Tab ชื่อ Messaging API และทำการแสกน QR code ด้วยแอป LINE เพื่อเพิ่ม Chatbot เป็นเพื่อน
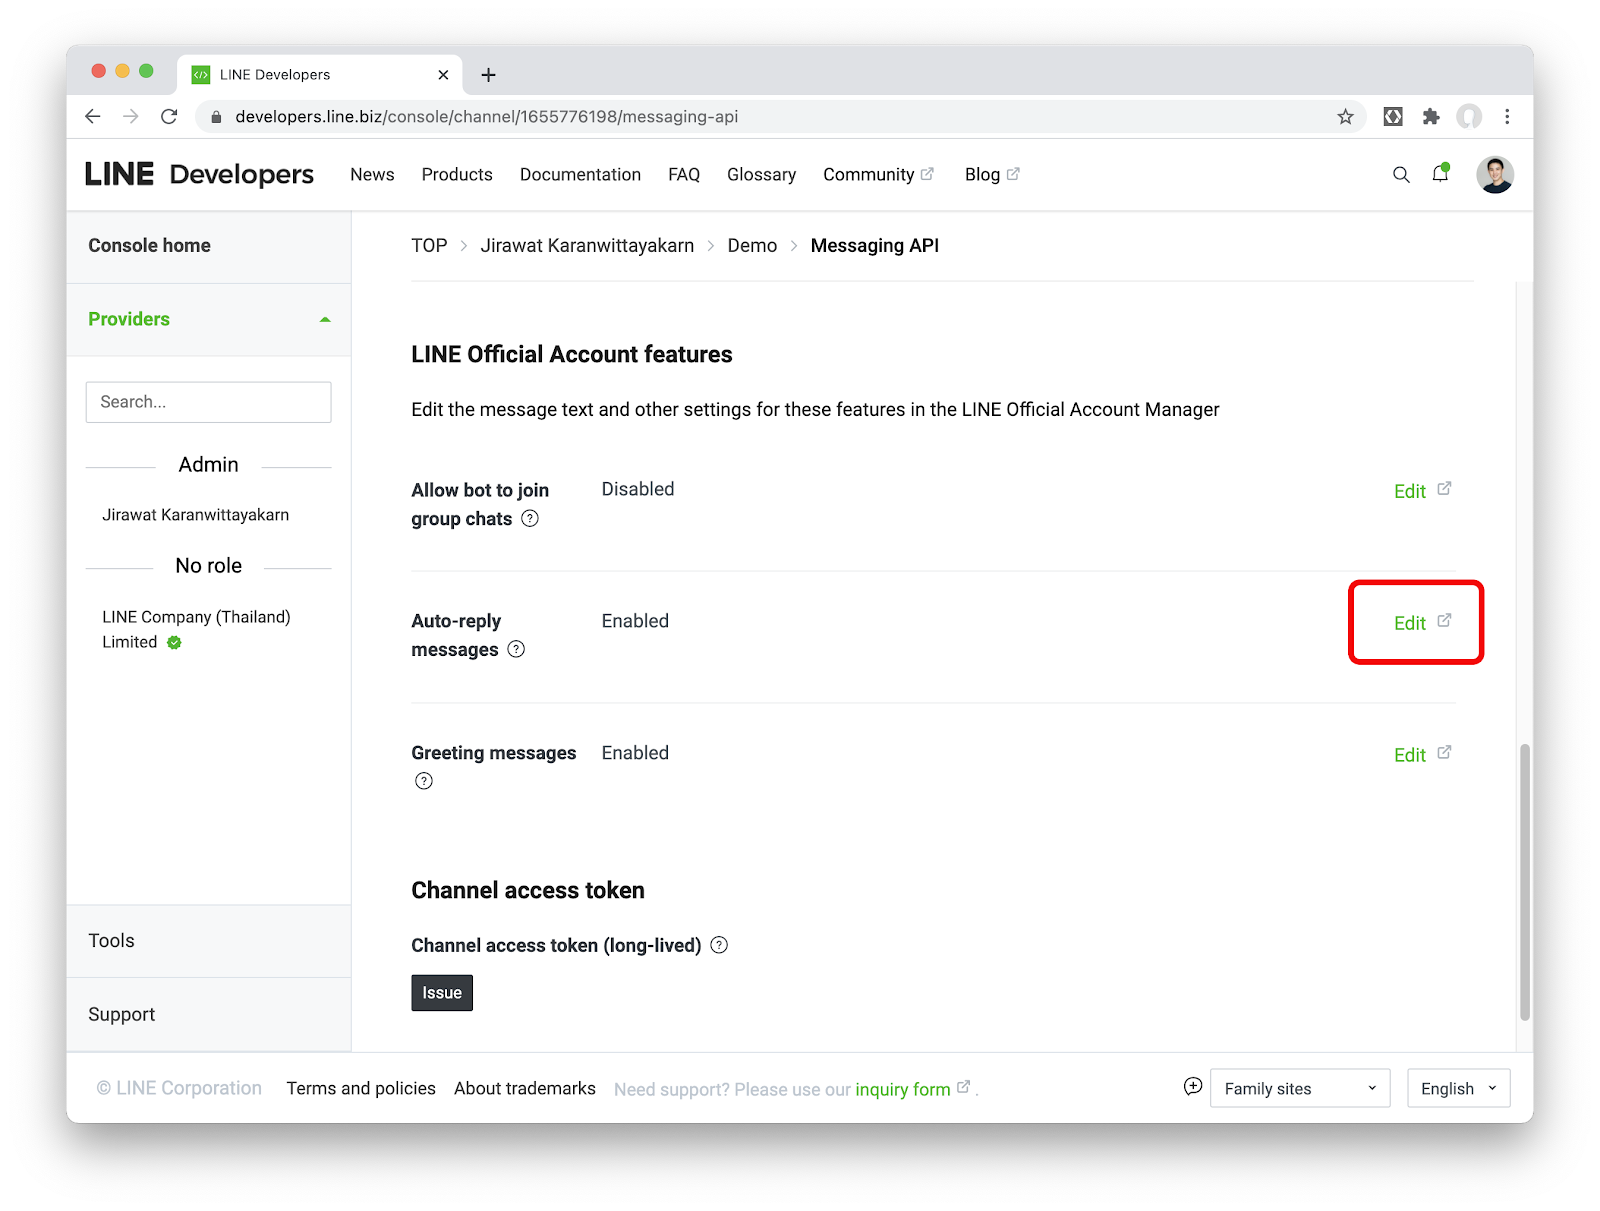
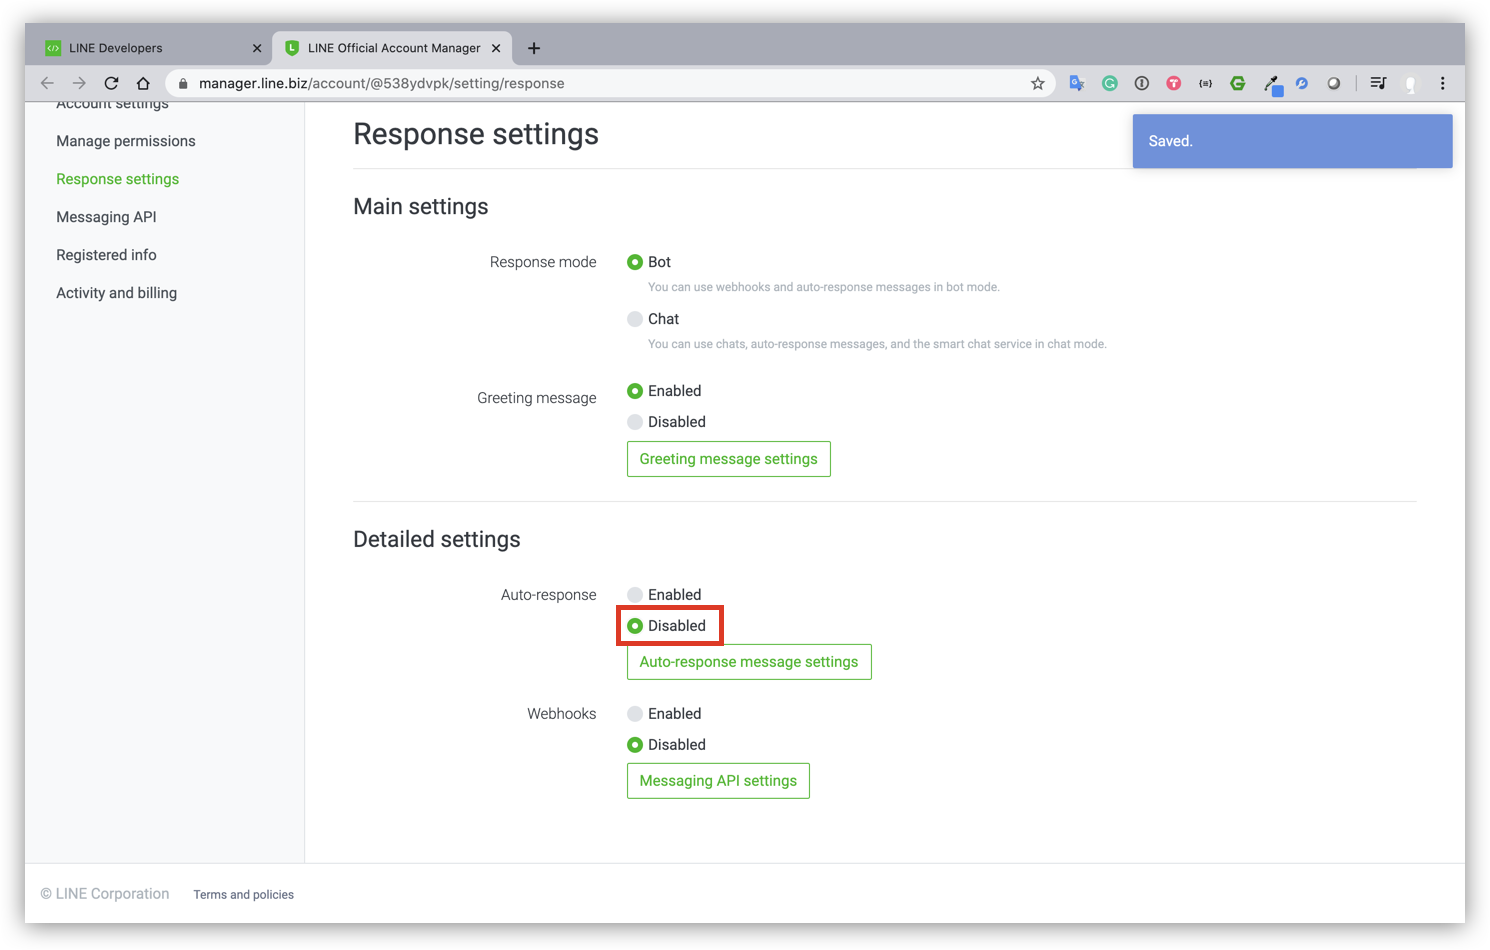
- ให้ปิด Auto-reply messages เนื่องจากฟีเจอร์นี้จะเป็น default การตอบกลับของ Chatbot ซึ่งไม่จำเป็นต้องใช้ฟีเจอร์นี้
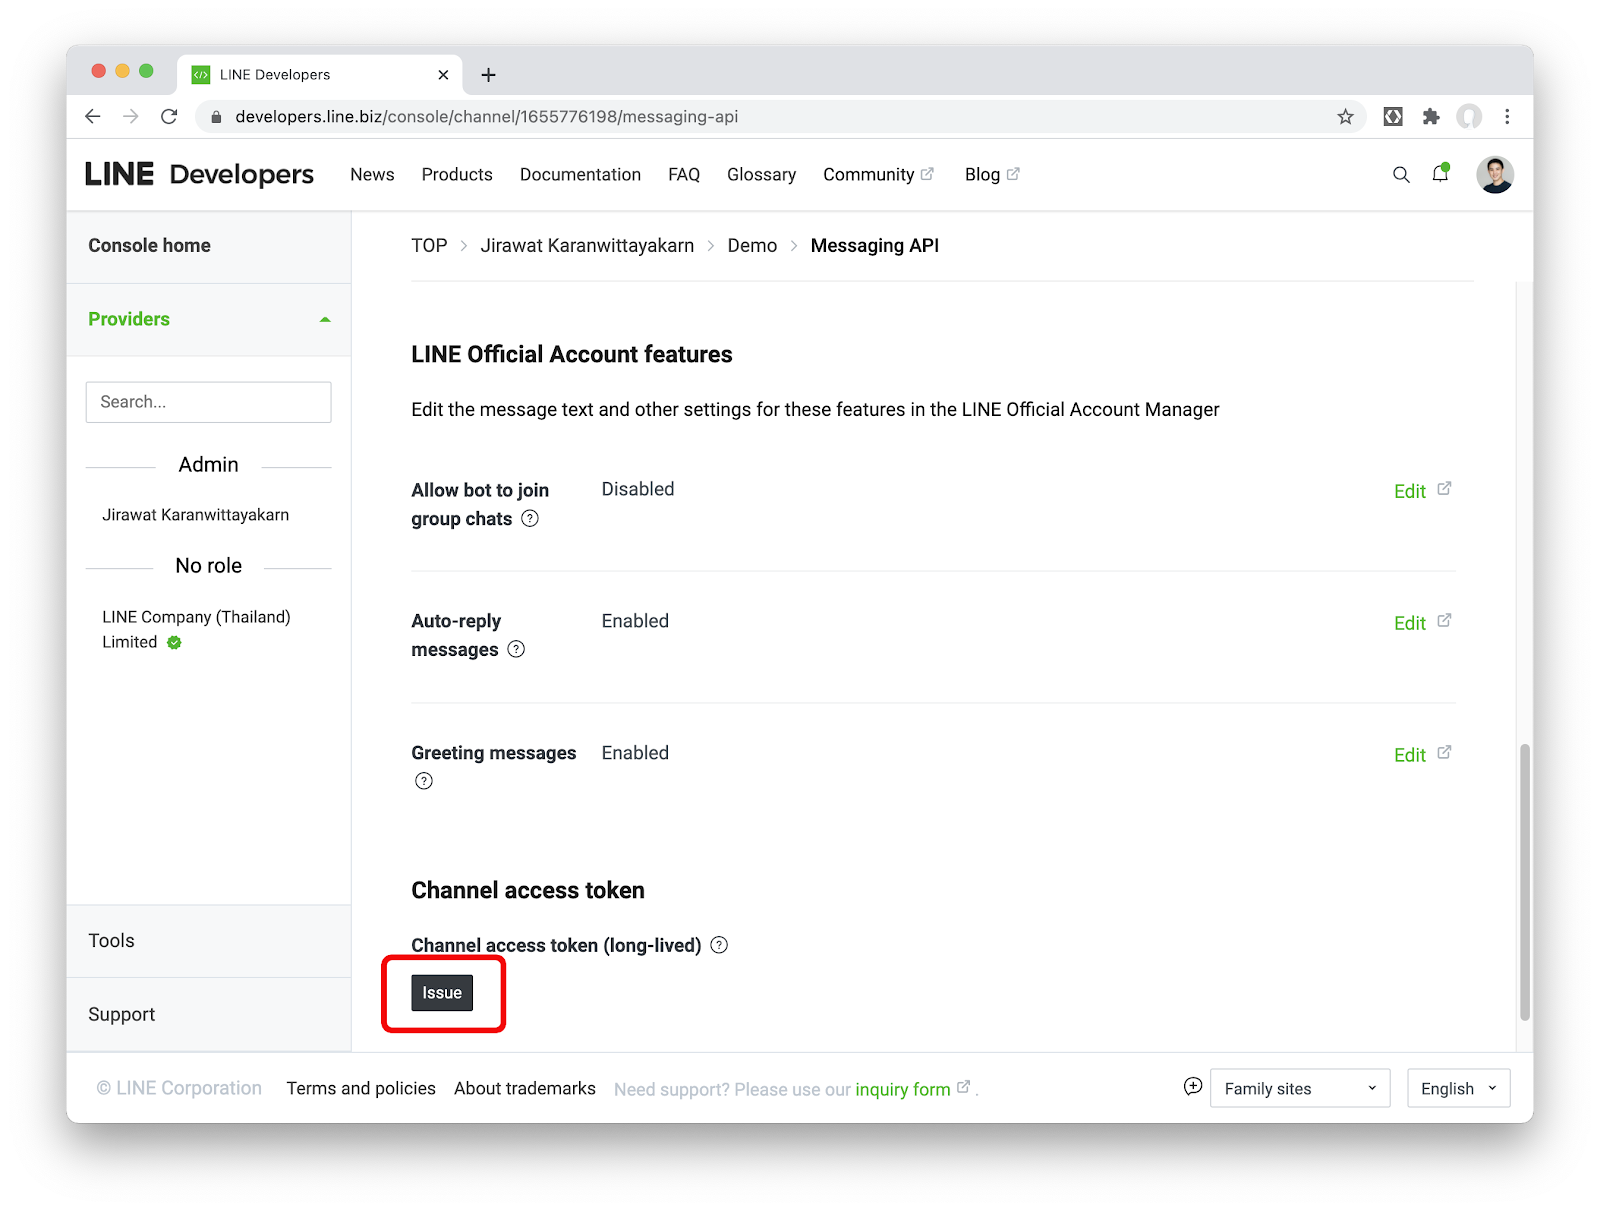
- กลับมาที่ Channel ที่เราสร้างใน Tab ชื่อ Messaging API ตรงส่วนของ Channel access token ให้กดปุ่ม Issue
เบื้องหลังของ Chatbot ตัวนี้ เราจะใช้บริการ Spotify API ทั้งในการสร้าง Playlist ที่จะเล่นและในการค้นหาเพลงต่างๆ ให้เรามาสร้าง ‘แอป' บน Spotify Developer Portal เพื่อที่สามารถเข้าใช้งาน API ของ Spotify ได้
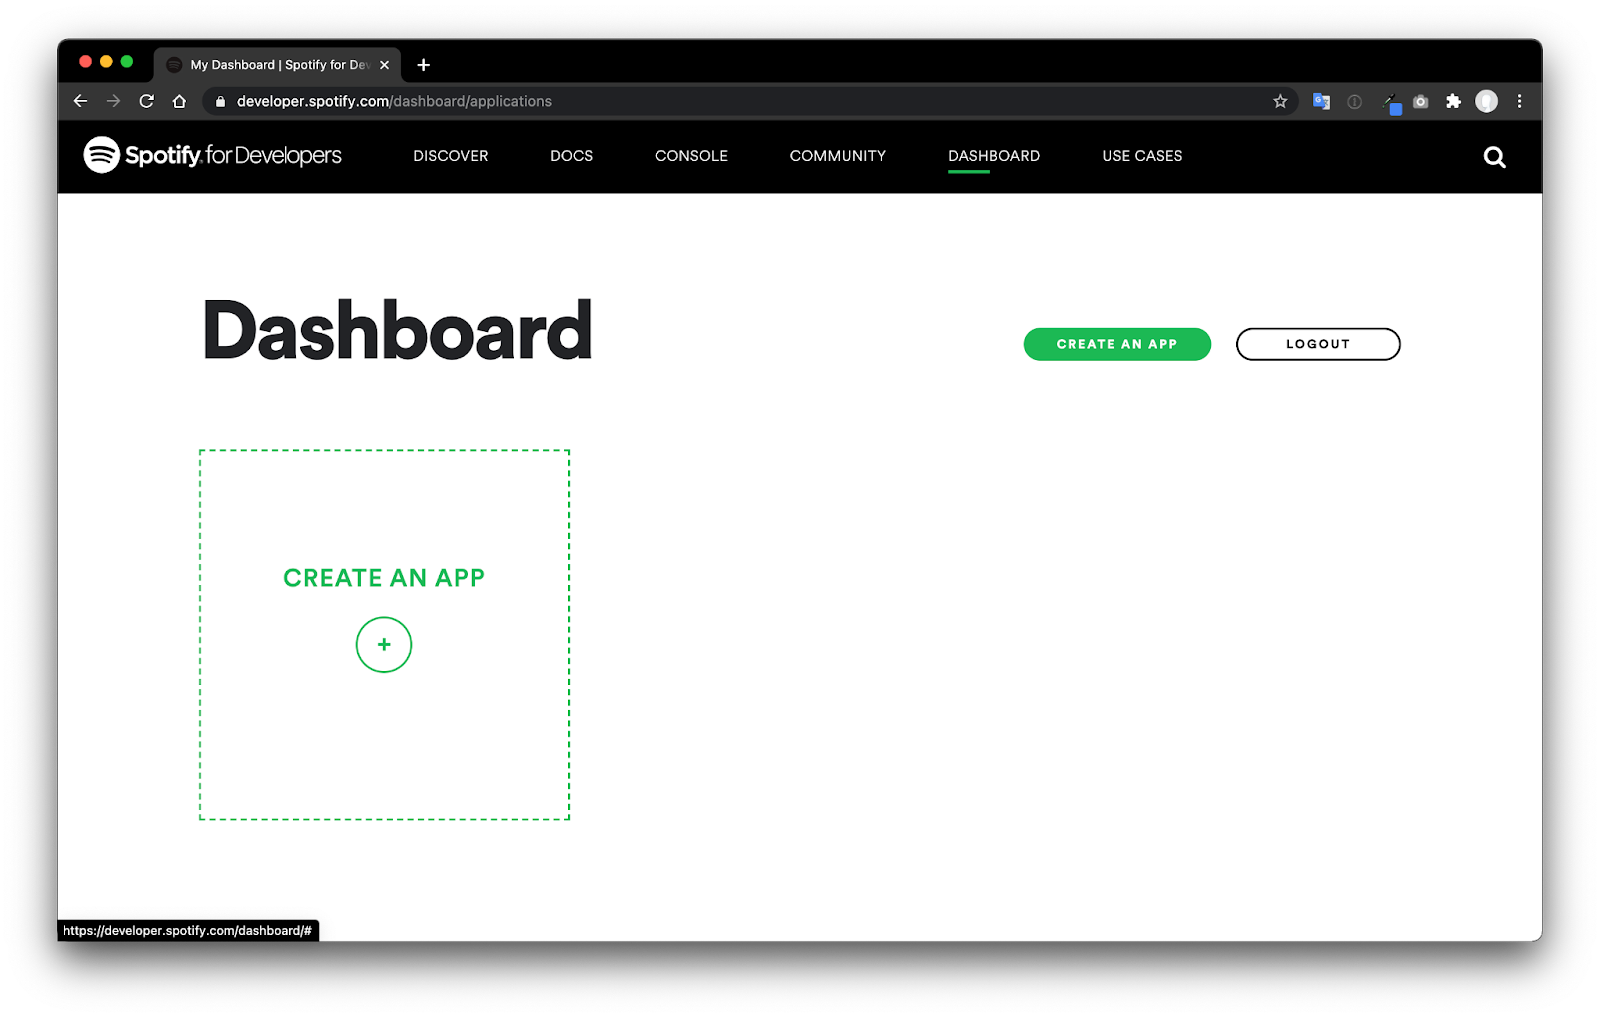
- ให้ Sign in ในหน้า https://developer.spotify.com/dashboard/login ด้วย Spotify account
- กดปุ่ม Create an app
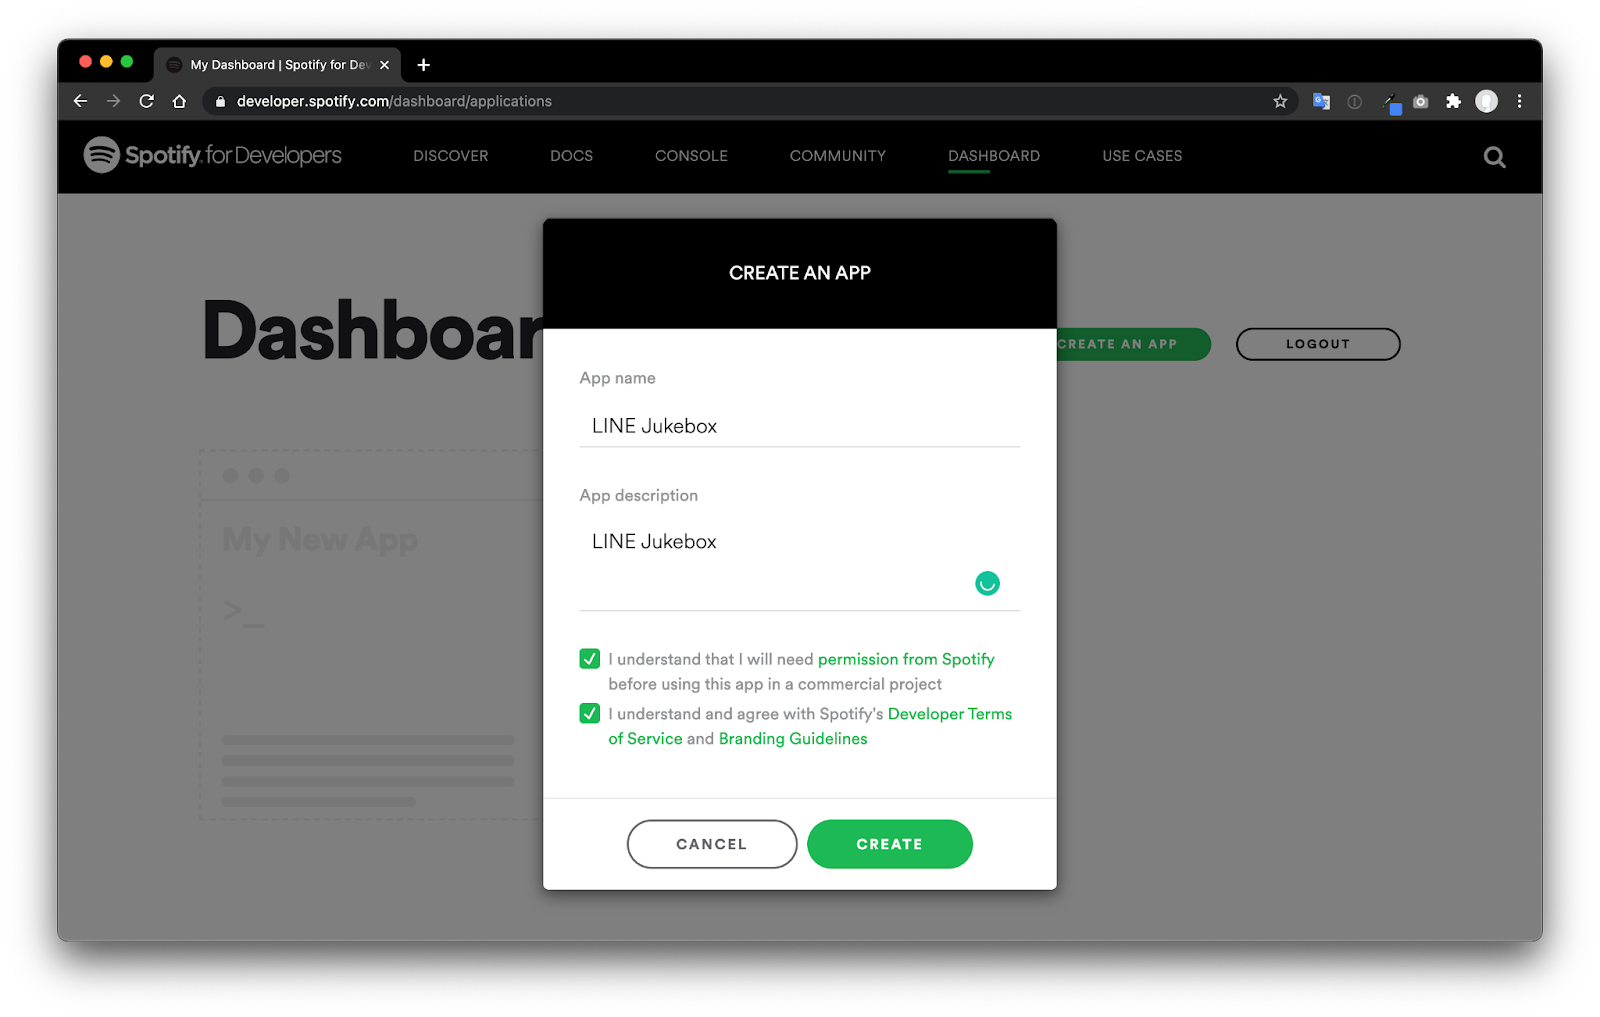
- จากนั้นให้กรอกข้อมูลต่างๆ (Name และ Description) ยอมรับข้อตกลงต่างๆและกด Create
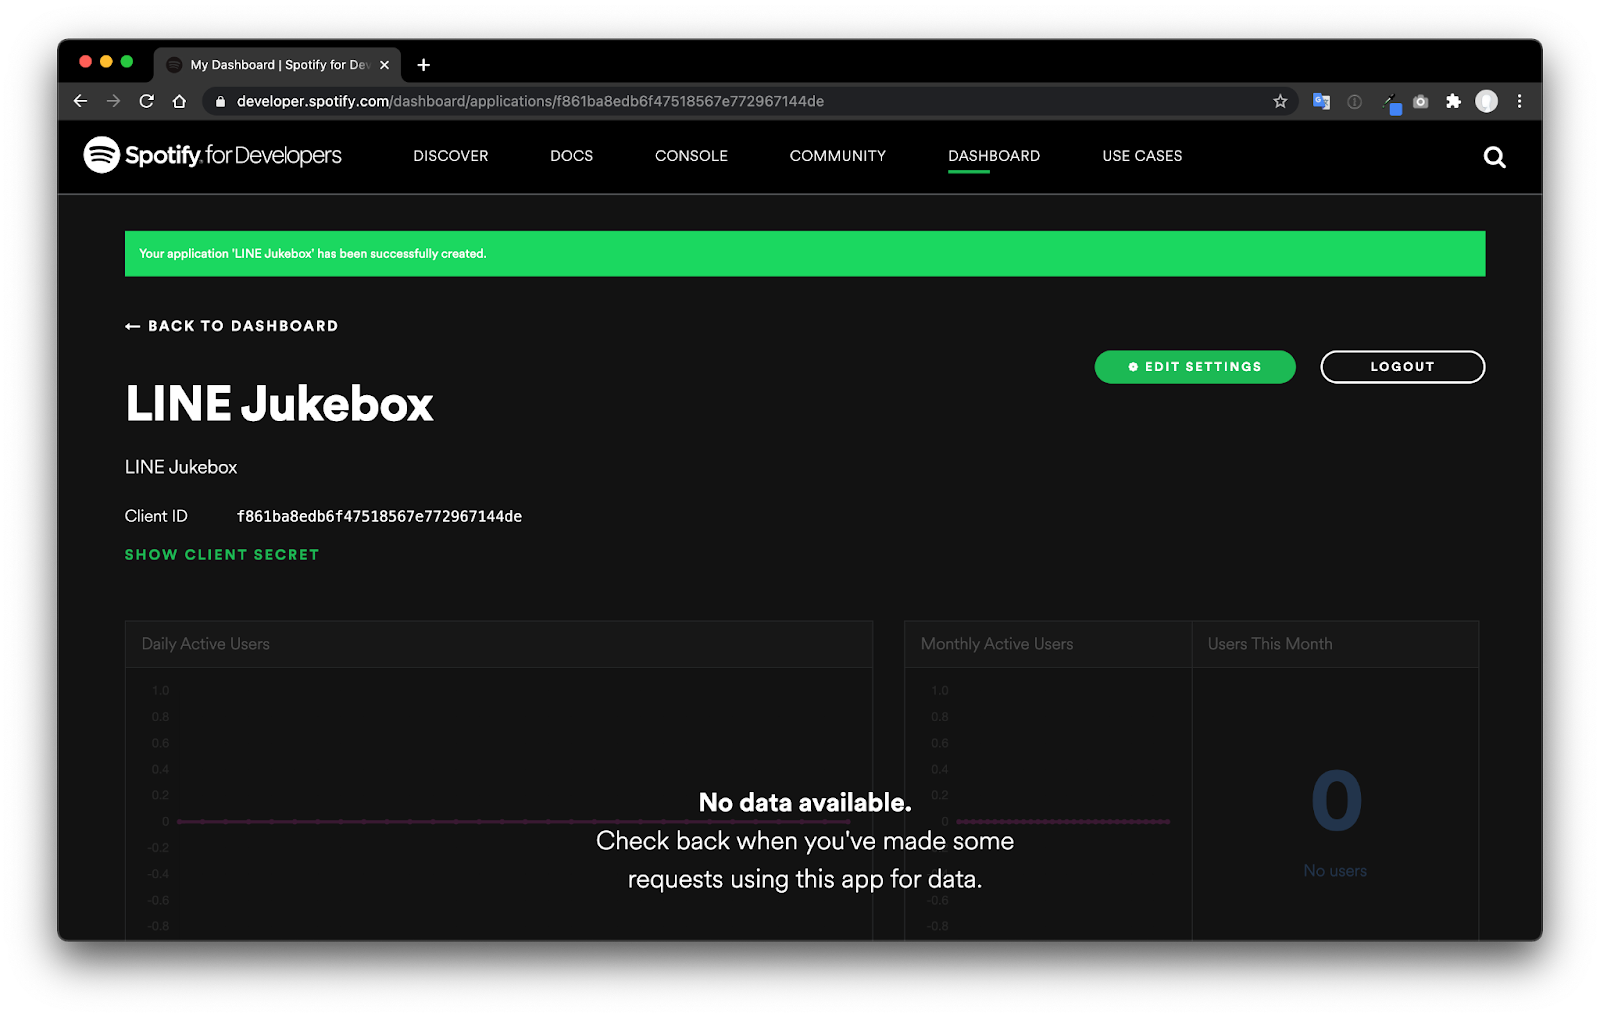
- จากนั้นเราก็จะได้แอปของเราใน Spotify แล้ว โดยในหน้านี้จะมี 2 ค่า ที่เราจะต้องใช้ในการพัฒนาซึ่งก็คือ Client ID และ Client Secret (กดตรงลิงค์ที่เขียนว่า Show Client Secret)
เบื้องหลังของ Chatbot ตัวนี้ เราจะใช้บริการใน Firebase อย่าง Cloud Functions for Firebase ดังนั้นขั้นตอนนี้เราจะมาสร้างโปรเจค Firebase เพื่อใช้งานกัน
สร้างโปรเจคใน Firebase
- ให้ Sign in ใน Firebase console ด้วย Google account
- ในหน้า Firebase console ให้คลิก Add project จากนั้นตั้งชื่อโปรเจคตามต้องการ
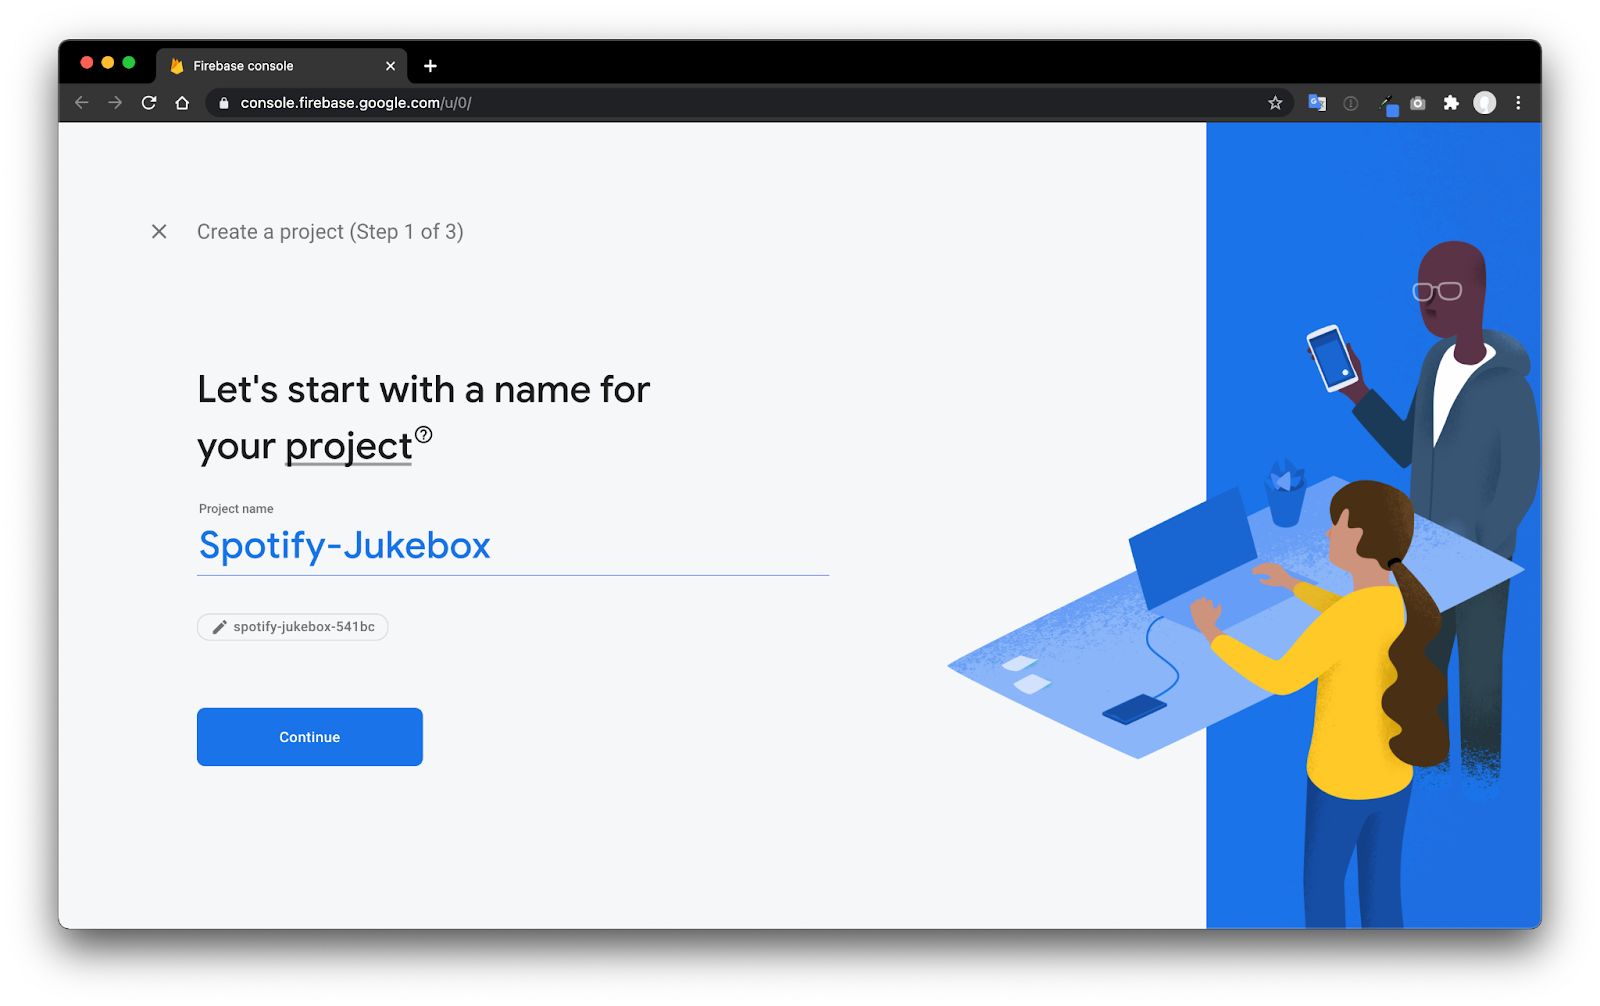
- เมื่อกด Continue แล้วให้ข้ามการตั้งค่า Google Analytics ไป เพราะคุณจะไม่ได้ใช้มันในโปรเจคนี้
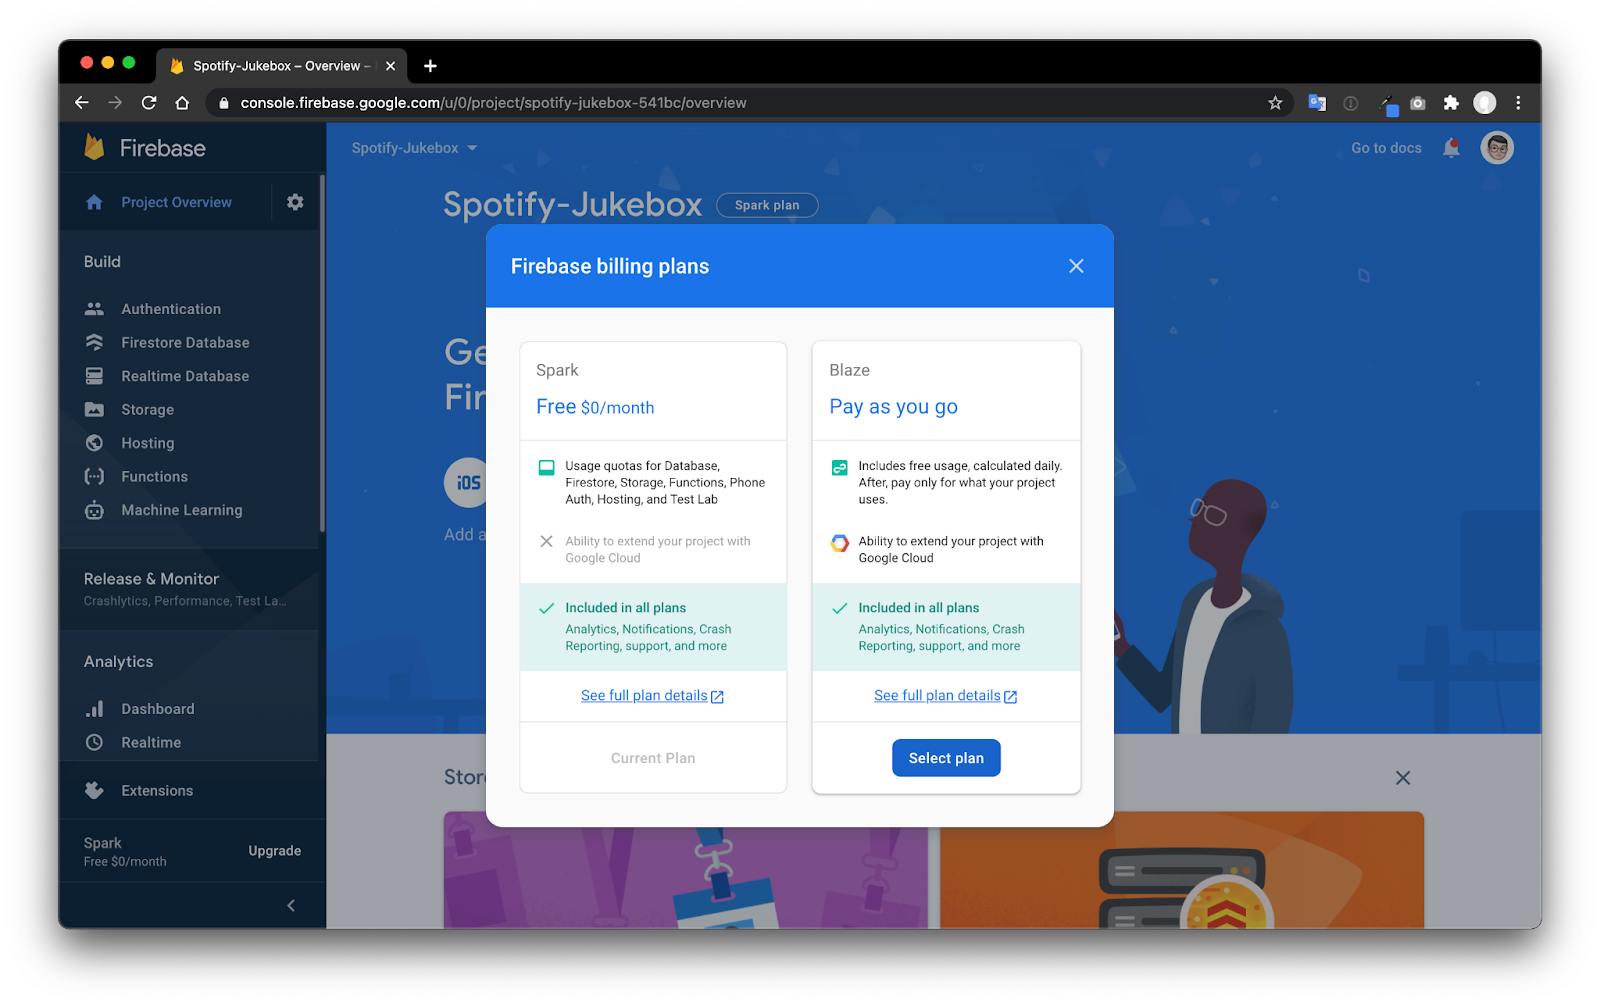
เปลี่ยนแพลนจาก Spark ไปเป็น Blaze (Pay as you go)
เนื่องจาก Cloud Functions for Firebase มีเงื่อนไขว่า หากต้องการไป request ตัว APIs ที่อยู่ภายนอก Google คุณจำเป็นจะต้องใช้ Blaze plan(เราจะต้องไปเรียก Messaging API ของ LINE)
การติดตั้ง Firebase CLI
Firebase CLI เป็นเครื่องมือที่จำเป็นสำหรับการ deploy ตัวฟังก์ชันที่เราพัฒนาขึ้น อีกทั้งยังสามารถจำลองการทำงานฟังก์ชัน(Emulate) ภายในเครื่องที่เราพัฒนาอยู่(Locally) ได้
- เปิด Terminal ขึ้นมาแล้ว run คำสั่ง
npm install -g firebase-tools- ตรวจสอบว่า Firebase CLI ได้ติดตั้งเรียบร้อยแล้วโดย run คำสั่ง (หากสำเร็จจะเห็นเลขเวอร์ชัน)
firebase --version
Initialize โปรเจค
- รันคำสั่งนี้ จากนั้นตัว browser จะเปิดขึ้นมาให้เราเข้าสู้ระบบด้วย Google account เดียวกันกับที่สร้างโปรดจคใน Firebase
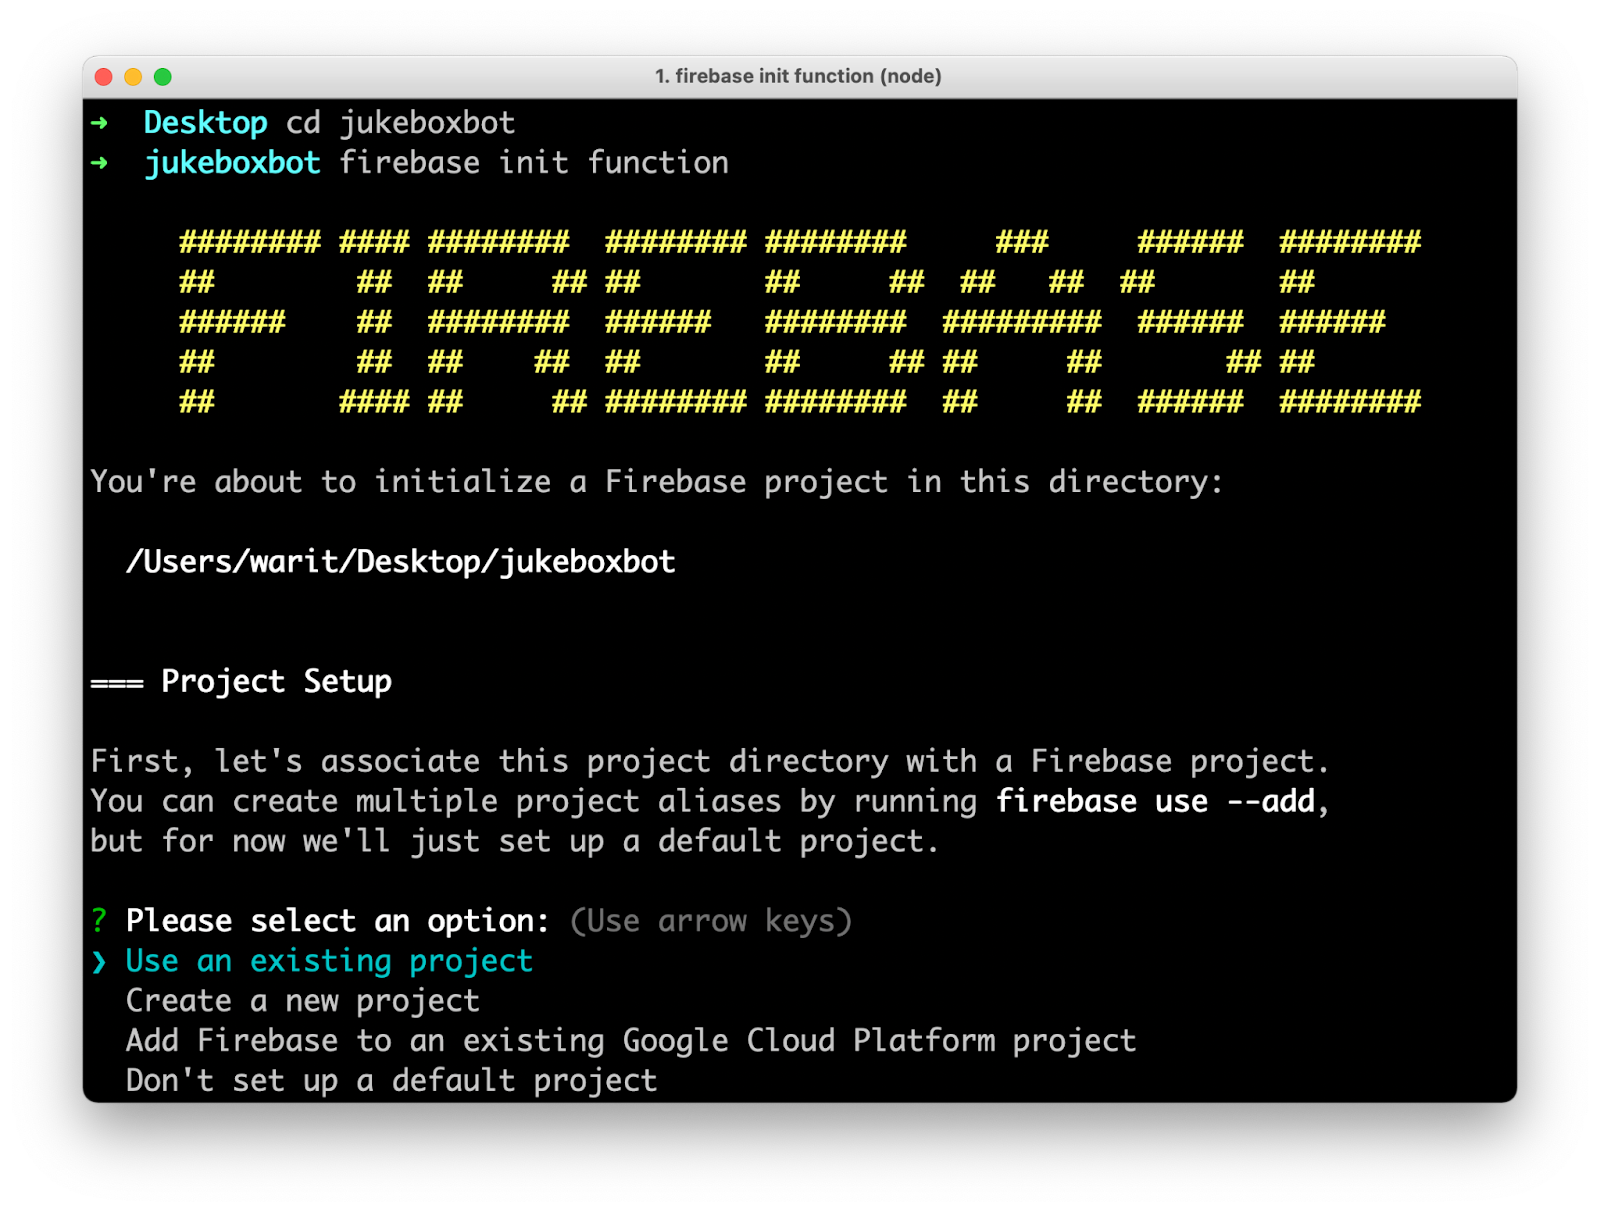
firebase login- สร้างโฟลเดอร์เปล่า(ตัวอย่างโฟลเดอร์ชื่อ bot) แล้วให้ shell เข้าไปในนั้น
mkdir jukeboxbot
cd jukeboxbot- เมื่อเข้ามาในโฟลเดอร์แล้ว ให้ Initial โปรเจคด้วยคำสั่ง
firebase init functions- เลือก Use an existing project จากนั้นจะเห็นเชื่อโปรเจคที่เราสร้างไว้ ให้เลือก Spotify-Jukebox และทำการกด enter
- ถัดไปจะมีตัวเลือกภาษา 2 ตัวคือ JavaScript และ TypeScript โดยตัวอย่างนี้ให้เลือก JavaScript
- จากนั้นมันจะถามว่าจะให้ติดตั้ง ESLint ไหม ตรงนี้แนะนำให้ตอบ N ไปก่อน(สำหรับมือใหม่)
- สุดท้ายมันจะถามว่าจะให้ติดตั้ง dependencies เลยไหมก็ให้ตอบว่า Y ไป
ขั้นตอนนี้เราจะมาสร้าง Utility Class ที่ชื่อว่า spotify.js ที่จะคอยช่วยจัดการเชื่อมต่อกับ API ของ Spotify โดยจะจัดการตั้งแต่สร้าง URL ให้ผู้ใช้ Login เข้าใช้งาน Spotify , สร้าง Playlist ให้ (ถ้ายังไม่มี), ค้นหาเพลงและเพิ่มเพลงไปยัง Playlist
เพิ่ม Dependencies ที่จำเป็นสำหรับโปรเจคนี้
- เปิดไฟล์
package.jsonขี้นมา - เพิ่ม
axiosและspotifyลงไปในdependencies
"dependencies": {
  "firebase-admin": "^9.7.0",
  "firebase-functions": "^3.13.2",
  "axios": "^0.21.1",
  "spotify-web-api-node": "^5.0.2"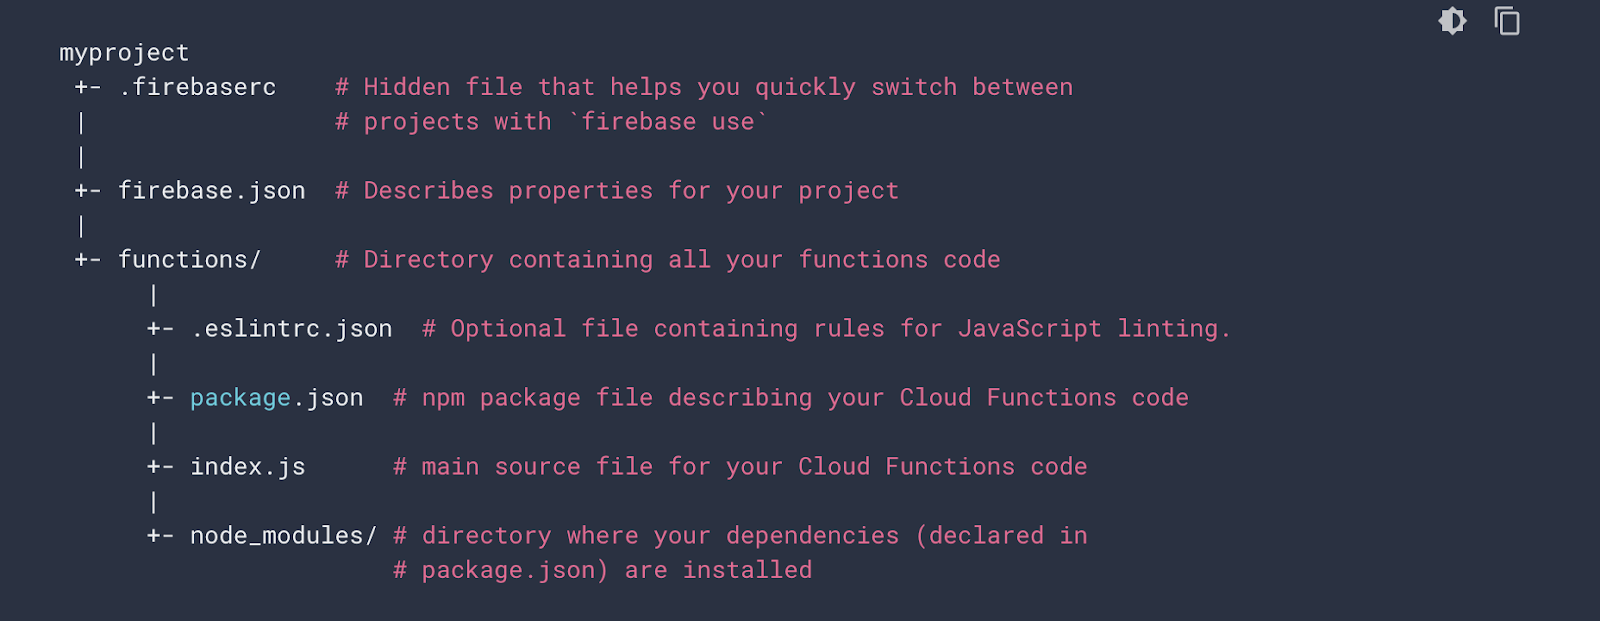
}- ในโฟลเดอร์ที่เราสร้างมา ให้เรา shell เข้าไปต่อในโฟลเดอร์ชื่อ
functionsจากนั้นสั่ง Install ตัว dependencies ที่เพิ่มเข้ามาใหม่ใน terminal ด้วยคำสั่ง
npm install- สร้างไฟล์ใหม่ชื่อ
spotify.jsในโฟลเดอร์เดิมที่ชื่อfunctionsและเขียนโค้ดตามตัวอย่างด้านล่าง
const SpotifyWebApi = require("spotify-web-api-node");

class Spotify {

    constructor() {
        // Init การเชื่อมต่อกับ Spotify
        this.api = new SpotifyWebApi({
            clientId: 'your-spotify-client-id',
            clientSecret: 'your-spotify-client-secret',
            redirectUri: 'https://us-central1-xxxxx.cloudfunctions.net/LineWebhook'
        });

        // สร้าง Login URL เพื่อสามารเข้าถึงสิทธิต่างๆของเครืื่องหลักที่ต่อลำโพง
        const scopes = ["playlist-read-private", "playlist-modify", "playlist-modify-private"];
        const authorizeUrl = this.api.createAuthorizeURL(scopes, "default-state");
        console.log(`Authorization required. Please visit ${authorizeUrl}`);
    }

    isAuthTokenValid() {
        if (this.auth == undefined || this.auth.expires_at == undefined) {
            return false;
        }
        else if (this.auth.expires_at < new Date()) {
            return false;
        }
        return true;
    }

    async initialized() {
        const playlists = [];

        const limit = 50;
        let offset = -limit;
        let total = 0;

        // ทำการ Download Playlist ทั้งหมดจาก Spotify ของผู้ใช้ที่ได้ Login เก็บไว้ในตัวแปร playlists
        do {
            offset += limit;
            const result = await this.api.getUserPlaylists(undefined, { offset: offset, limit: 50 });
            total = result.body.total;

            const subset = result.body.items.map((playlist) => {
                return { id: playlist.id, name: playlist.name };
            });
            playlists.push(...subset);

        } while ((offset + limit) < total);

        // ทำการค้นหา Playlist ที่ชื่อว่า 'SpotifyJukebox'
        // ถ้าไม่เจอ ให้ทำการสร้าง Playlist ขึ้นมาใหม่
        const index = playlists.findIndex((playlist) => playlist.name === 'SpotifyJukebox');
        if (index >= 0) {
            this.playlist = playlists[index].id;
            console.log('Playlist already exist');
        }
        else {
            let result;
            // สร้าง Playlist ใหม่
            await this.api.createPlaylist('SpotifyJukebox', { 'description': 'My Jukebox Chatbot', 'public': true }).then(function(data) {
                    result = data.body.id;
                    console.log('Created playlist! ' + result);
                }, function (err) {
                    console.log('Something went wrong!', err);
                });
            this.playlist = result;
        }

        console.log("Spotify is ready!");
    }

    async refreshAuthToken() {
        const result = await this.api.refreshAccessToken();

        const expiresAt = new Date();
        expiresAt.setSeconds(expiresAt.getSeconds() + result.body.expires_in);
        this.settings.auth.access_token = result.body.access_token;
        this.settings.auth.expires_at = expiresAt;

        this.api.setAccessToken(result.body.access_token);
    }

    async receivedAuthCode(authCode) {

        // ได้รับ Authorization code ตอนที่ Call back URL ถูกเรียก
        // จากนั้นเอา Code นี้ไปรับ Access token กับ Refresh token อีกที
        const authFlow = await this.api.authorizationCodeGrant(authCode);
        this.auth = authFlow.body;

        // เก็บค่่าของ expire time ไว้ใช้ตอนเรียก refresh token
        const expiresAt = new Date();
        expiresAt.setSeconds(expiresAt.getSeconds() + authFlow.body.expires_in);
        this.auth.expires_at = expiresAt;

        // ส่งค่า Tokens ทั้งสองให้กับ library ของ Spotify
        this.api.setAccessToken(authFlow.body.access_token);
        this.api.setRefreshToken(authFlow.body.refresh_token);

        // เริ่มทำการ Init การเชื่อมต่อกับ Spotify
        this.initialized();
    }

    async searchTracks(terms, skip = 0, limit = 10) {
        if (!this.isAuthTokenValid()) {
            await this.refreshAuthToken();
        }

        const result = await this.api.searchTracks(terms, { offset: skip, limit: limit })
        return result.body.tracks;
    }

    async queueTrack(track) {
        if (!this.isAuthTokenValid()) {
            await this.refreshAuthToken();
        }
        return this.api.addTracksToPlaylist(this.playlist, [`spotify:track:${track}`]);
    }
}

module.exports = new Spotify();- ทำการ copy ค่า
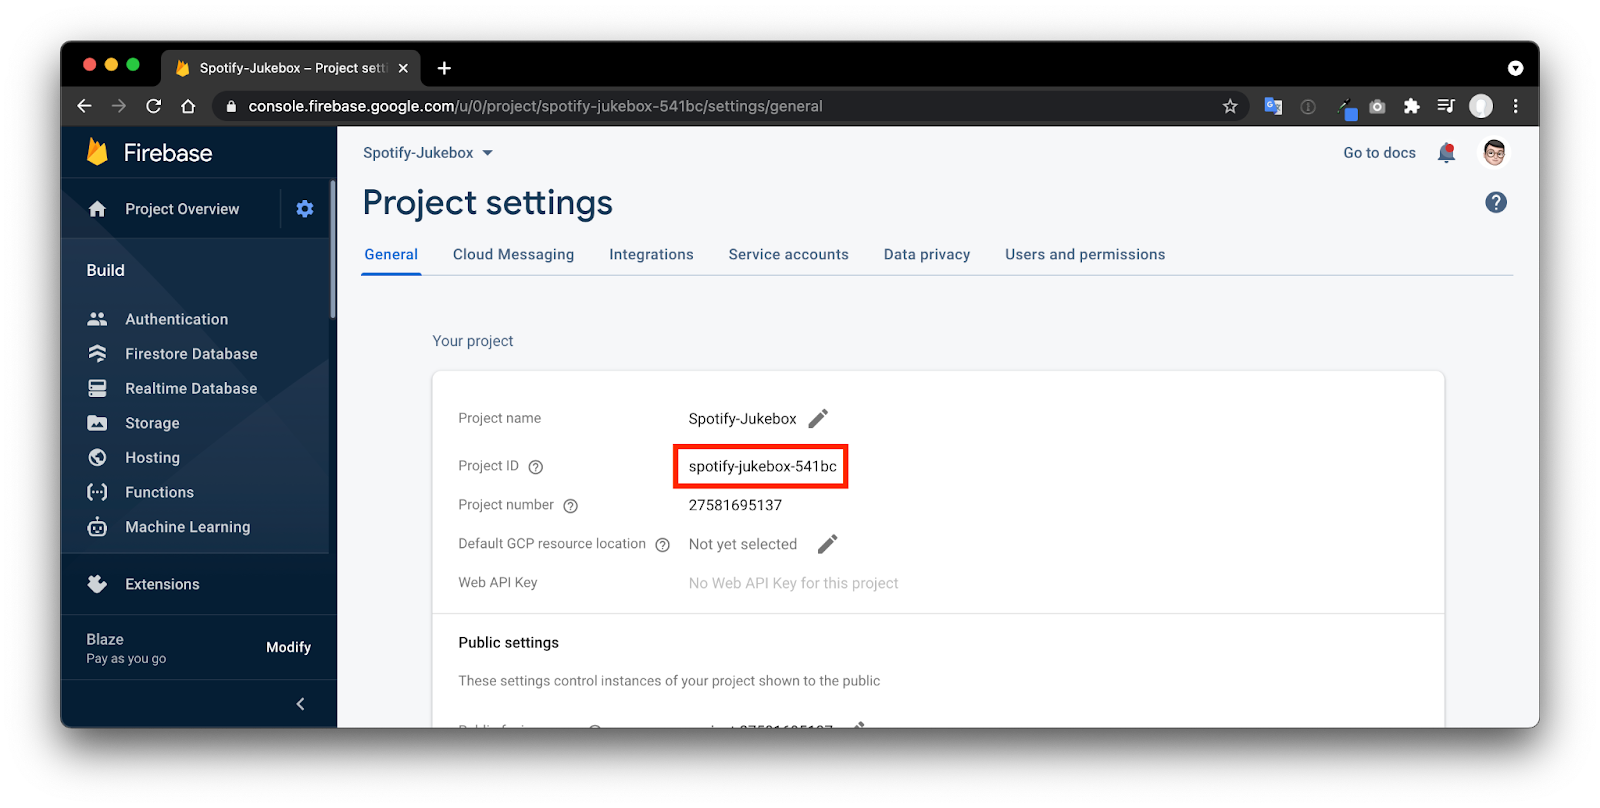
clientIdและclientSecretที่ได้ใน Spotify dashboard ก่อนหน้านี้มาแทนที่ในโค้ด - ให้เอาค่าใน Project ID ไปแทนที่ xxxxx ในตัวแปร
redirectUriโดยสามารถดูได้จากหน้า Project setting ใน Firebase console
ขั้นตอนนี้เราจะมาสร้าง Utility Class ที่ช่วยจัดการส่วนที่เกี่ยวข้องกับ LINE โดยจะเรียงลำดับผลลัพธ์ของการค้นหาเพลง และทำการปั้น Flex message สวยๆ รวมไปถึงจัดการ Postback event เมื่อผู้ใช้ทำการกดปุ่มจาก Flex message เข้ามา
สร้างไฟล์ใหม่ชื่อ lineapp.js ในโฟลเดอร์เดิมที่ชื่อ functions และเขียนโค้ดตามตัวอย่างด้านล่าง
const spotify = require("./spotify");
const axios = require("axios");
const LINE_HEADER = {
"Content-Type": "application/json",
Authorization: "Bearer xxxxxxx"
}
const Commands = {
ADD_TRACK: "ADD_TRACK",
SEARCH_MORE: "SEARCH_MORE"
}
class lineApp {
async receivedPostback(event) {
const payload = JSON.parse(event.postback.data);
switch (payload.command) {
case Commands.ADD_TRACK: {
// เพิ่มเพลงที่ผู้ใช้เลือกใน Flex message เข้าไปใน Playlist
return this.queueMusic(payload.track);
}
case Commands.SEARCH_MORE: {
// เรียกเมธอด searchMusic อีกครั้งพร้อมกับส่ง parameters ที่อยู่ใน payload
return this.searchMusic(payload.terms, payload.skip, payload.limit);
}
}
}
async queueMusic(track) {
await spotify.queueTrack(track);
const message = {
type: "flex",
altText: "Thanks! Your track has been added.",
contents:
{
type: "bubble",
size: "kilo",
body: {
type: "box",
layout: "vertical",
contents: [
{
type: "text",
contents: [
{
type: "span",
text: "Thanks! ",
color: "#1DB954",
weight: "bold",
size: "md"
},
{
type: "span",
text: "Your track has been added to the BrownJukebox playlist 🎶",
color: "#191414"
}
],
wrap: true
}
]
},
styles: {
body: {
backgroundColor: "#FFFFFF"
}
}
}
};
return message;
}
async searchMusic(terms, skip = 0, limit = 10) {
// ทำการค้นหาเพลง โดยค่อยๆดึงทีละ 10 เพลง
const queryBegin = skip;
const queryEnd = limit;
const result = await spotify.searchTracks(terms, queryBegin, queryEnd);
if (result.items.length > 0) {
// ถ้ายังมีผลลัพธ์เหลืออยู่ จะแสดงปุ่ม 'More' ใน Flex message เพื่อให้ผู้ใช้ค้นหาเพลงเพิ่มเติม
const remainingResults = result.total - limit - skip;
const showMoreButton = (remainingResults > 0);
// จัดเรียงผลลัพธ์ตามความนิยม
result.items.sort((a, b) => (b.popularity - a.popularity));
const message = {
type: "flex",
altText: "Your Spotify search result",
contents: {
type: "bubble",
size: "giga",
header: {
type: "box",
layout: "horizontal",
contents: [
{
type: "image",
url: "https://bcrm-i.line-scdn.net/bcrm/uploads/1557539795/public_asset/file/853/1591094107652078_Spotify_Icon_RGB_White.png",
align: "start",
size: "xxs",
flex: 0,
aspectRatio: "4:3"
},
{
type: "text",
text: "Powered by Spotify",
color: "#ffffff",
size: "xxs",
align: "end",
gravity: "center",
position: "relative",
weight: "regular"
}
],
paddingAll: "10px"
},
body: {
type: "box",
layout: "vertical",
contents: [],
backgroundColor: "#191414",
spacing: "md"
},
styles: {
header: {
backgroundColor: "#1DB954"
}
}
}
};
// เพิ่มปุ่ม 'More' หากมีผลลัพธ์เพิ่มเติม โดยแปะข้อมูลที่จำเป็นใน payload ด้วยเผื่อในกรณีที่ผู้ใช้ต้องการค้นหาอีก
if (showMoreButton) {
message.contents.footer = this.generateMoreButton({
command: Commands.SEARCH_MORE,
terms: terms,
skip: skip + limit,
limit: limit
})
}
// นำผลลัพธ์ที่ได้มาแสดงใน Flex message โดยวนลูปสร้างทีละเพลง
message.contents.body.contents = result.items.map((track) => {
this.sortTrackArtwork(track);
return {
type: "box",
layout: "horizontal",
contents: [
{
type: "box",
layout: "vertical",
contents: [
{
type: "image",
aspectRatio: "4:3",
aspectMode: "cover",
url: track.album.images.length > 0 ? track.album.images[0].url : ""
}
],
flex: 0,
cornerRadius: "5px",
width: "30%",
spacing: "none"
},
{
type: "box",
layout: "vertical",
contents: [
{
type: "text",
size: "md",
color: "#1DB954",
style: "normal",
weight: "bold",
text: track.name,
wrap: true
},
{
type: "text",
size: "xxs",
wrap: true,
color: "#FFFFFF",
text: this.generateArtistList(track)
}
],
spacing: "none",
width: "40%"
},
{
type: "box",
layout: "vertical",
contents: [
{
type: "button",
action: this.generatePostbackButton("Add", { command: Commands.ADD_TRACK, track: track.id }),
style: "primary",
gravity: "bottom",
color: "#1DB954"
}
],
spacing: "none",
width: "20%"
}
],
backgroundColor: "#191414",
spacing: "xl",
cornerRadius: "5px"
}
});
return message;
}
}
generatePostbackButton(title, payload) {
return {
type: "postback",
label: title,
data: JSON.stringify(payload)
};
}
generateMoreButton(payload) {
return {
type: "box",
layout: "vertical",
contents: [
{
type: "button",
action: {
type: "postback",
label: "More",
data: JSON.stringify(payload)
},
style: "secondary"
}
],
backgroundColor: "#191414"
};
}
generateArtistList(track) {
// ในกรณีที่เพลงนั้นๆอาจจะมีชื่อศิลปินหลายคน จะ list ชื่อของศิลปินแต่ละคน ตามด้วย comma
let artists = "";
track.artists.forEach((artist) => {
artists = artists + ", " + artist.name;
});
artists = artists.substring(2);
return artists;
}
sortTrackArtwork(track) {
// จัดเรียงภาพอัลบั้มตามขนาด จากขนาดเล็กไปขนาดใหญ่ (ascending)
track.album.images.sort((a, b) => {
return b.width - a.width;
});
}
async replyMessage(replyToken, message) {
try {
return await Promise.resolve(axios({
method: "post",
url: 'https://api.line.me/v2/bot/message/reply',
headers: LINE_HEADER,
data: JSON.stringify({
replyToken: replyToken,
messages: [message]
})
}))
} catch (error) {
console.error(`Delivery to LINE failed (${error})`);
}
}
}
module.exports = new lineApp();- ขั้นตอนนี้เราจะสร้างฟังก์ชันชื่อ
LineWebhookในไฟล์index.jsที่ทำหน้าที่จัดการรับ Webhook ของผู้ใช้และรอรับ Callback จาก Spotify
const functions = require("firebase-functions");
const spotify = require("./spotify");
const lineApp = require("./lineapp");

exports.LineWebhook = functions.https.onRequest(async (req, res) => {
    if (req.query.code !== undefined) {
        // กรณีผู้ใช้ทำการ Login ด้วย Spotify จะมี Callback กลับมาเพื่อทำการเชื่อมต่อกับ Spotify API
        spotify.receivedAuthCode(req.query.code);
        res.status(200).send("Login Successfully!");

    } else {
        let event = req.body.events[0];
        let message;
        if (event.type === 'message' && event.message.type === 'text') {
            // กรณีผู้ใช้พิมพ์ข้อความเพื่อค้นหาตามชื่อเพลง/ศิลปิน
            message = event.message.text;
            let searchInput = event.message.text;
            message = await lineApp.searchMusic(searchInput);

        } else if (event.type === 'postback') {
            // กรณีผู้ใช้กดปุ่ม Add (เพื่อเพิ่มเพลง) หรือกดปุ่ม More (เพื่อค้นหาเพลงเพิ่มเติม)
            message = await lineApp.receivedPostback(event)
        }

        await lineApp.replyMessage(event.replyToken, message);
        return res.status(200).send(req.method);
    }
});- เมื่อทุกอย่างพร้อมแล้ว ก็ deploy ฟังก์ชันผ่าน terminal ด้วยคำสั่ง
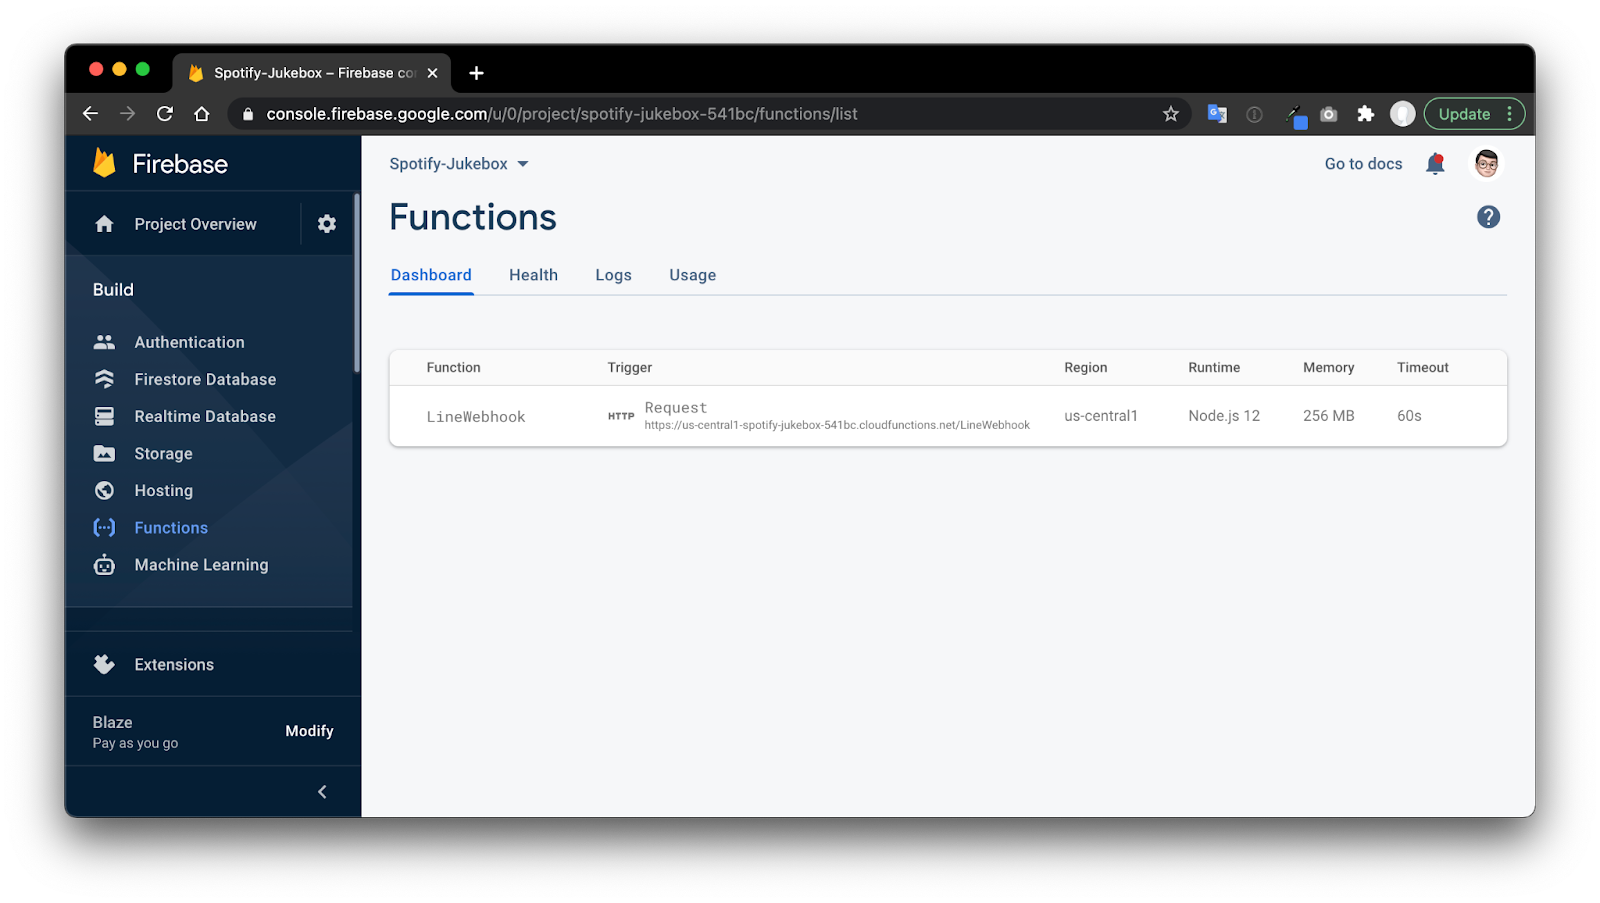
firebase deploy --only functions- หาก deploy สำเร็จเราจะได้ Cloud Functions ชื่อ LineWebhook แสดงอยู่ในเมนู Functions ใน Firebase console
อัพเดตค่า Config ใน LINE Developers Console
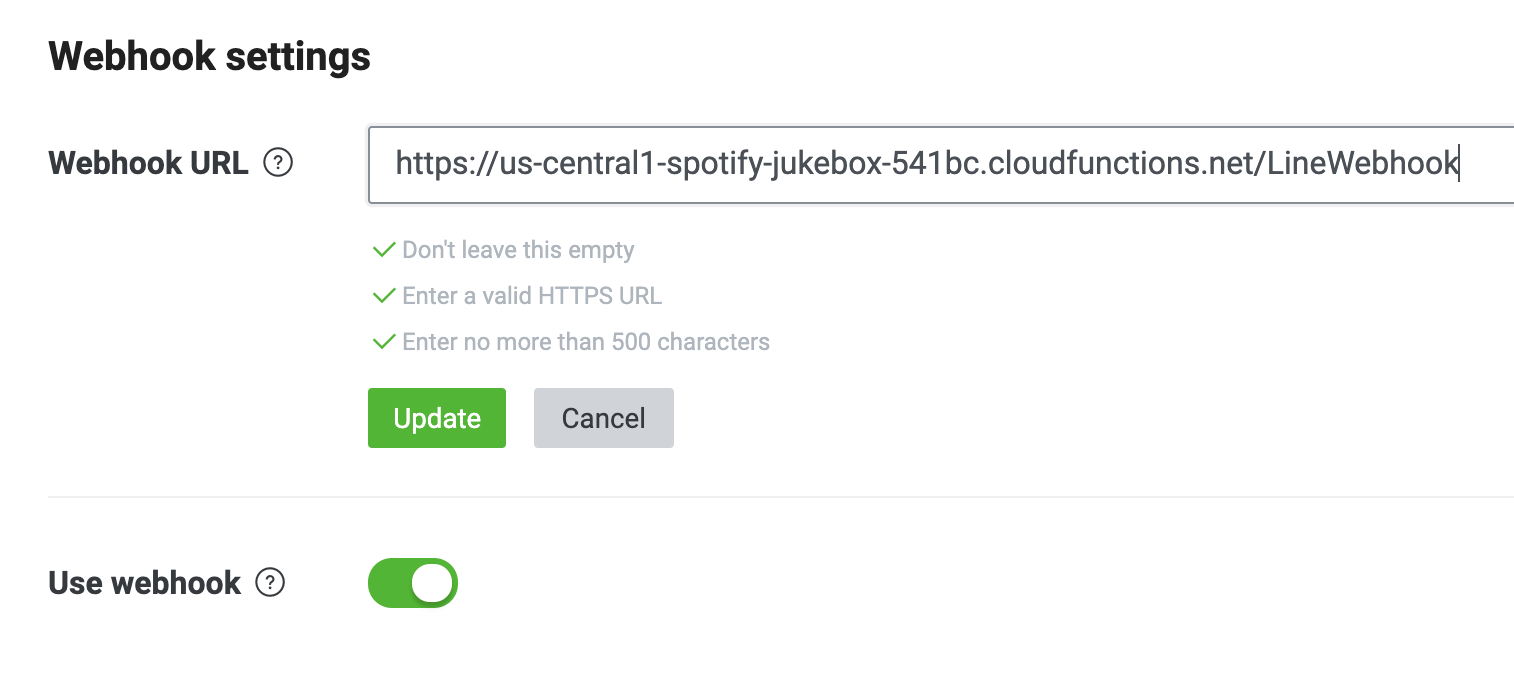
ให้เอา URL ของ Cloud Functions /LineWebhook ไปใส่ใน Webhook settings ของ Messaging API Channel ที่เราสร้างไว้ในขั้นตอนที่ 2
อัพเดตค่า Config ใน Spotify Developer Dashboard
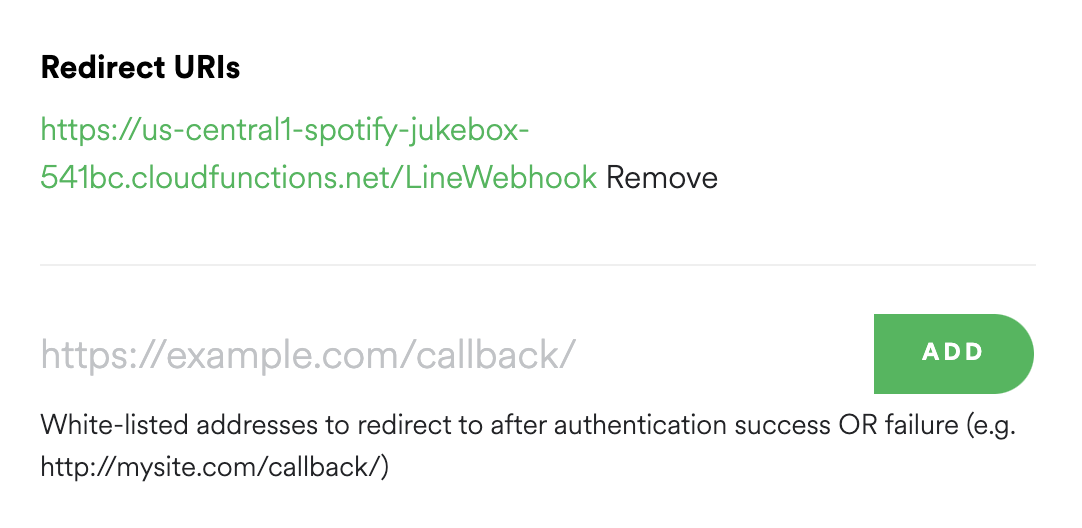
กลับไปที่หน้า Spotify Developer Dashboard โดยเราต้องมาตั้งค่า Callback URL เมื่อผู้ใช้ทำการ Login เสร็จตัว authorization code จะถูกส่งไปยัง URL endpoint นี้ซึ่งเราต้องการใช้ในการรับ Access token/Refresh token อีกที
ให้เราทำการกดปุ่ม Edit Settings > Redirect URIs > ใส่ URL เดียวกัน
ทำการ Login ด้วย Spotify Account
- กลับไปที่หน้า Log ของ Firebase console และทำการค้นหา URL ที่ใช้ในการ Login ของ Spotify นำ URL ไปวางใน Browser จากนั้นให้ทำการ Login ด้วย Spotify Account เดียวกันกับที่สร้าง Project
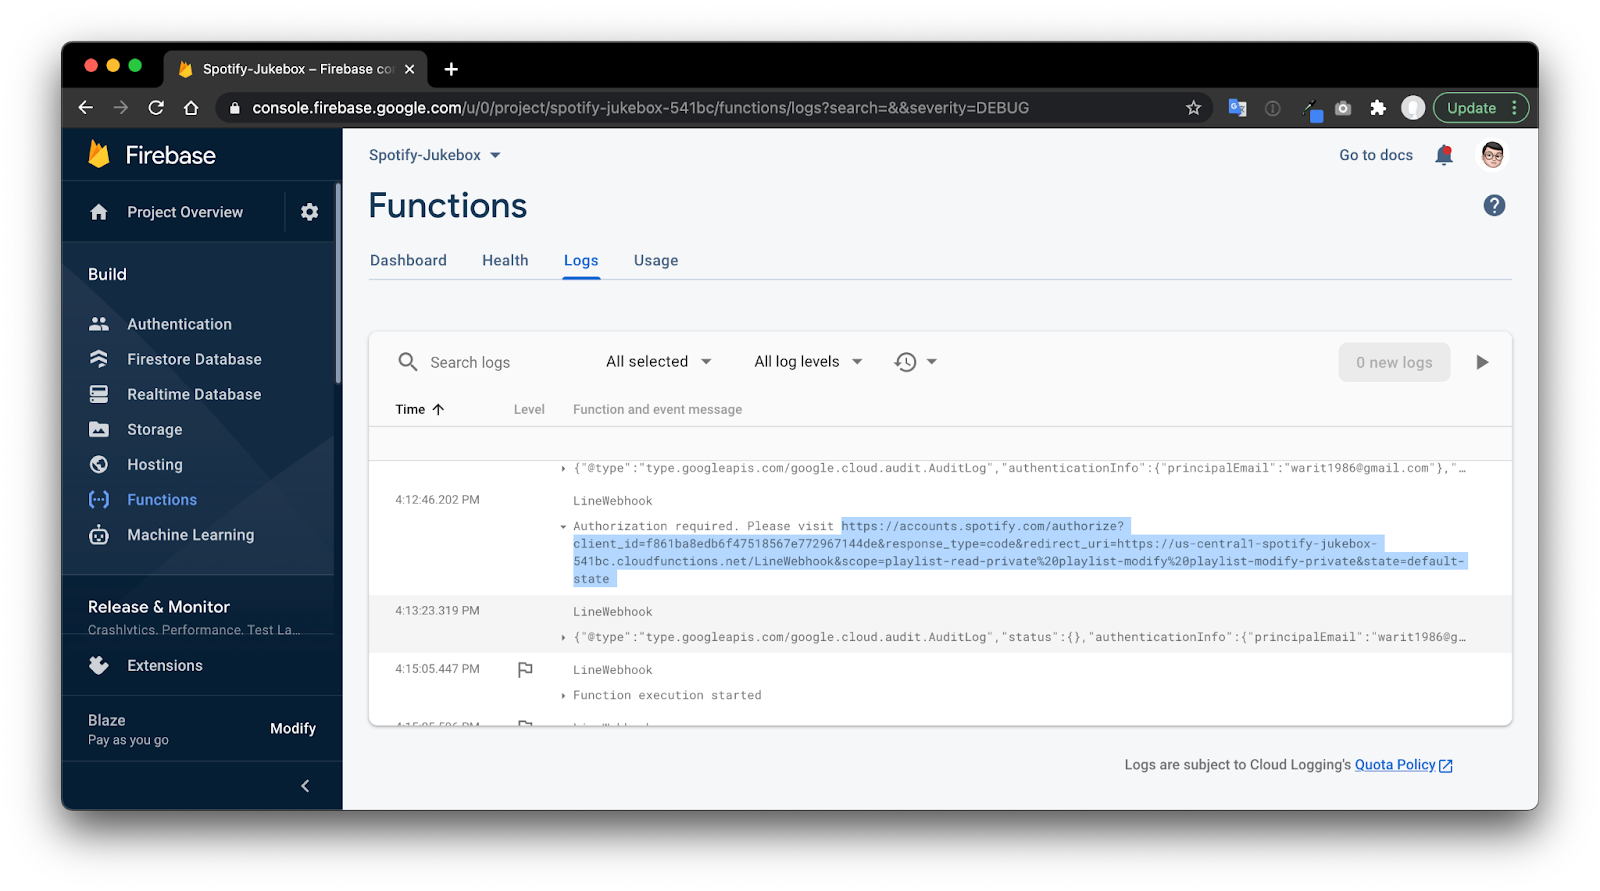
https://accounts.spotify.com/authorize?client_id=yyyyyy&response_type=code&redirect_uri=https://us-central1-xxxxxx.cloudfunctions.net/LineWebhook&scope=playlist-read-private%20playlist-modify%20playlist-modify-private&state=default-state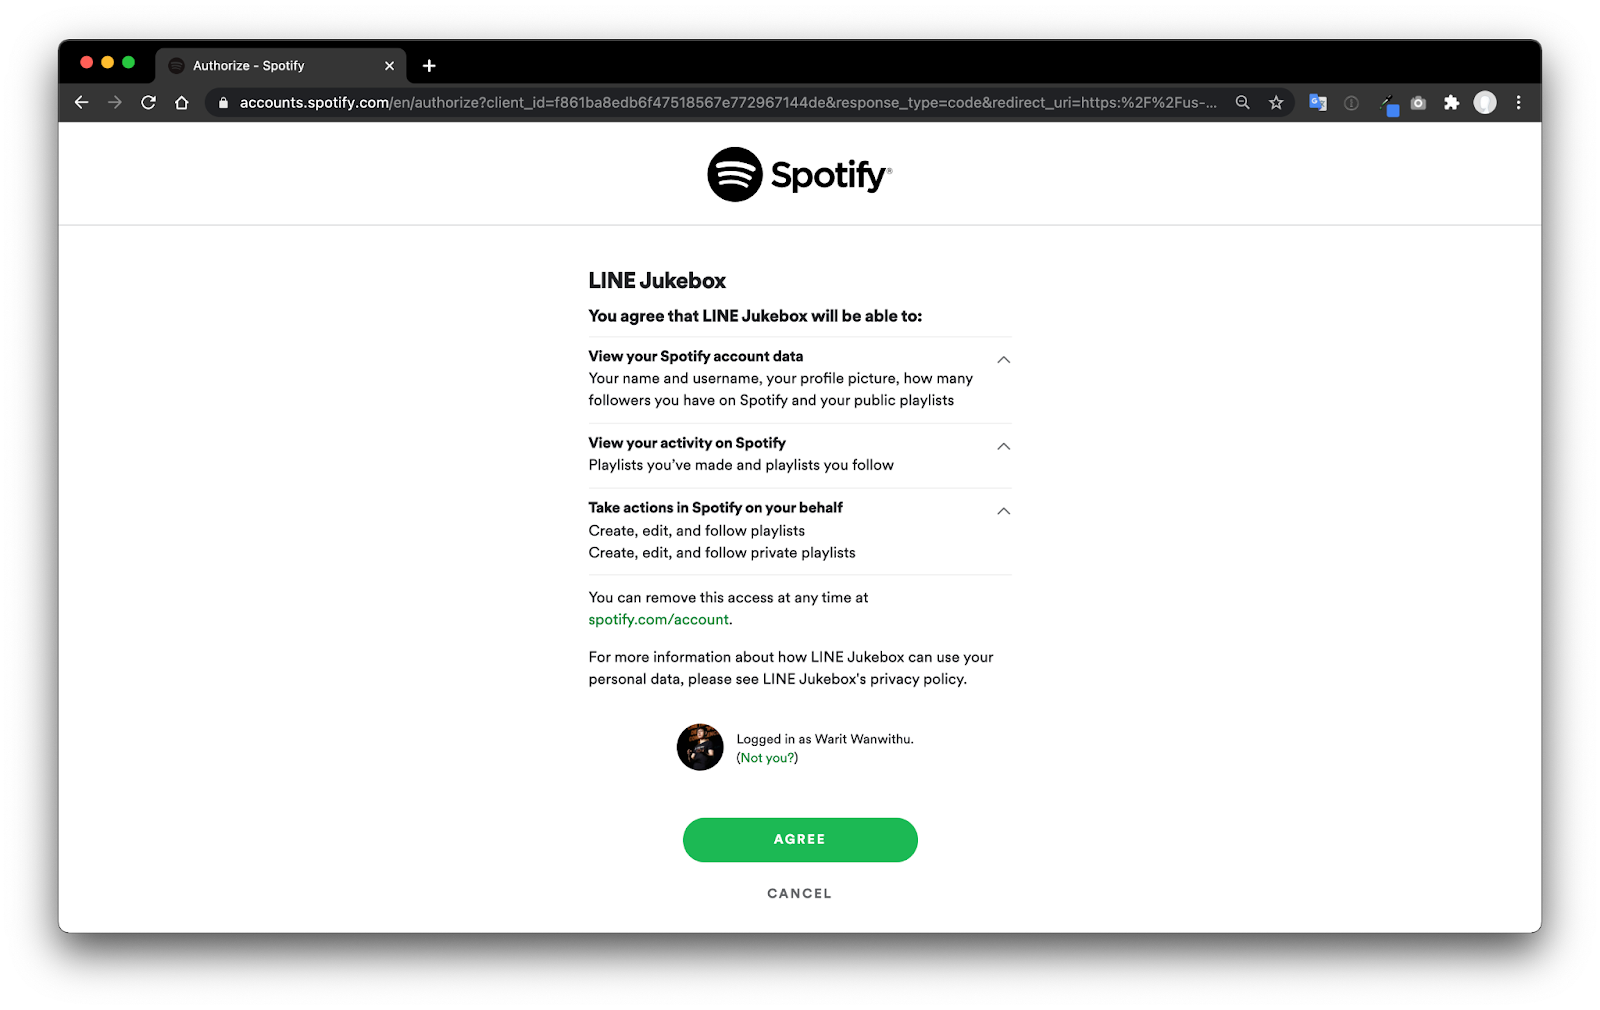
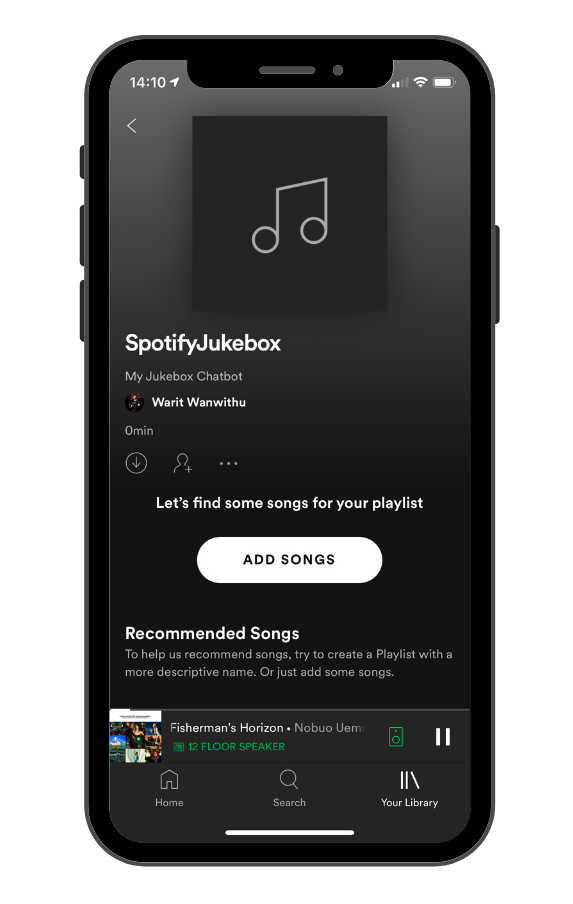
- เมื่อ Login เสร็จเรียบร้อยแล้ว เราจะเจอ Playlist ที่ชื่อว่า ‘SpotifyJukebox' ถูกสร้างขึ้นมาในแอป Spotify ของเรา
ผลลัพธ์
ยินดีด้วย! ถึงตรงนี้คุณก็มี LINE Chatbot ที่เป็นตู้เพลง Jukebox เท่ห์ๆของคุณเองแล้ว!!!
สิ่งที่คุณได้เรียนรู้ใน Codelab นี้
- ✅ การสร้าง LINE Chatbot
- ✅ การสร้างแอปใน Spotify Developer Portal
- ✅ การสร้าง Class ที่จัดการส่วนที่ต่อกับ Spotify API
- ✅ การสร้างโปรเจคใน Firebase
- ✅ การติดตั้ง Firebase CLI และ Cloud Functions for Firebase
- ✅ จัดการ Webhook โดยใช้ Cloud Functions และส่งผลลัพธ์เป็น Flex message กลับไปหาผู้ใช้
เรียนรู้เพิ่มเติม
- บทความมาสร้างตู้เพลง Jukebox เท่ห์ๆด้วย LINE Chatbot ผ่าน Spotify API กัน!
- บทความเกี่ยวกับ LINE Chatbot
- คอร์สเรียนออนไลน์ Building LINE Chatbot using Dialogflow (ฟรี)
Reference docs
- LINE Messaging API reference
- Cloud Functions for Firebase document
- Spotify official docs
- Spotify Web API node