ใน Codelab นี้คุณจะได้เรียนรู้การสร้าง LINE Chatbot สำหรับแจ้งสถานะการส่งพัสดุแบบ Real Time ผ่าน REST API ของไปรษณีย์ไทย (ThailandPost)
สิ่งที่คุณจะได้เรียนรู้
- การสร้าง LINE Chatbot
- การสร้าง Account และการ Create Token บนเว็บไปรษณีย์ไทย
- การสร้าง Class ที่จัดการส่วนที่ต่อกับ Rest API ของไปรษณีย์ไทย
- การสร้างโปรเจคใน Firebase
- การติดตั้ง Firebase CLI และ Cloud Functions for Firebase
- จัดการ Webhook โดยใช้ Cloud Functions และส่งผลลัพธ์เป็น Flex message กลับไปหาผู้ใช้
สิ่งที่คุณต้องเตรียมพร้อมก่อนเริ่ม Codelab
สร้าง LINE Official Account
จุดเริ่มต้นของการพัฒนา LINE Chatbot คือคุณจะต้องสร้าง LINE OA(LINE Official Account) และเปิดใช้งาน Messaging API
- เข้าไปที่ https://manager.line.biz แล้วเลือก Log in with LINE account(สีเขียว) เพื่อเข้าสู่ระบบ
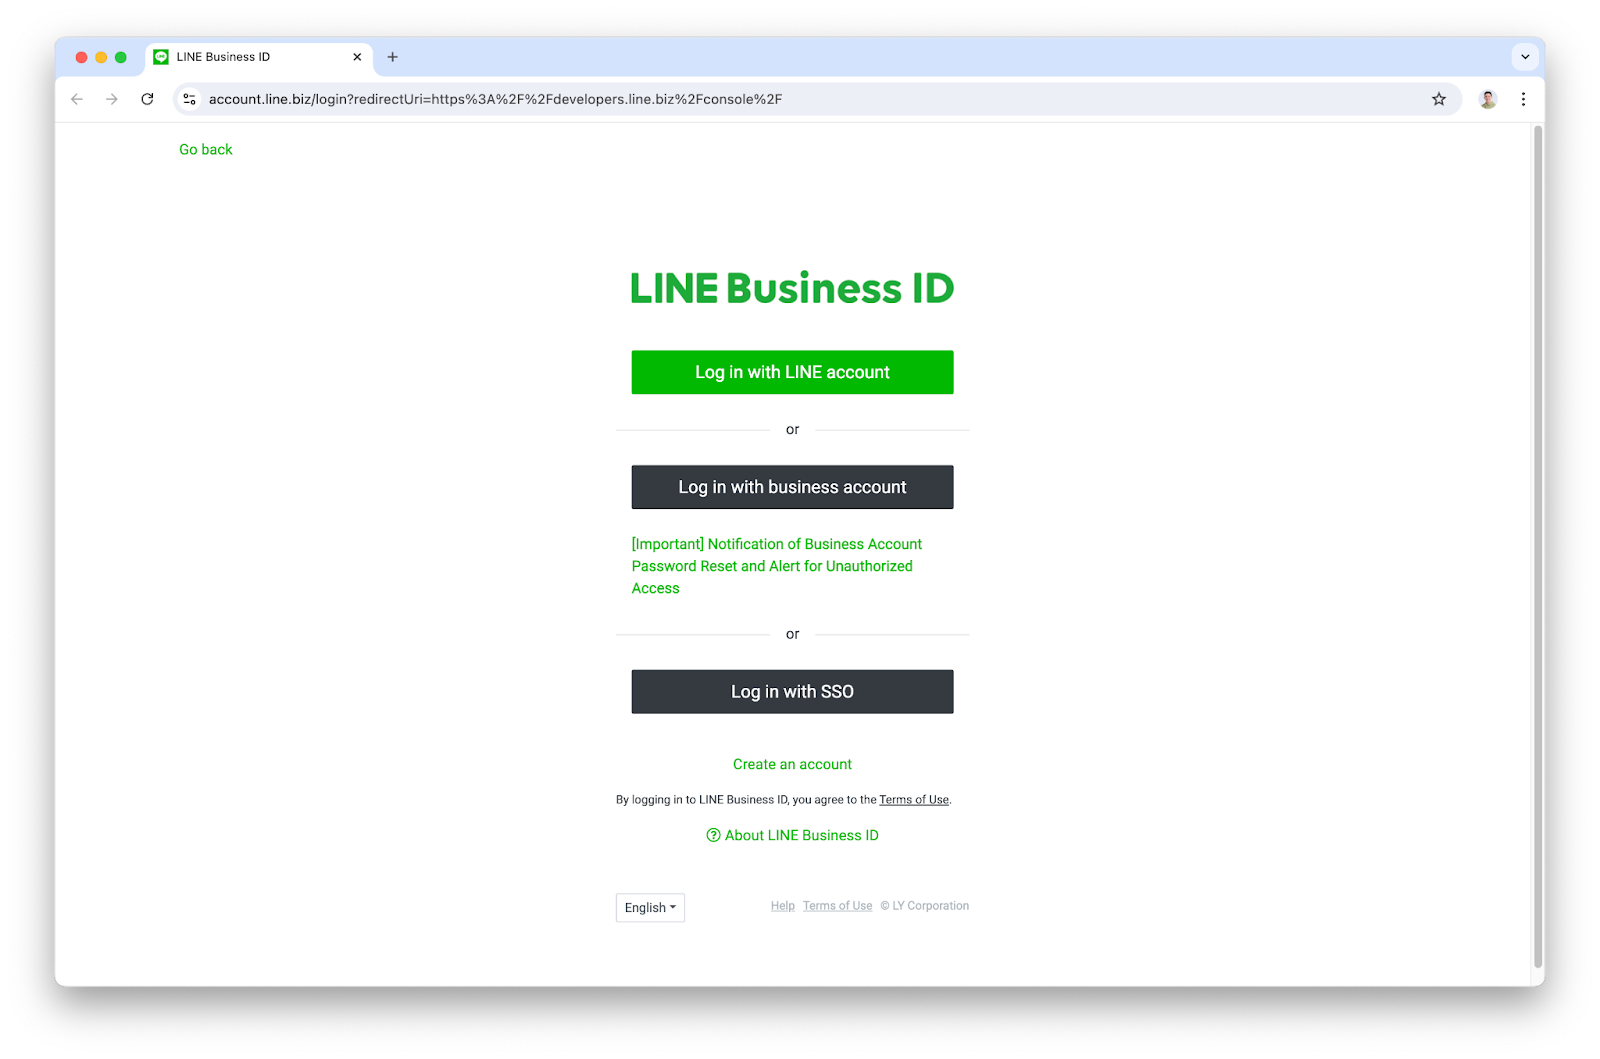
- เข้าสู่ระบบด้วยบัญชี LINE ของคุณให้เรียบร้อย
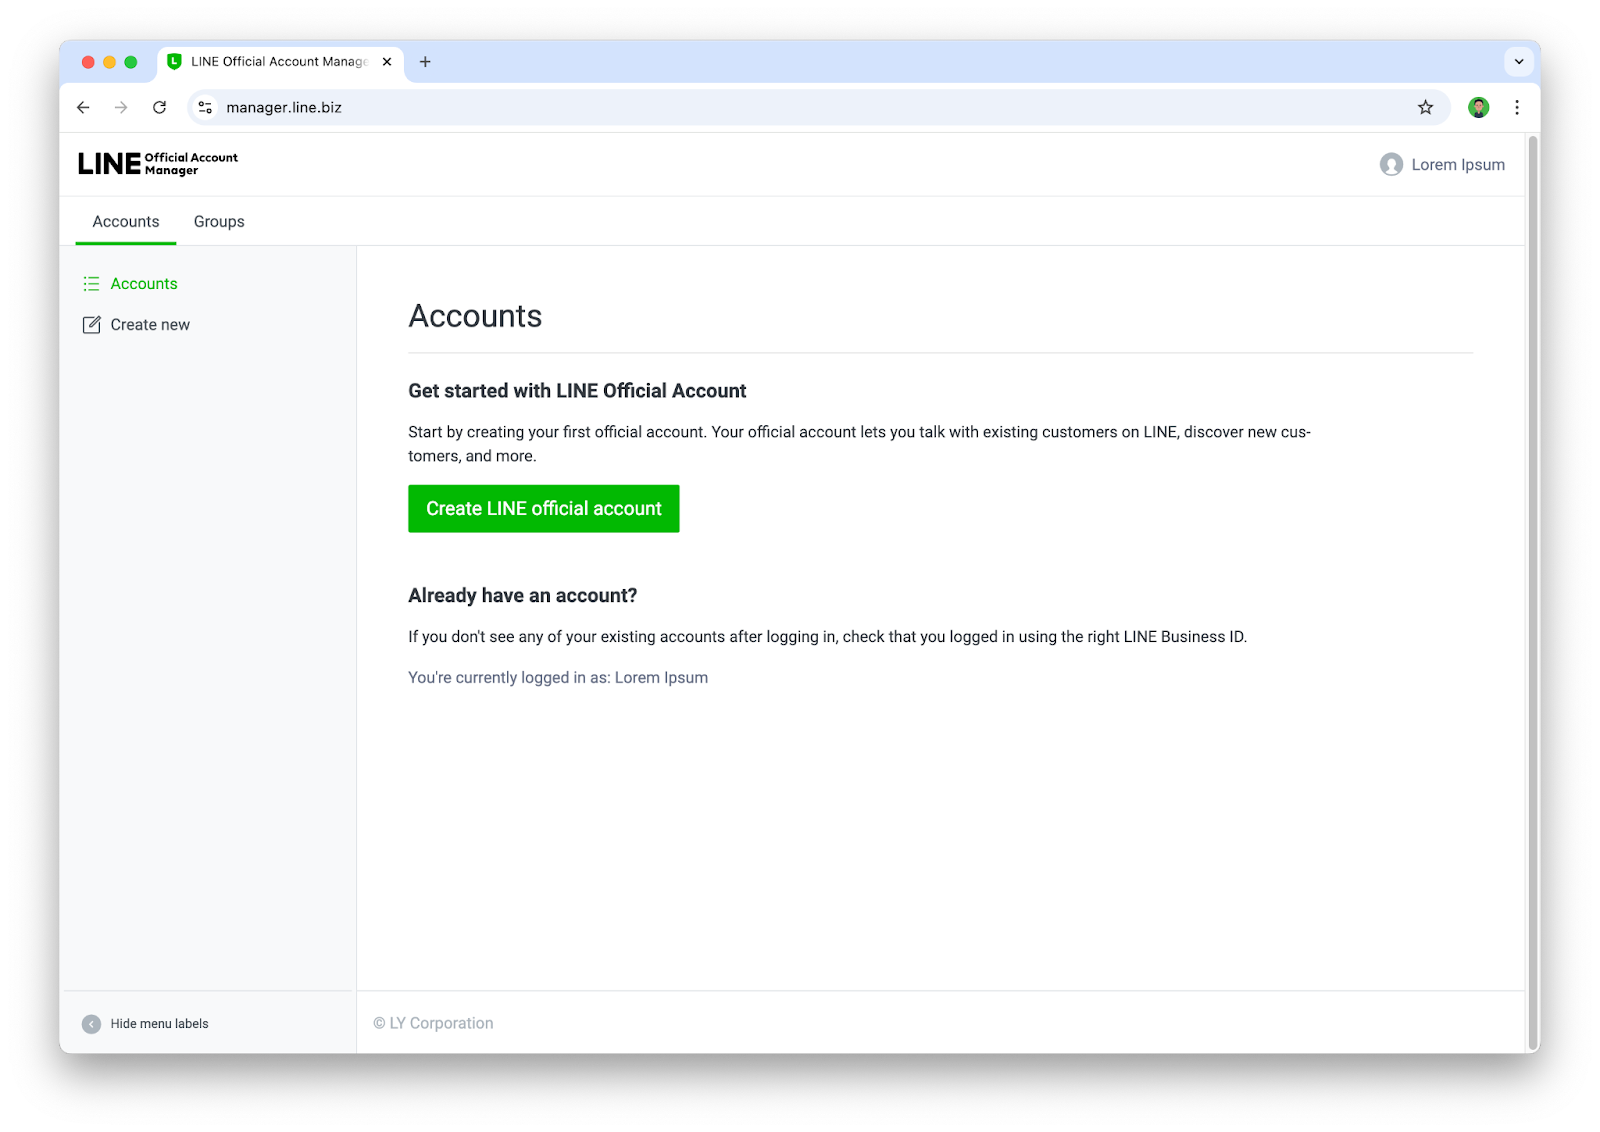
- กดสร้าง LINE OA จากปุ่ม Create LINE official account สำหรับผู้ทีสร้าง LINE OA ครั้งแรก หรือกด Create new ทางด้านซ้ายสำหรับผู้ที่เคยสร้าง LINE OA แล้ว
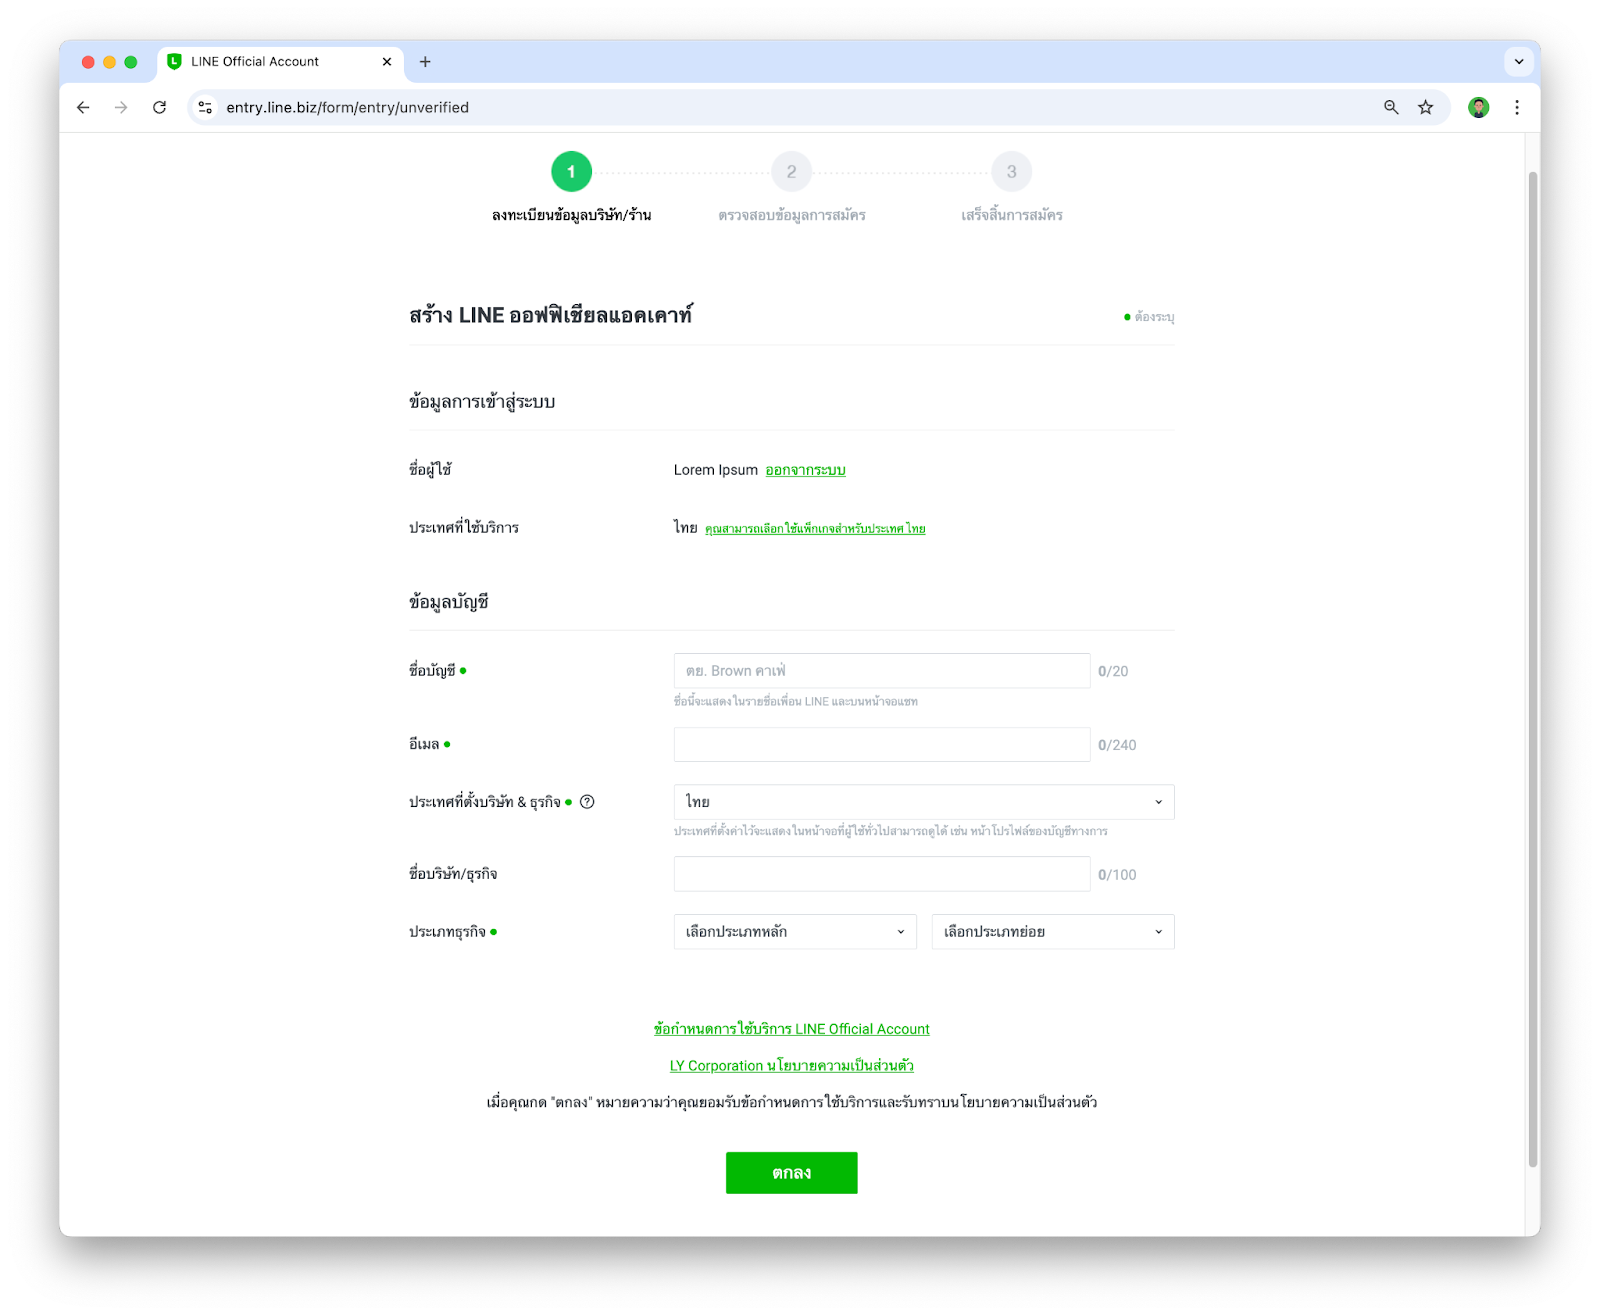
- ให้ระบุข้อมูลต่างๆลงไปในฟอร์ม แล้วกด ตกลง
- จากนั้นให้ยืนยันรายละเอียดในการสร้าง LINE OA เป็นอันเสร็จสิ้น

เปิดใช้งาน Messaging API
หลังจากที่เรามี LINE OA เรียบร้อยแล้ว ขั้นตอนนี้จะพาทุกคนไปเพิ่มความสามารถให้ LINE OA ของเรากลายเป็น LINE Chatbot ได้
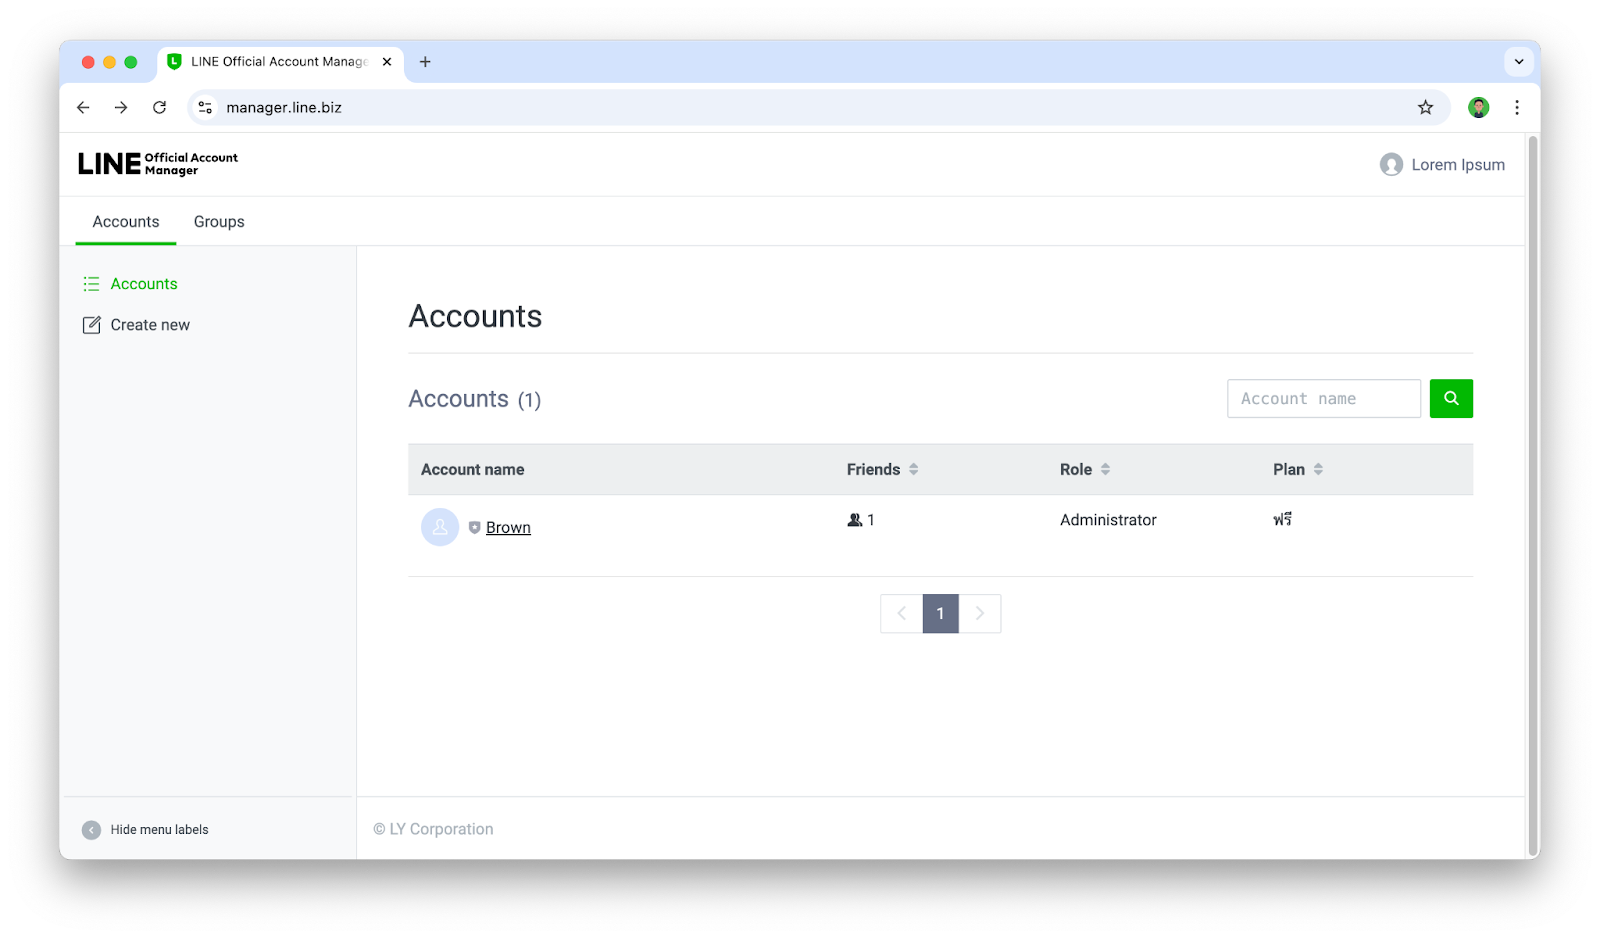
- เข้าไปที่ https://manager.line.biz ในกรณีที่เรามีบัญชี LINE OA ที่สร้างไว้แล้ว หน้านี้จะแสดงบัญชี LINE OA ต่างๆที่เรามี ก็ให้เรากดเลือกบัญชี LINE OA ที่เราต้องการ
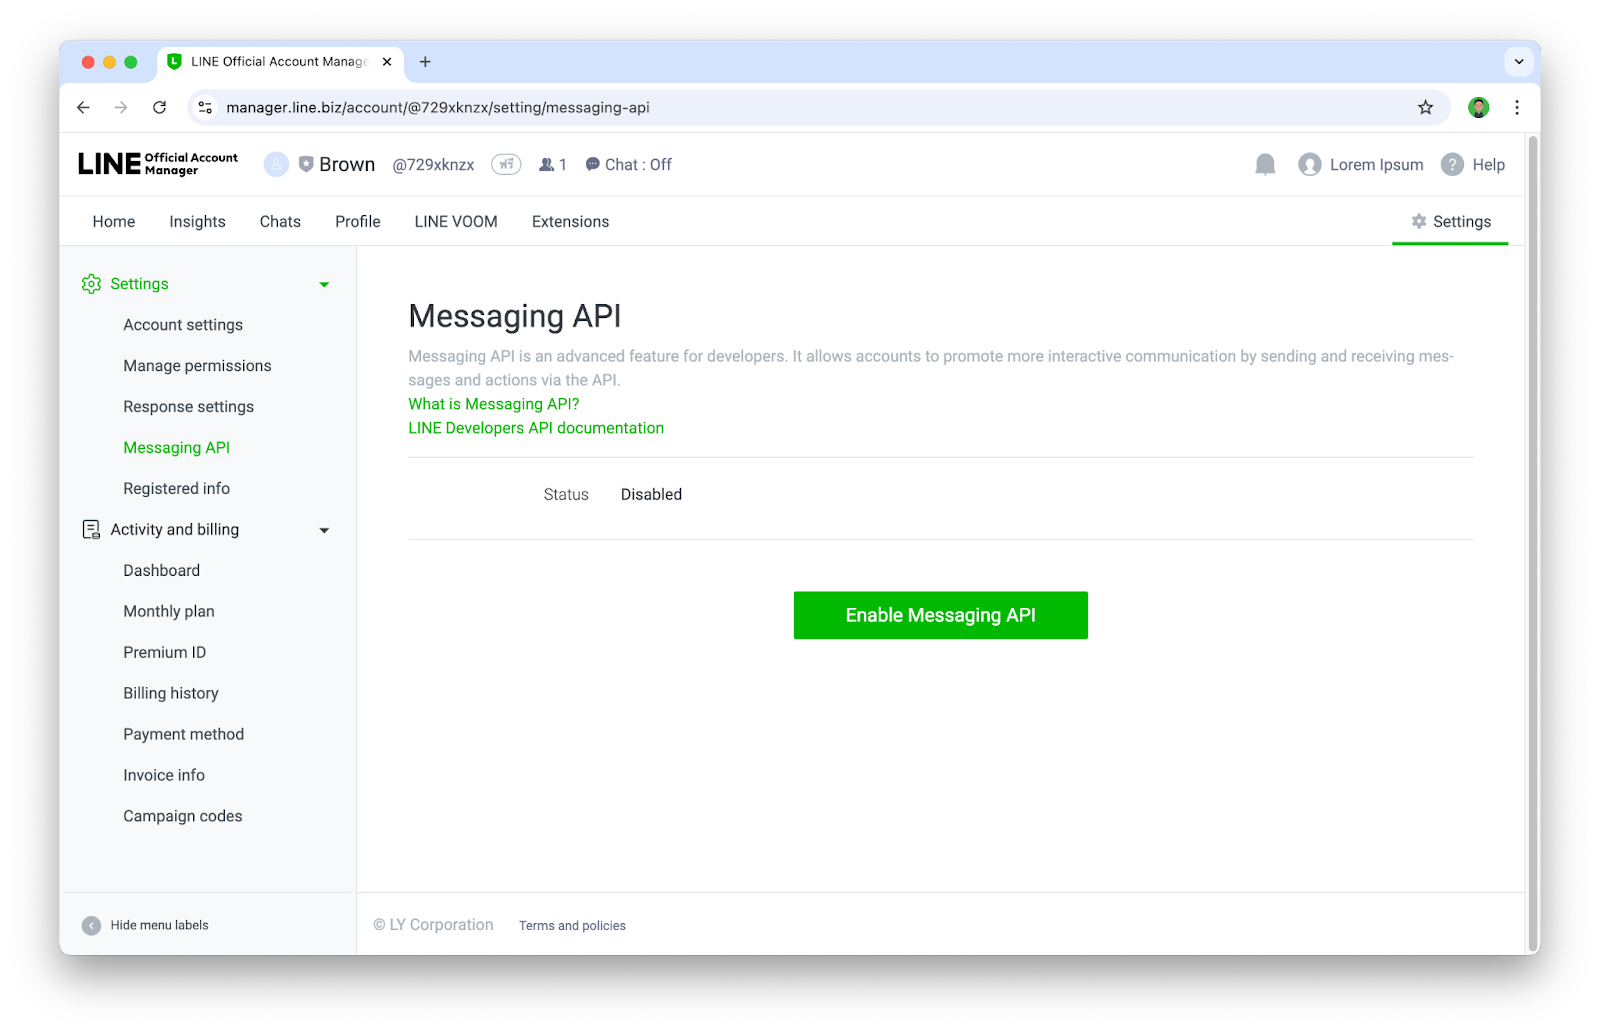
- ให้เราไปทีเมนู Settings > Messaging API แล้วให้กดปุ่ม Enable Messaging API
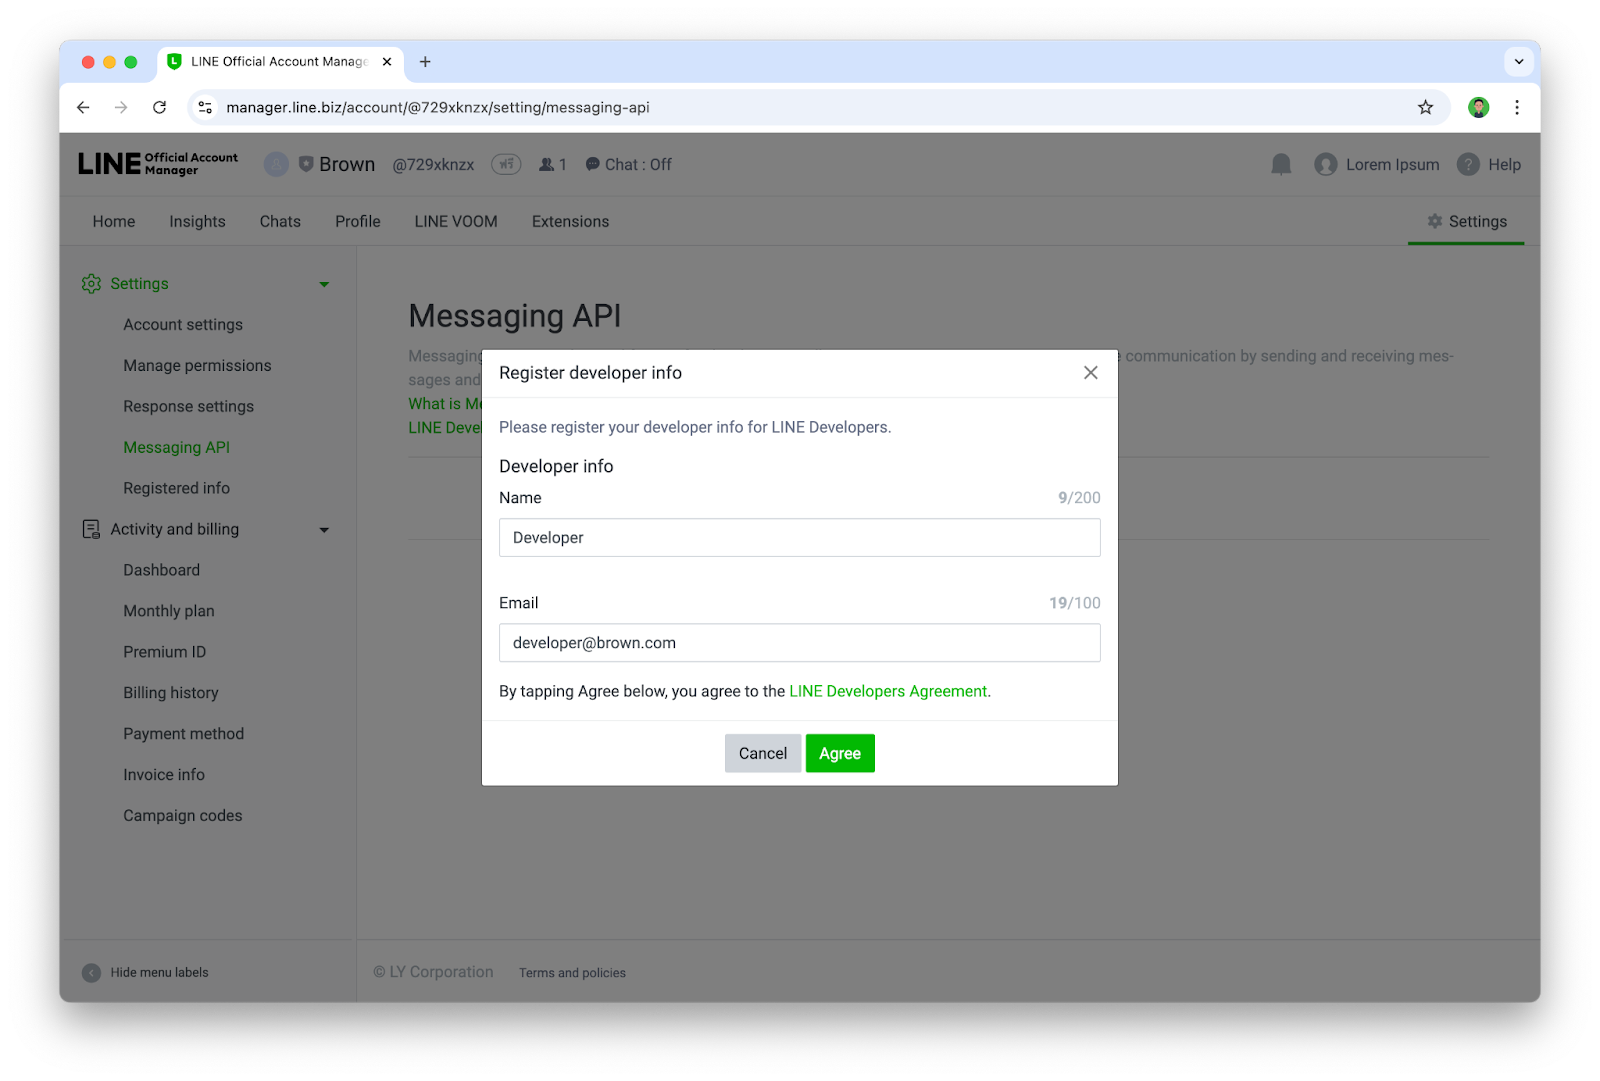
- หากเป็นการ Enable Messaging API ครั้งแรกของบัญชี LINE Business ID จะเจอหน้าให้ลงทะเบียน Developer info ก็ให้กรอก ชื่อ และ อีเมล
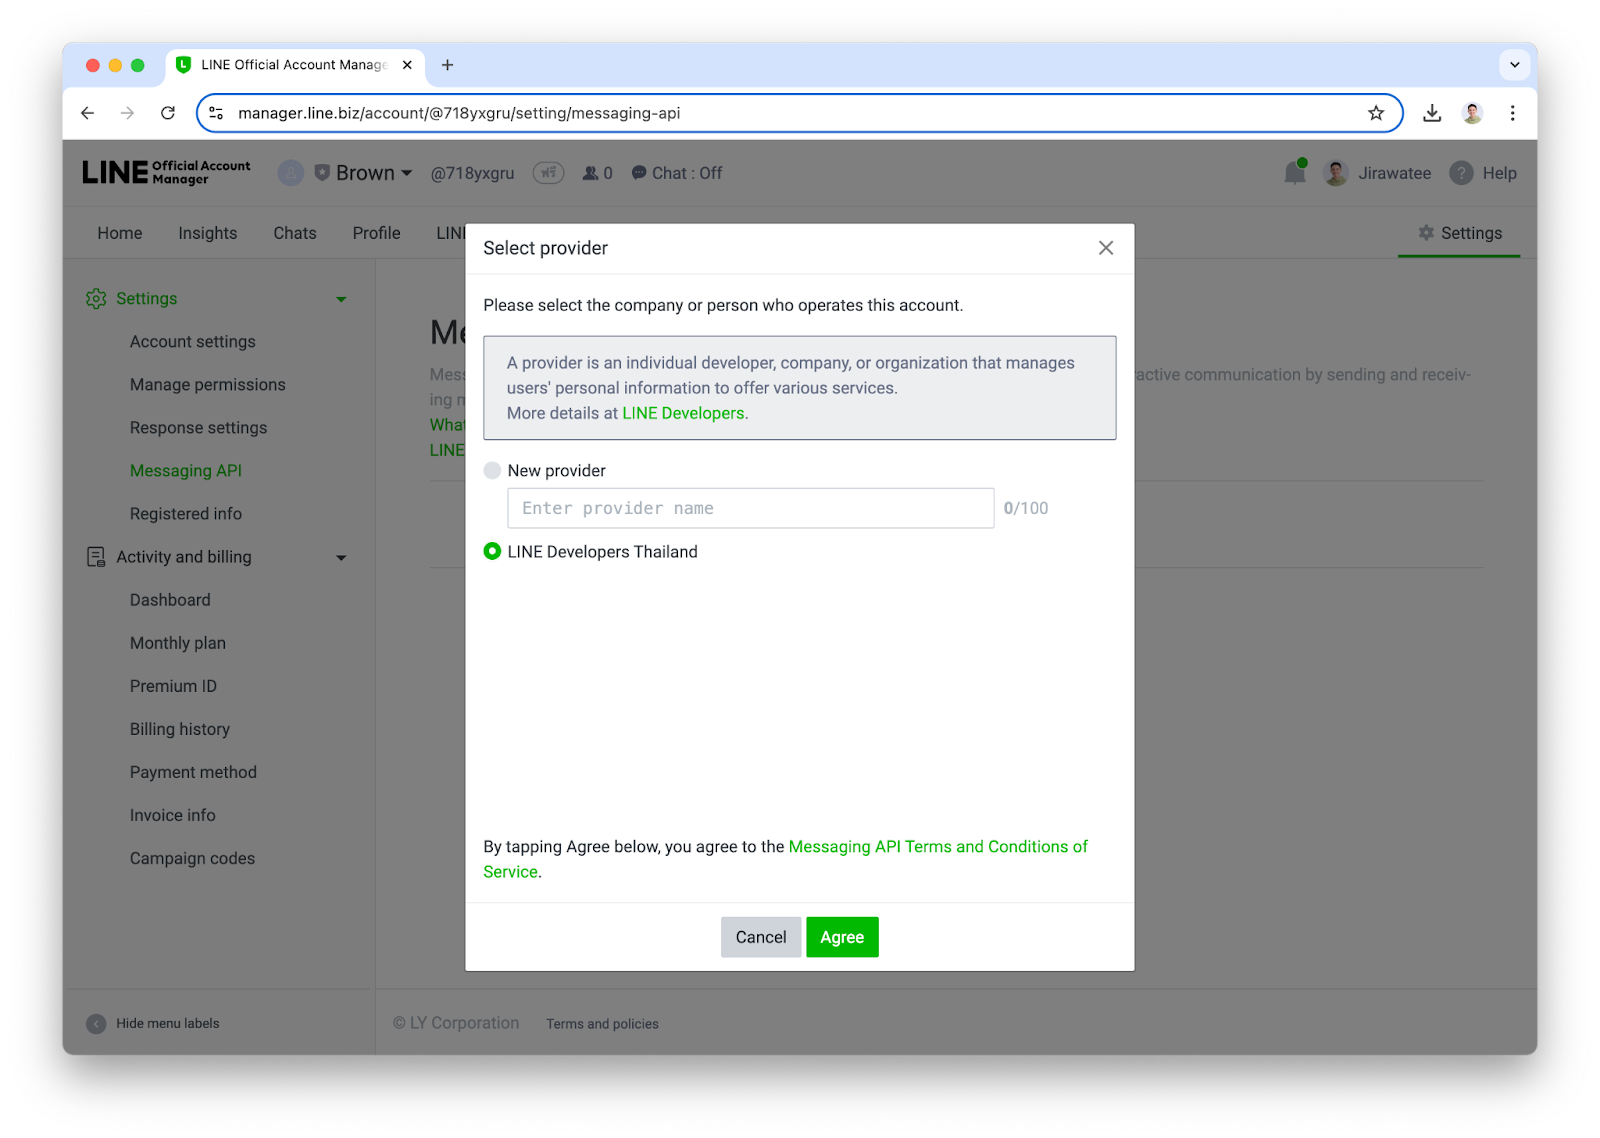
- จากนั้นให้สร้าง Provider ใหม่ หรือเลือก Provider เดิมกรณีที่เคยสร้างไปแล้ว
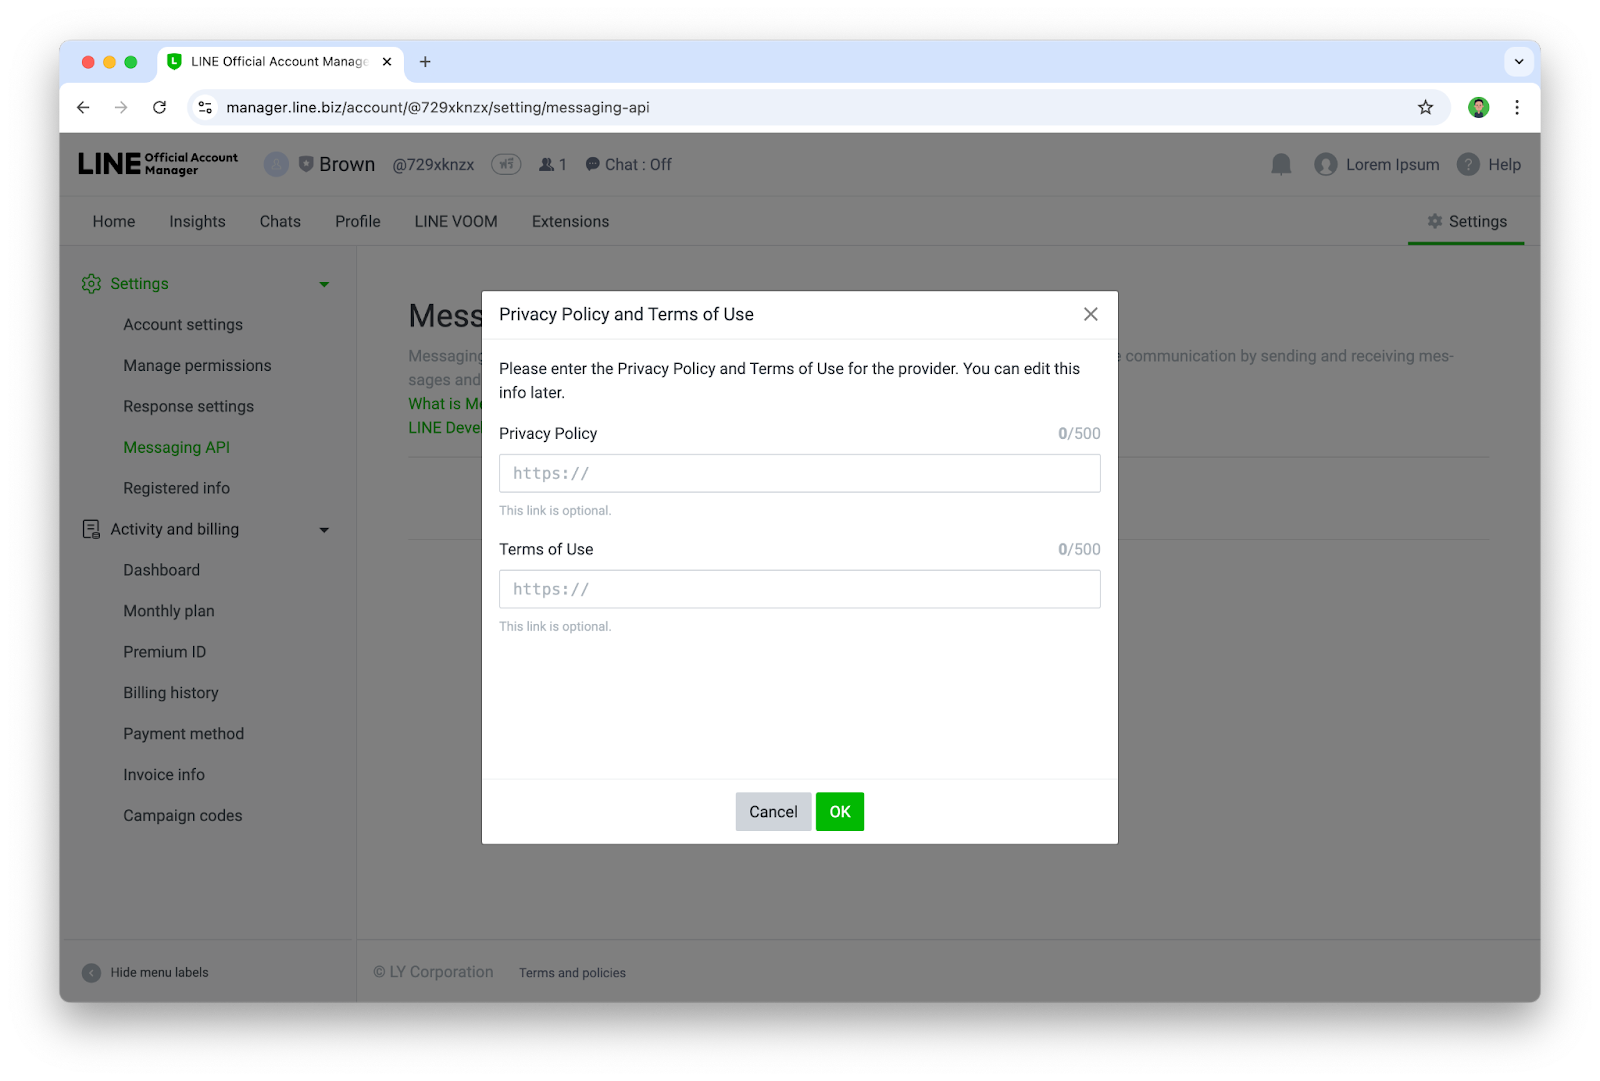
- ระบุ URL ของ Privacy Policy และ Terms of Use (ถ้ามี) หากยังไม่มีก็สามารถกดปุ่ม ok ข้ามไปได้
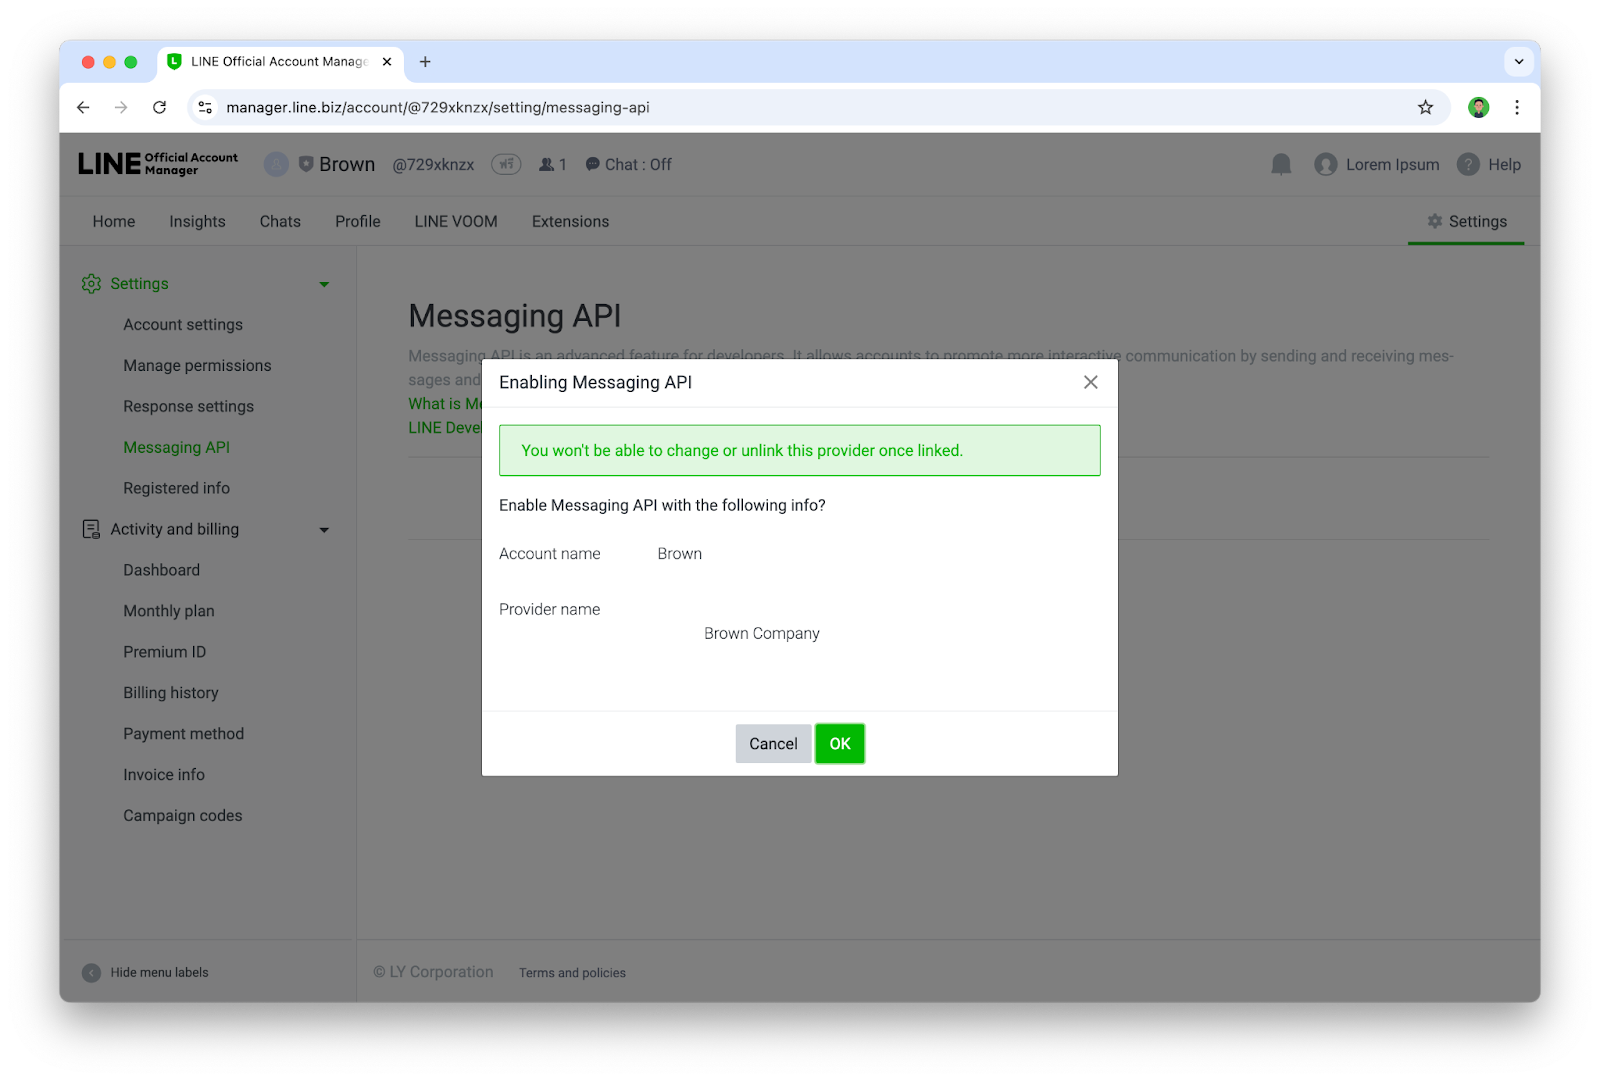
- ยืนยันการเปิดใช้งาน Messaging API ด้วยการกด Ok
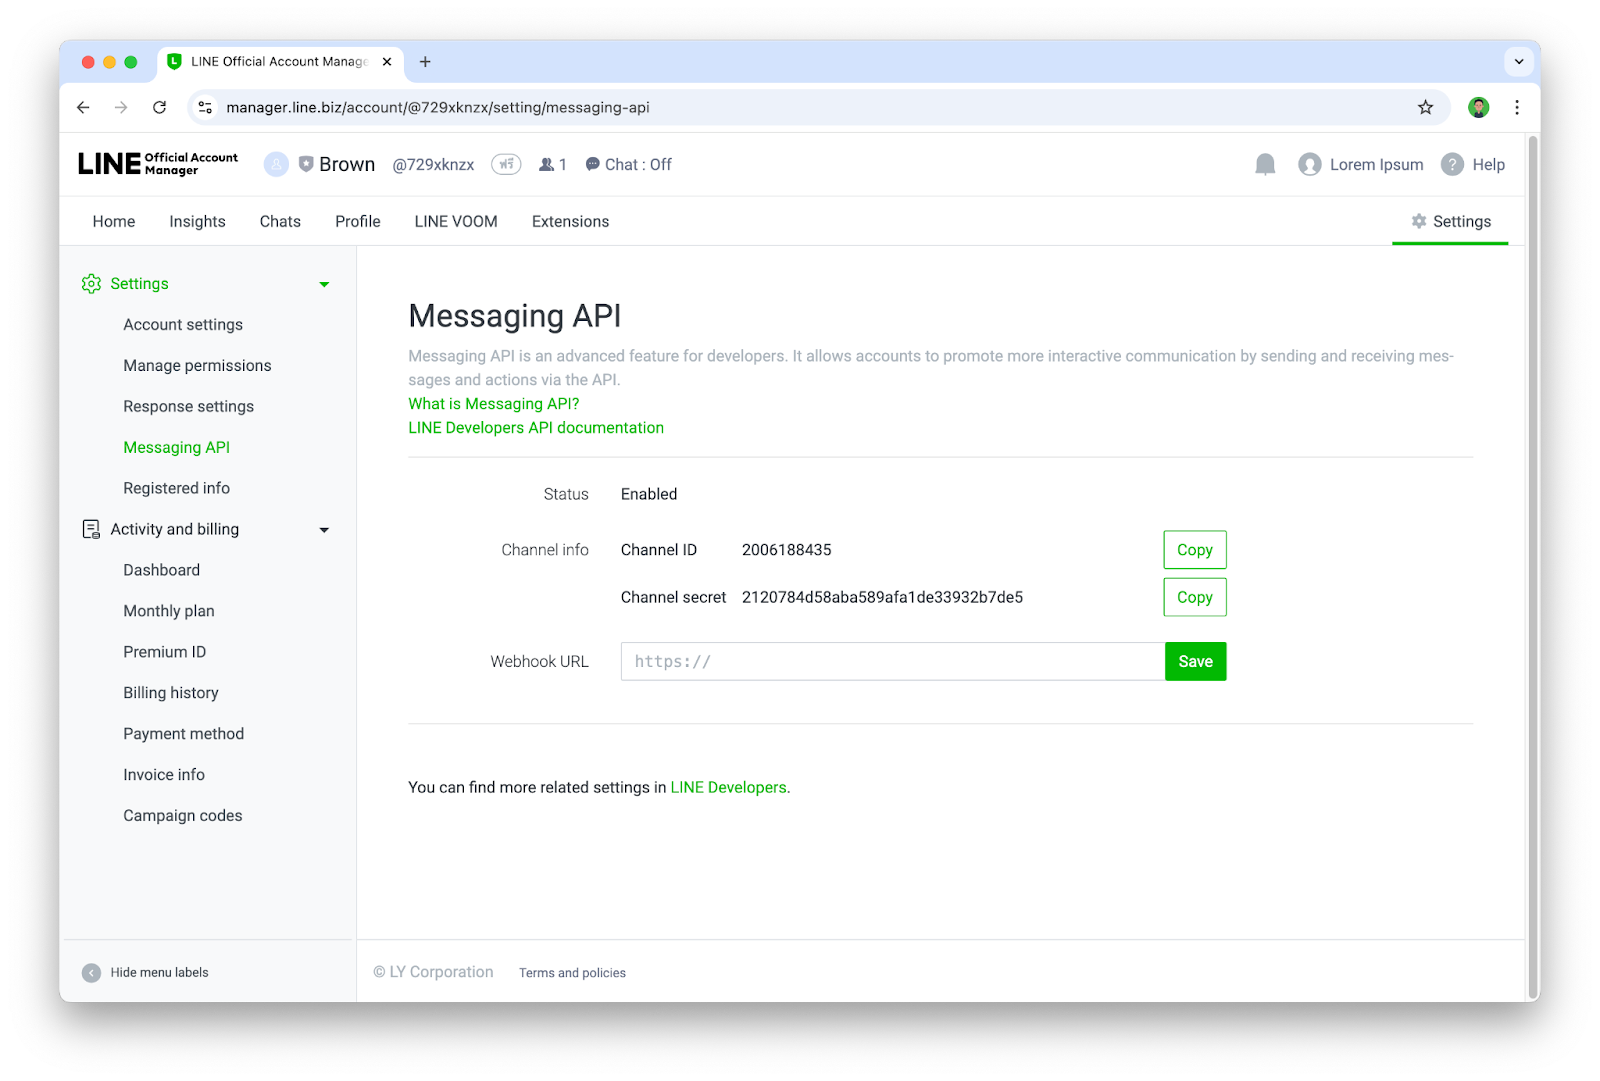
- เมื่อเจอหน้านี้ ก็แปลว่าคุณได้เปิดใช้งาน Messaging API ให้กับบัญชี LINE OA เรียบร้อยแล้ว
เพิ่ม Chatbot เป็นเพื่อนและตั้งค่า Channel
ขั้นตอนนี้เราจะเข้าไปใช้งาน LINE Developers Console ซึ่งเป็นเว็บไซต์สำหรับการบริหารจัดการ LINE Chatbot(LINE OA ที่เปิดใช้งาน Messaging API แล้ว) ในส่วนของนักพัฒนา
- เข้าไปที่ https://developers.line.biz/console/
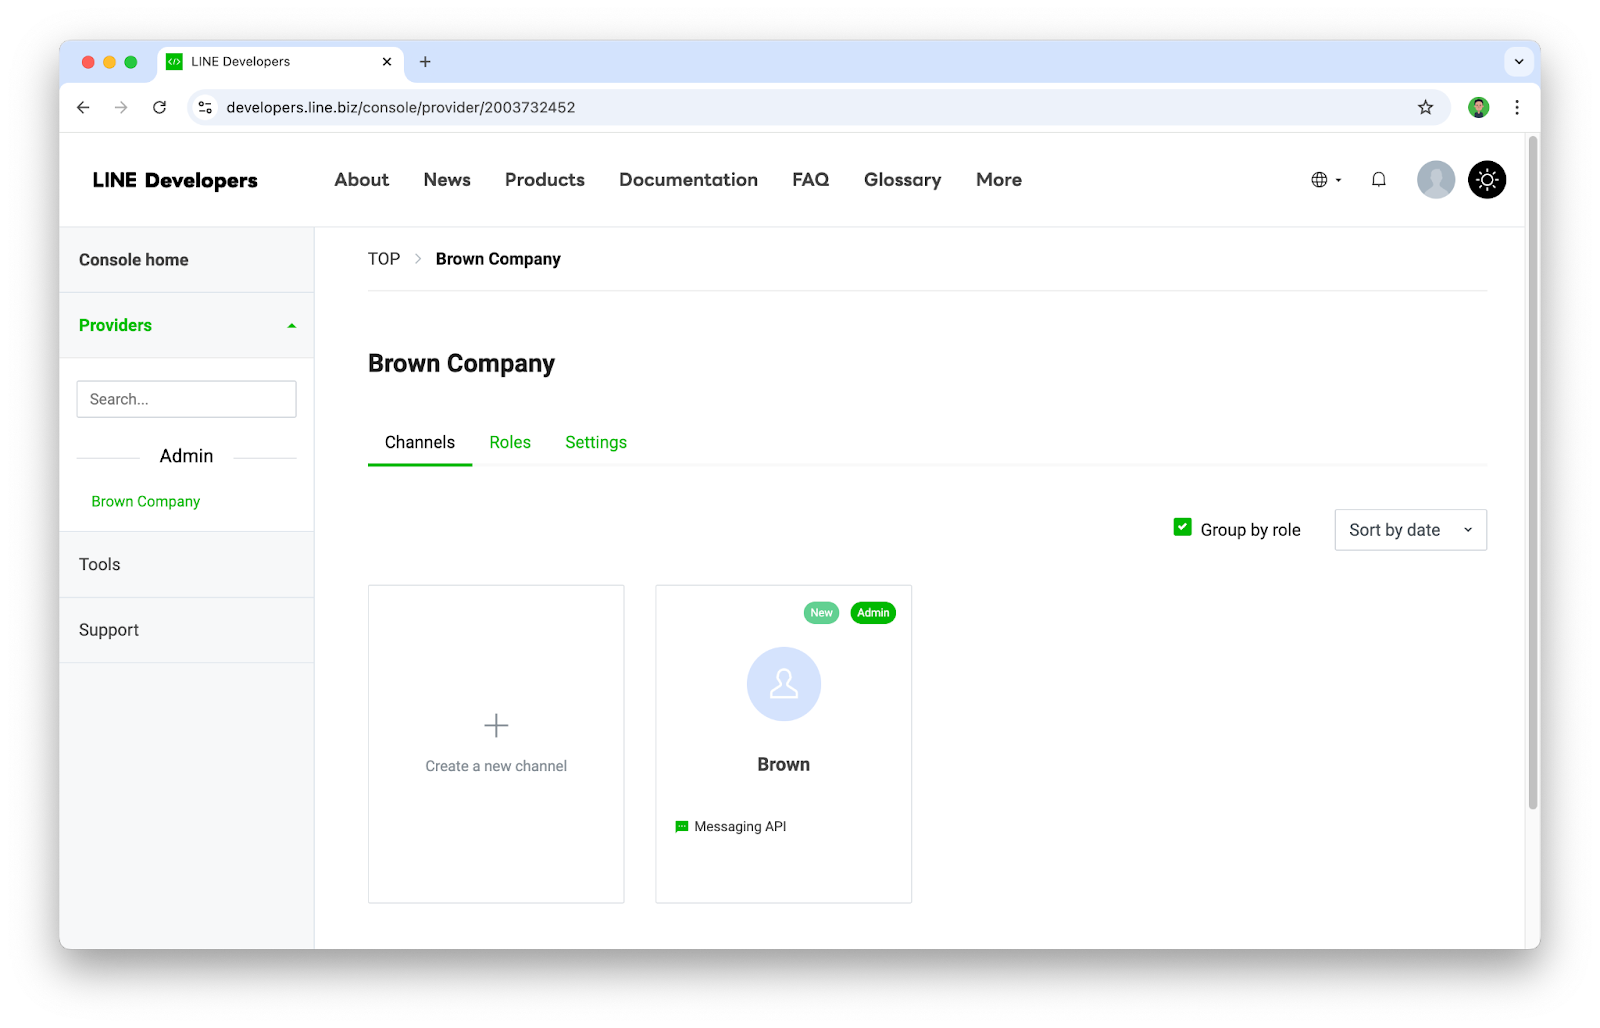
- ให้กดเลือก Provider ที่ต้องการ

- เราจะพบกับบัญชี LINE OA ที่เราได้เปิดใช้งาน Messaging API ไว้ ซึ่งในที่นี้เราจะเรียกมันว่า Channel(Channel จะเปรียบเสมือน Chatbot หรือ App) ก็ให้กดเลือก Channel ที่ต้องการ
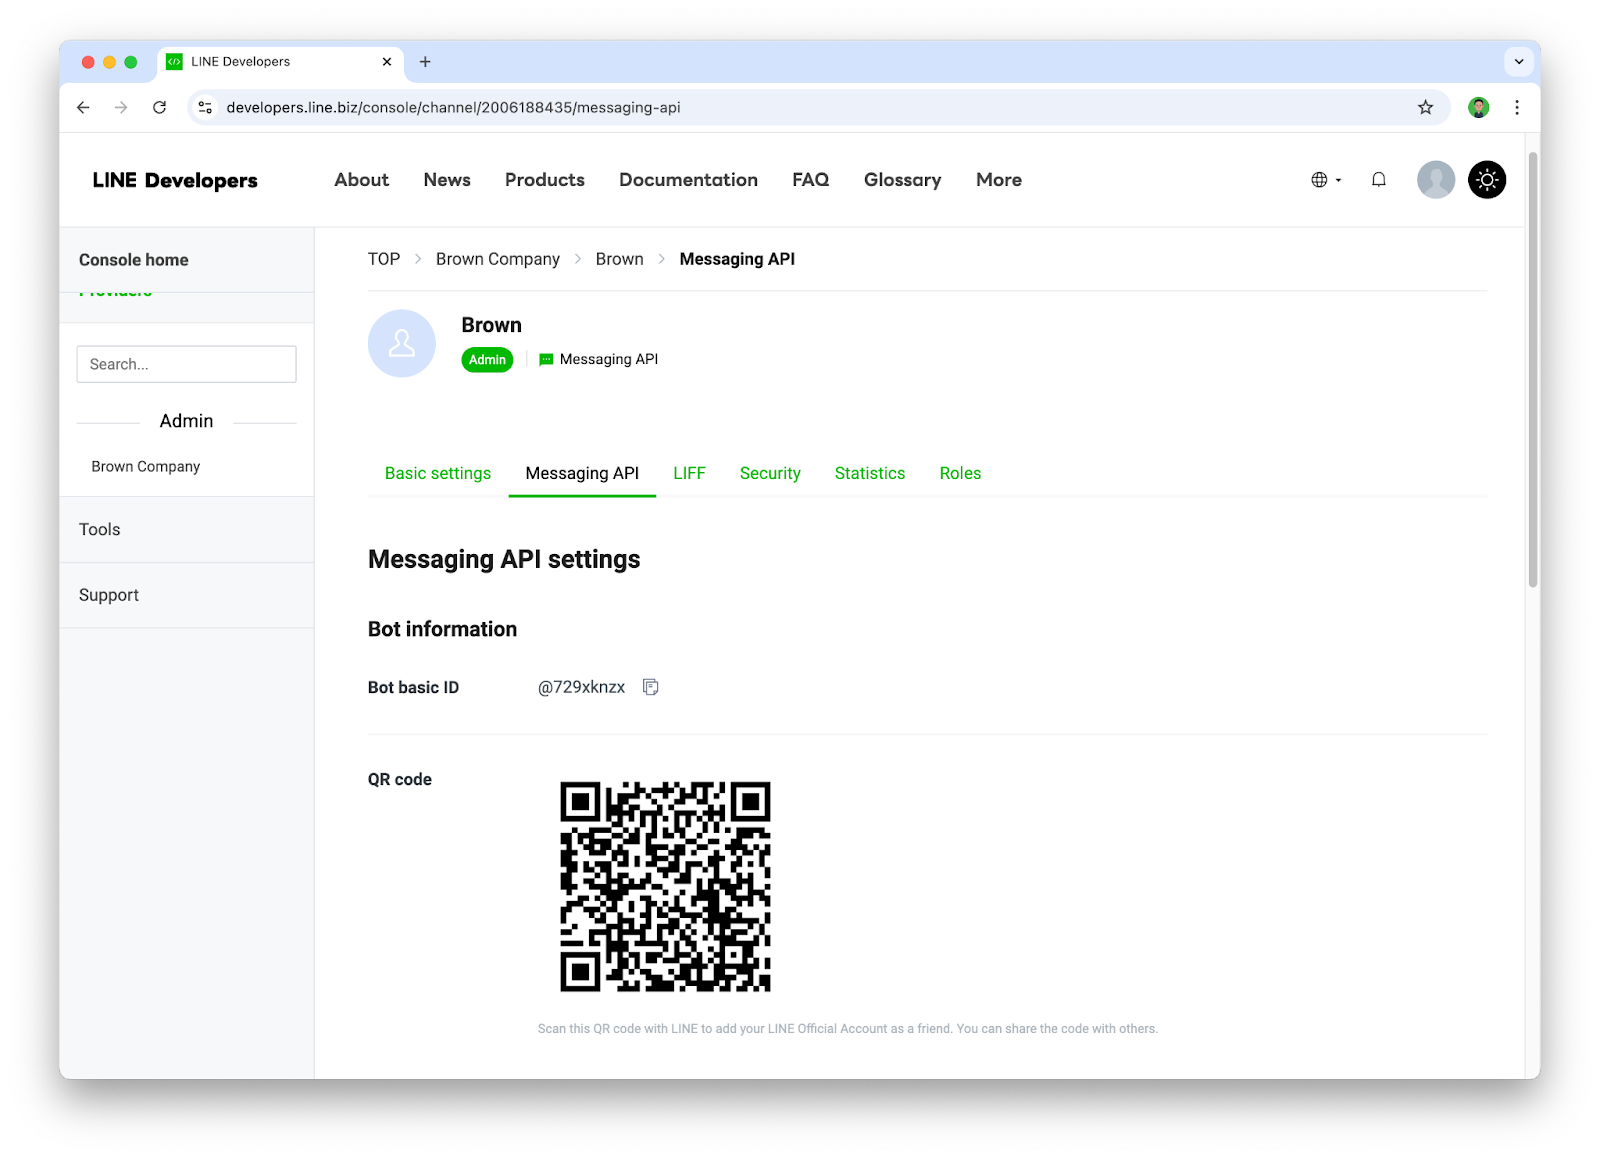
- ให้ไปที่ Tab ชื่อ Messaging API และทำการแสกน QR code ด้วยแอป LINE เพื่อเพิ่ม Chatbot เป็นเพื่อน
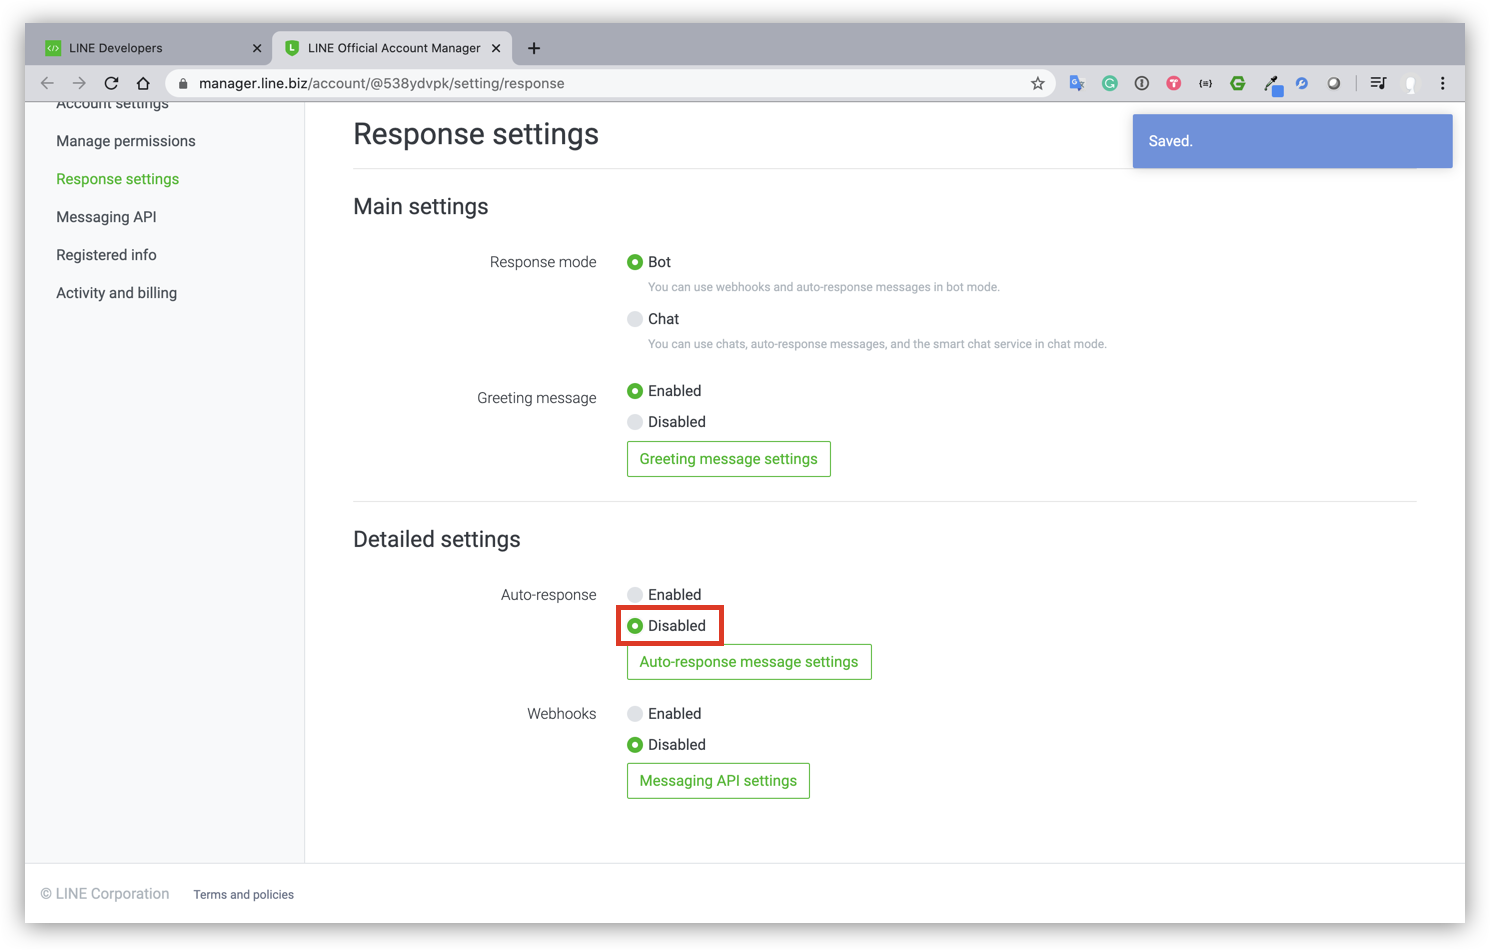
- ให้ปิด Auto-reply messages เนื่องจากฟีเจอร์นี้จะเป็น default การตอบกลับของ Chatbot ซึ่งไม่จำเป็นต้องใช้ฟีเจอร์นี้
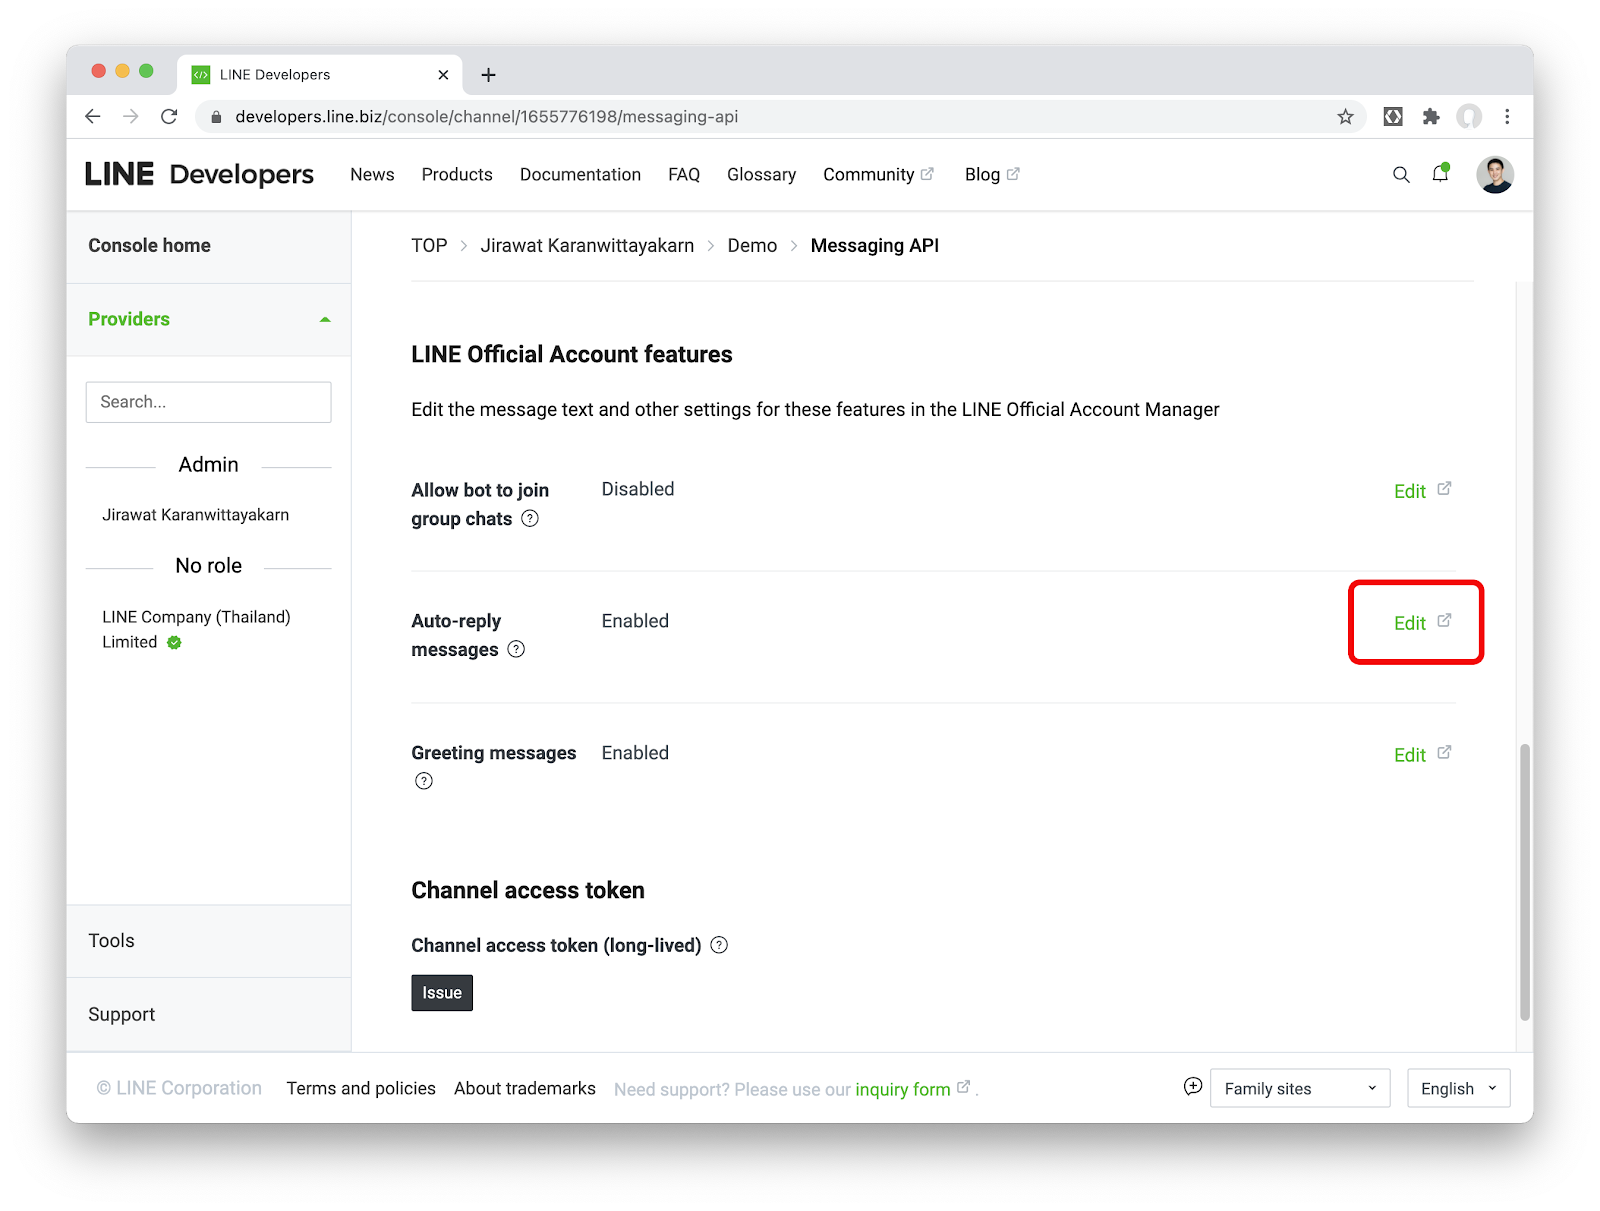
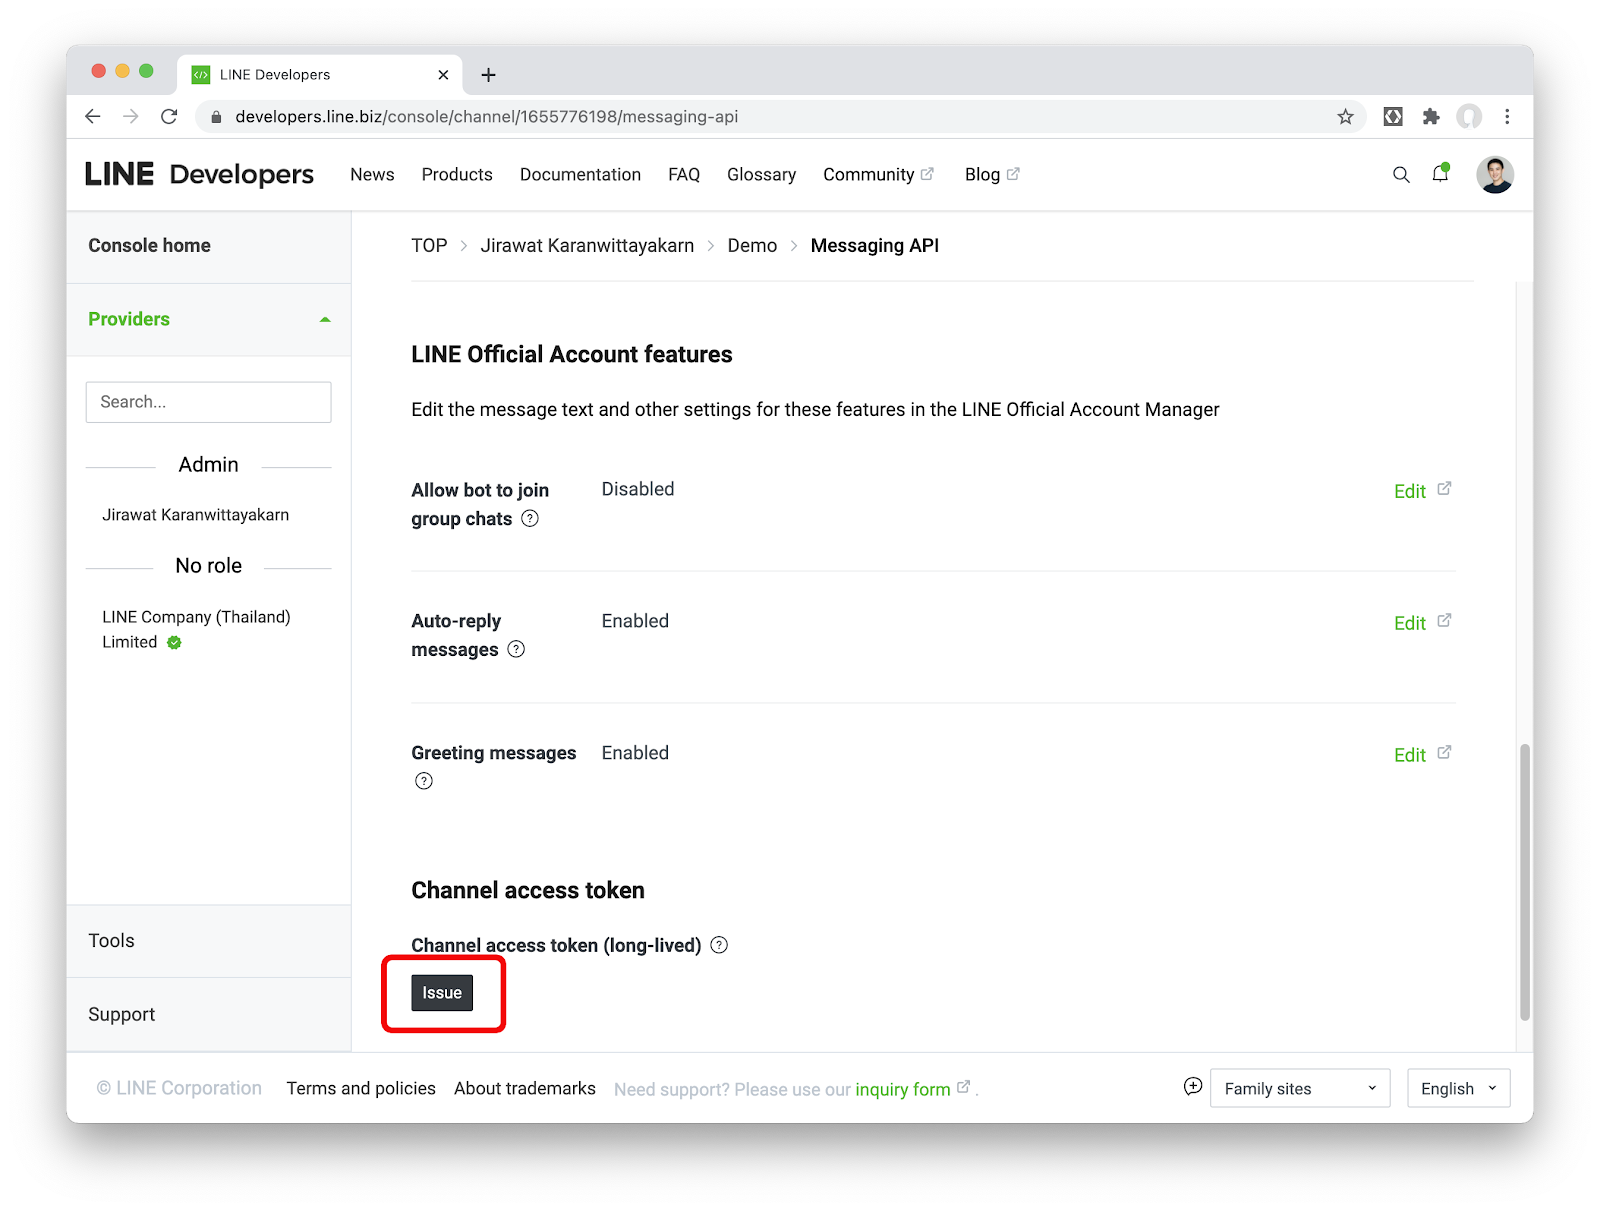
- กลับมาที่ Channel ที่เราสร้างใน Tab ชื่อ Messaging API ตรงส่วนของ Channel access token ให้กดปุ่ม Issue
เบื้องหลังของ Chatbot ตัวนี้ เราจะใช้บริการใน Firebase อย่าง Cloud Functions for Firebase และ Cloud Firestore ดังนั้นขั้นตอนนี้เราจะมาสร้างโปรเจค Firebase เพื่อใช้งานกัน
สร้างโปรเจคใน Firebase
- ให้ Sign in ใน Firebase console ด้วย Google account
- ในหน้า Firebase console ให้คลิก Add project จากนั้นตั้งชื่อโปรเจคตามต้องการ
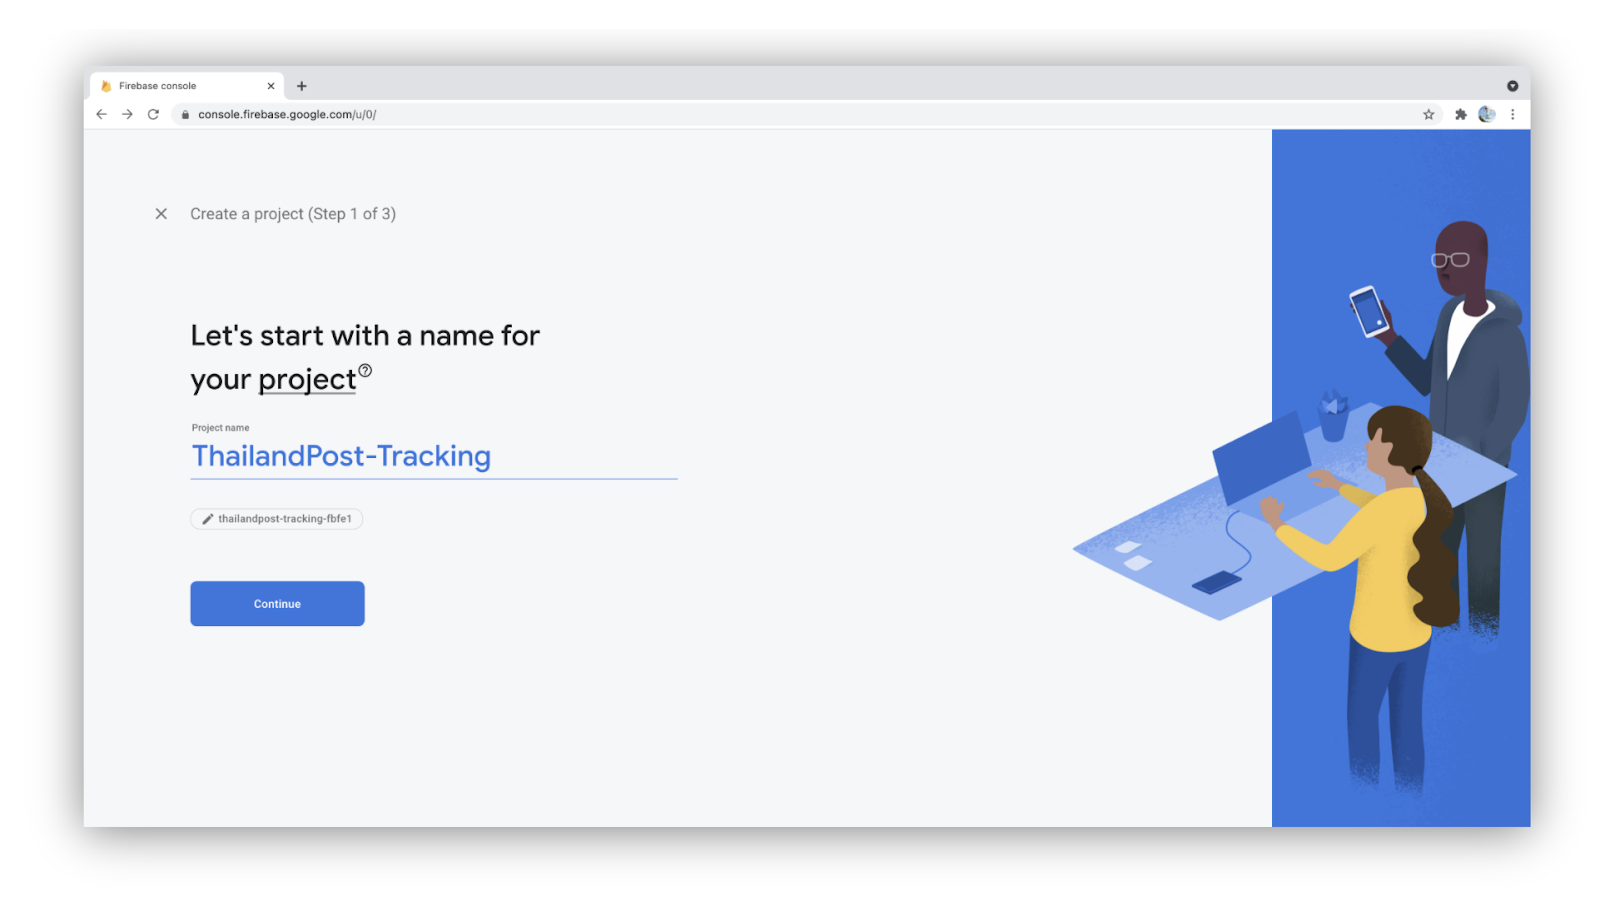
- เมื่อกด Continue แล้วให้ข้ามการตั้งค่า Google Analytics ไป เพราะคุณจะไม่ได้ใช้มันในโปรเจคนี้
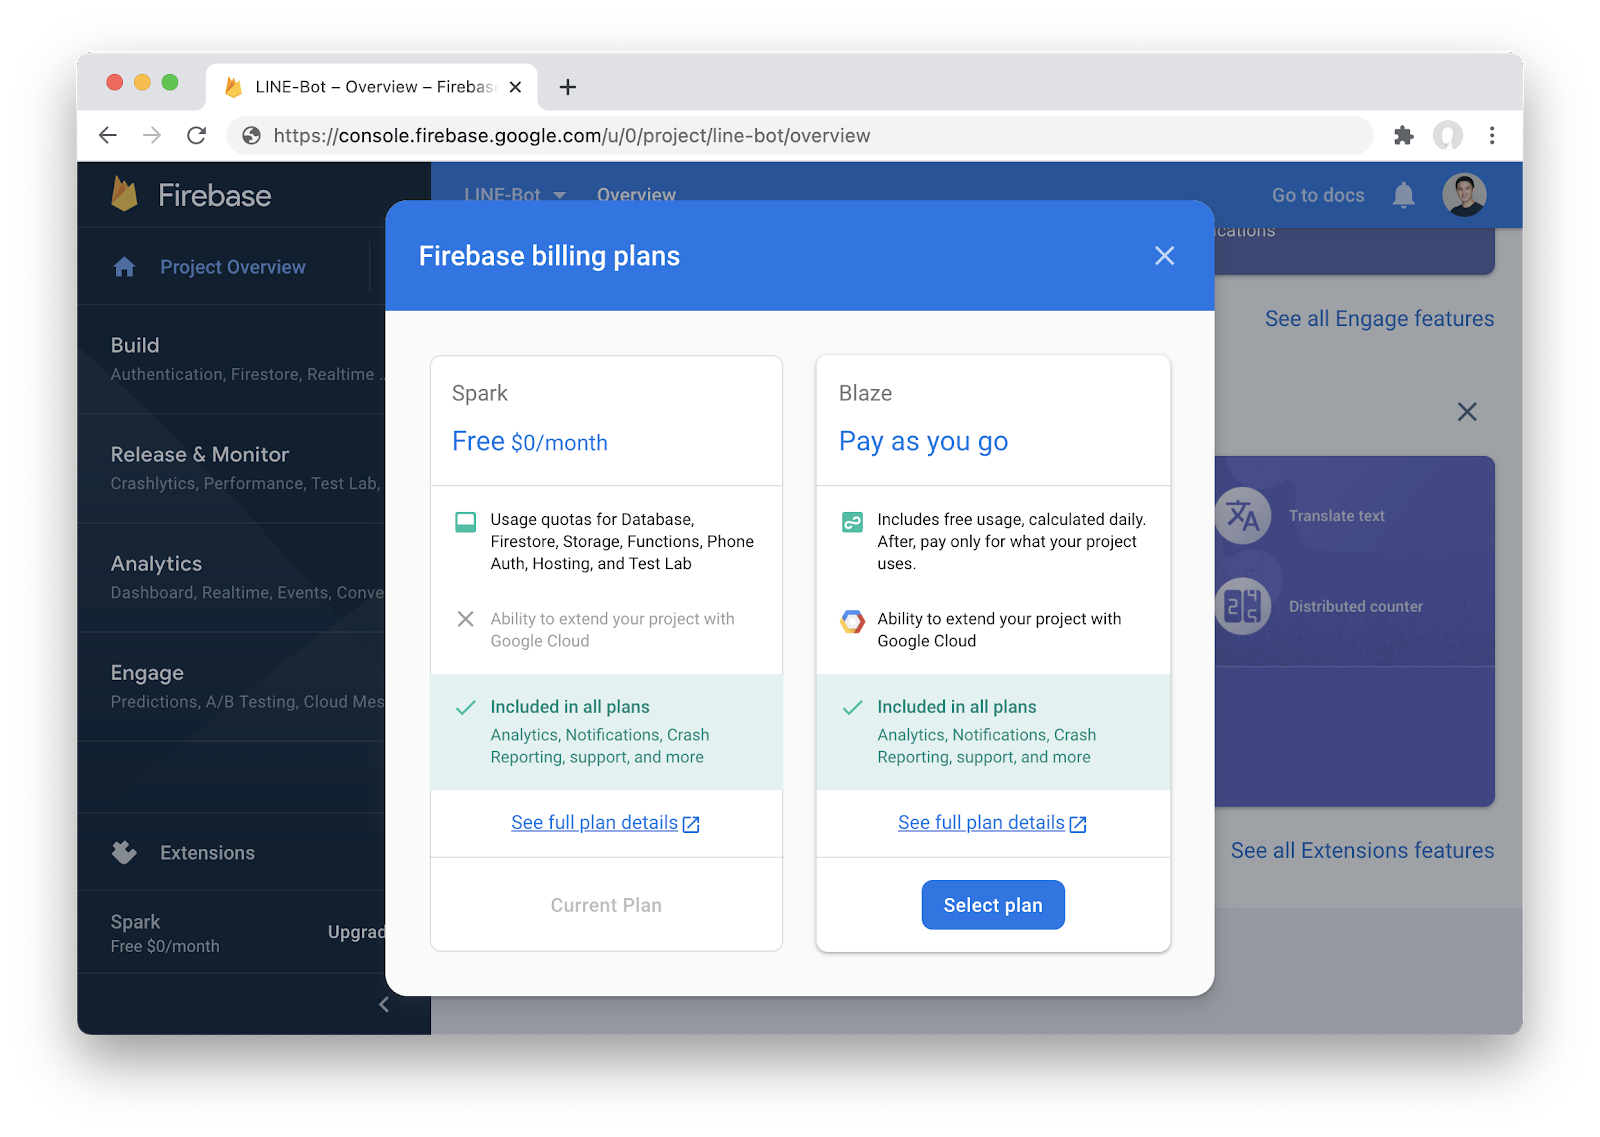
เปลี่ยนแพลนจาก Spark ไปเป็น Blaze (Pay as you go)
เนื่องจาก Cloud Functions for Firebase มีเงื่อนไขว่า หากต้องการไป request ตัว APIs ที่อยู่ภายนอก Google คุณจำเป็นจะต้องใช้ Blaze plan(เราจะต้องไปเรียก Messaging API ของ LINE)
การติดตั้ง Firebase CLI
Firebase CLI เป็นเครื่องมือที่จำเป็นสำหรับการ deploy ตัวฟังก์ชันที่เราพัฒนาขึ้น อีกทั้งยังสามารถจำลองการทำงานฟังก์ชัน(Emulate) ภายในเครื่องที่เราพัฒนาอยู่(Locally) ได้
- เปิด Terminal ขึ้นมาแล้ว run คำสั่ง
npm install -g firebase-toolsCaution: หากคุณพบปัญหาในการติดตั้ง Firebase CLI แบบ globally คุณจำเป็นตัองตั้งค่า npm permission ซะก่อน
- ตรวจสอบว่า Firebase CLI ได้ติดตั้งเรียบร้อยแล้วโดย run คำสั่ง (หากสำเร็จจะเห็นเลขเวอร์ชัน)
firebase --versionInitialize โปรเจค
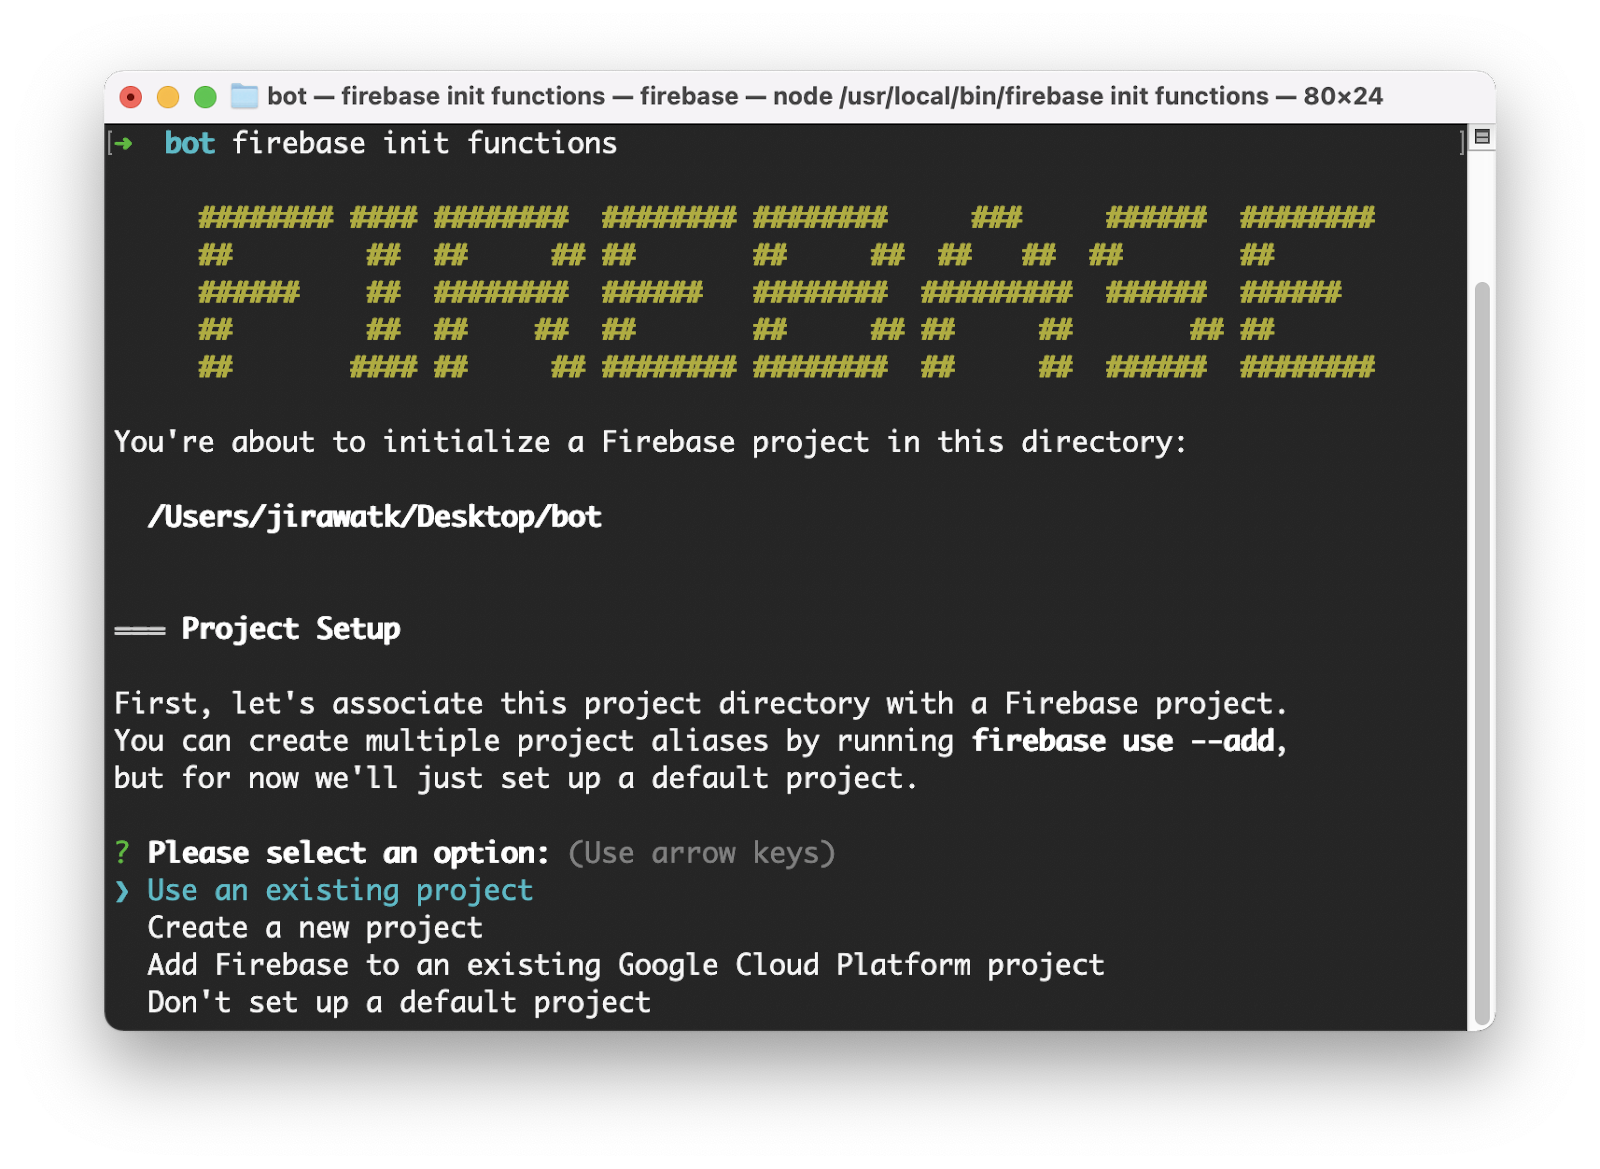
- รันคำสั่งนี้ จากนั้นตัว browser จะเปิดขึ้นมาให้เราเข้าสู้ระบบด้วย Google account เดียวกันกับที่สร้างโปรดจคใน Firebase
firebase login- สร้างโฟลเดอร์เปล่า(ตัวอย่างโฟลเดอร์ชื่อ bot) แล้วให้ shell เข้าไปในนั้น
mkdir bot
cd bot- เมื่อเข้ามาในโฟลเดอร์แล้ว ให้ Initial โปรเจคด้วยคำสั่ง
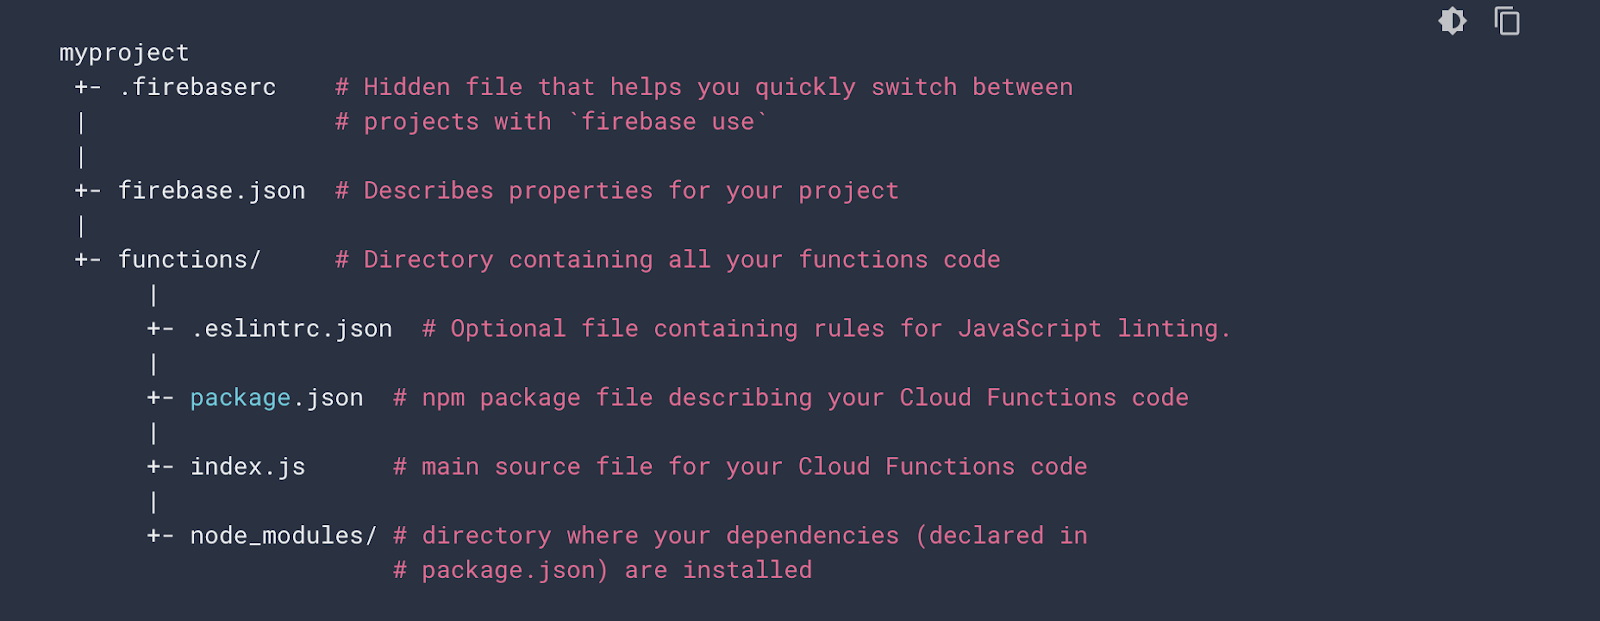
firebase init functions- เลือก Use an existing project จากนั้นจะเห็นเชื่อโปรเจคที่เราสร้างไว้ ก็กด enter ต่อไป
- ถัดไปจะมีตัวเลือกภาษา 2 ตัวคือ JavaScript และ TypeScript โดยตัวอย่างนี้ให้เลือก JavaScript
- จากนั้นมันจะถามว่าจะให้ติดตั้ง ESLint ไหม ตรงนี้แนะนำให้ตอบ N ไปก่อน(สำหรับมือใหม่)
- สุดท้ายมันจะถามว่าจะให้ติดตั้ง dependencies เลยไหมก็ให้ตอบว่า Y ไป
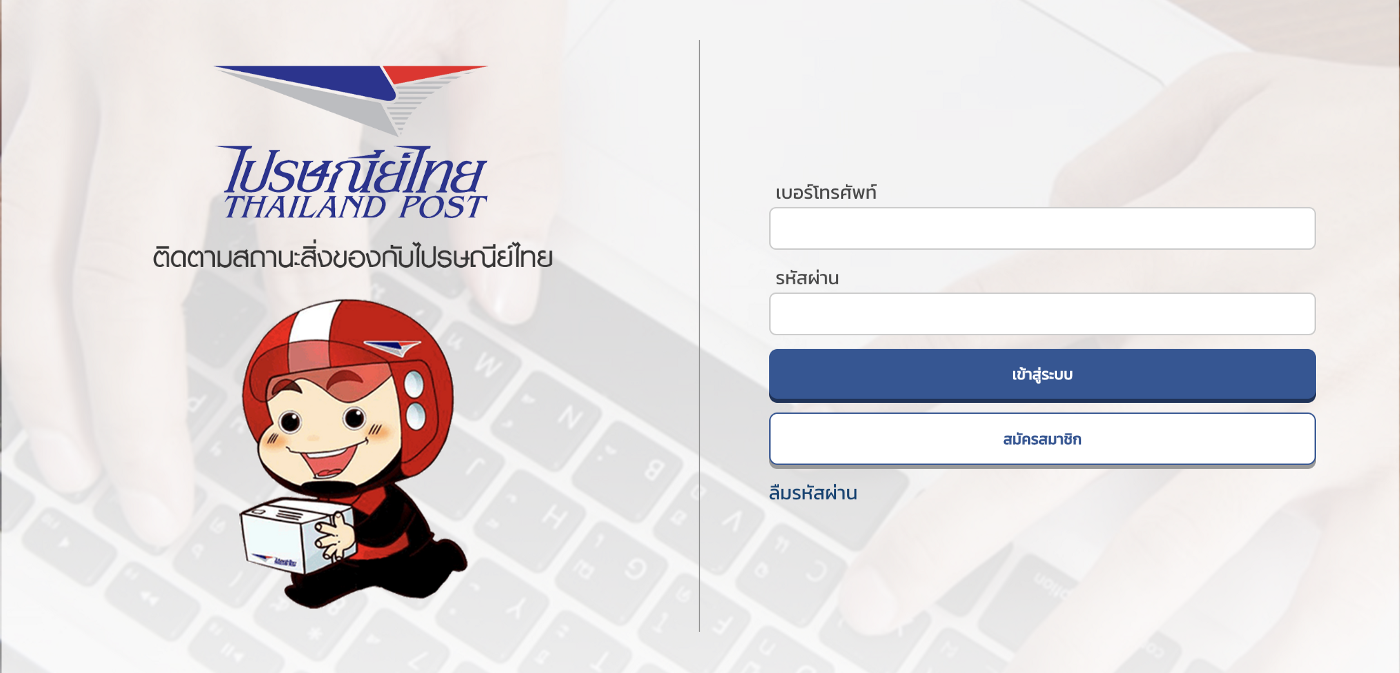
มี Account แล้ว
สำหรับใครที่มี account บนเว็บไปรษณีย์ไทยแล้วให้เข้าไปที่ หน้า Sign in แล้ว Sign in ได้เลย
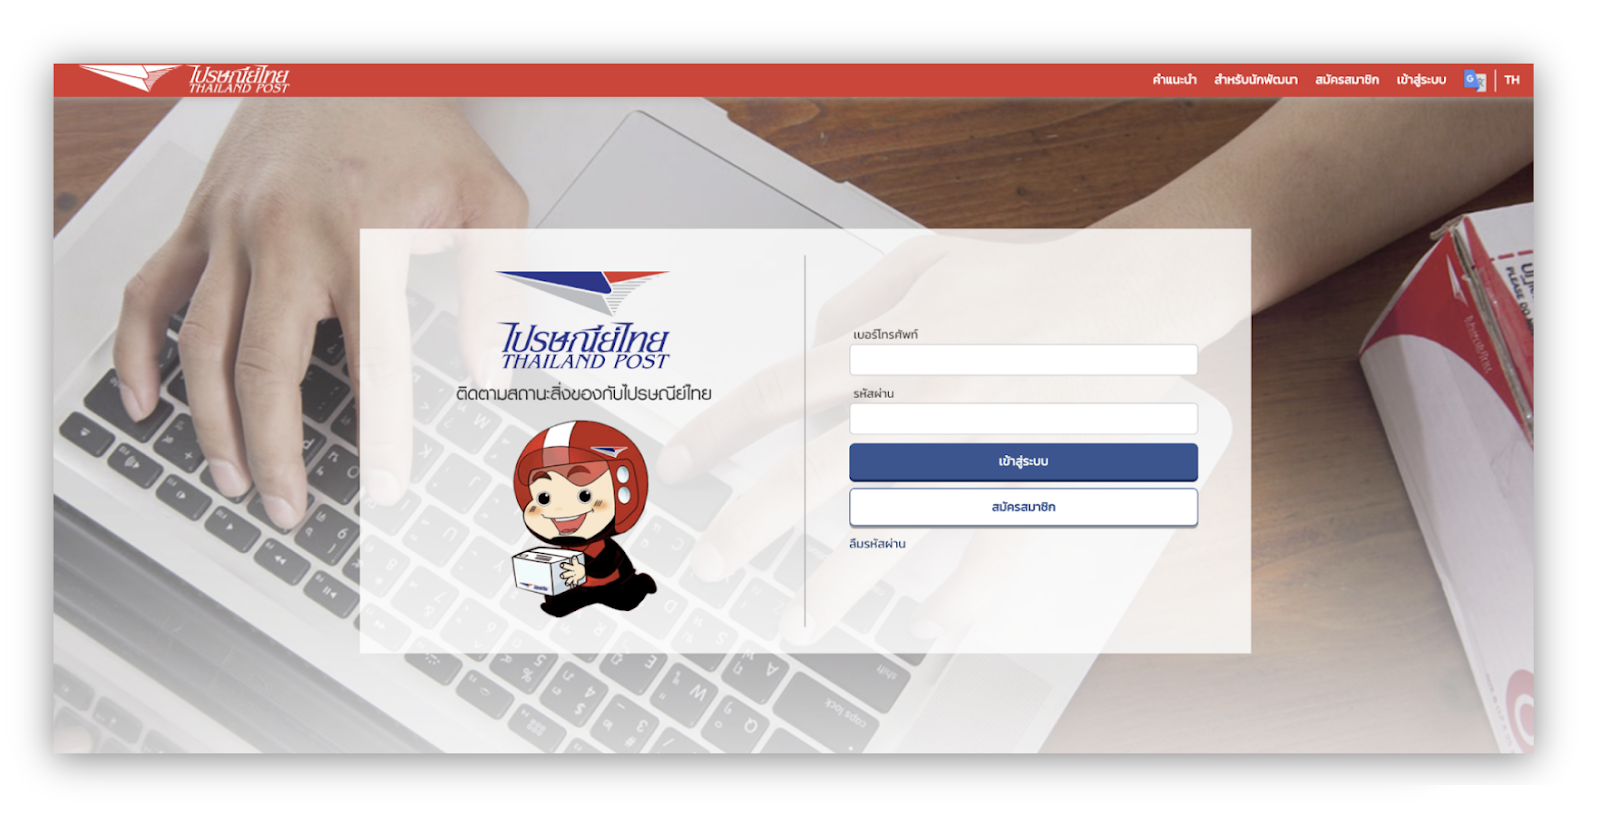
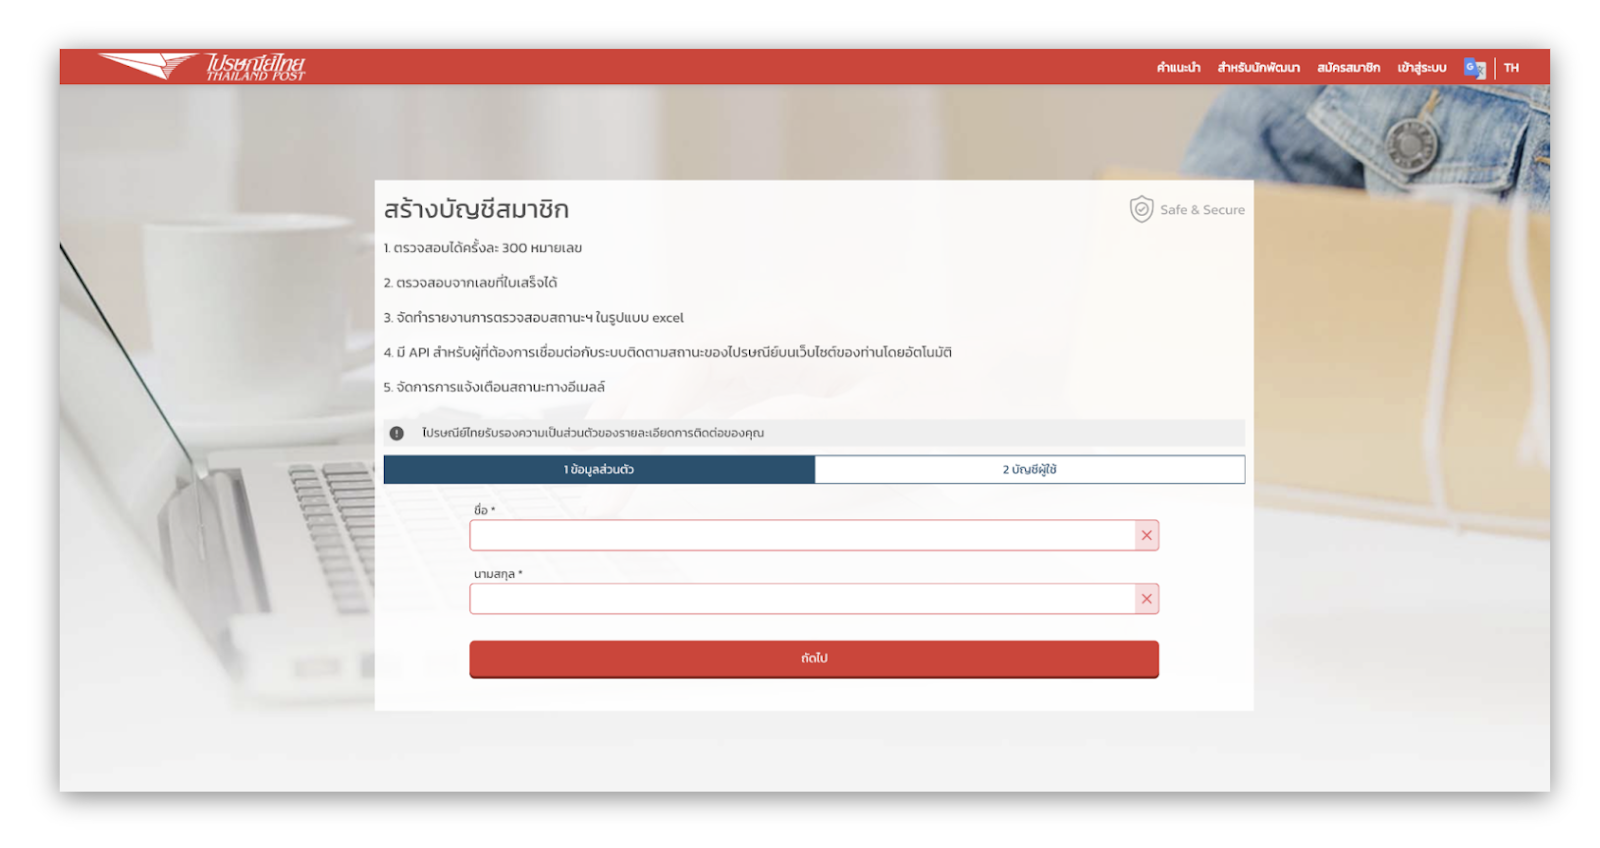
ยังไม่มี Account
สำหรับใครที่ยังไม่มี account สามารถไปสมัครสมาชิกได้ที่ หน้า Register ครับ
หลังจาก Login เข้าระบบของไปรษณีย์ไทยมาแล้ว ขั้นตอนนี้เราจะทำการ create API token เพื่อเอาไปใช้งานตอนเรียก API
- ให้เข้าไปที่เมนู "<> สำหรับนักพัฒนา" จะพบหน้าตาแบบนี้ครับ
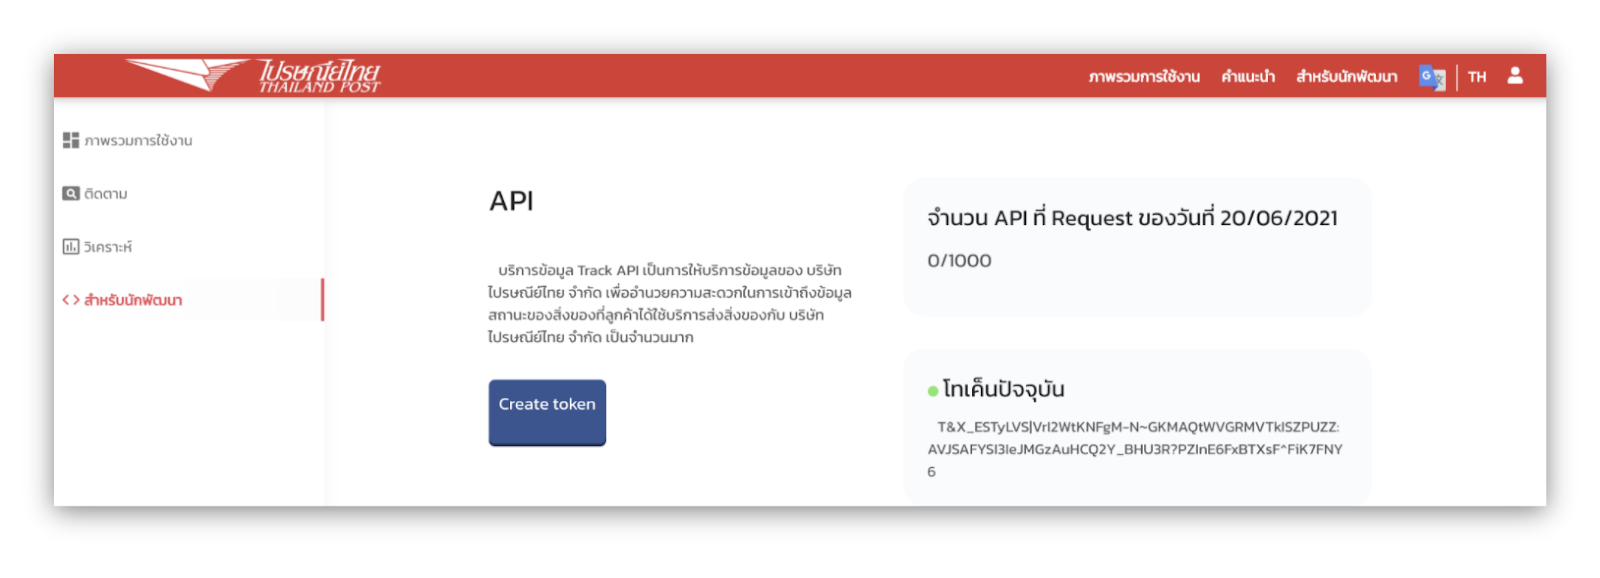
- กดที่ปุ่ม
Create token
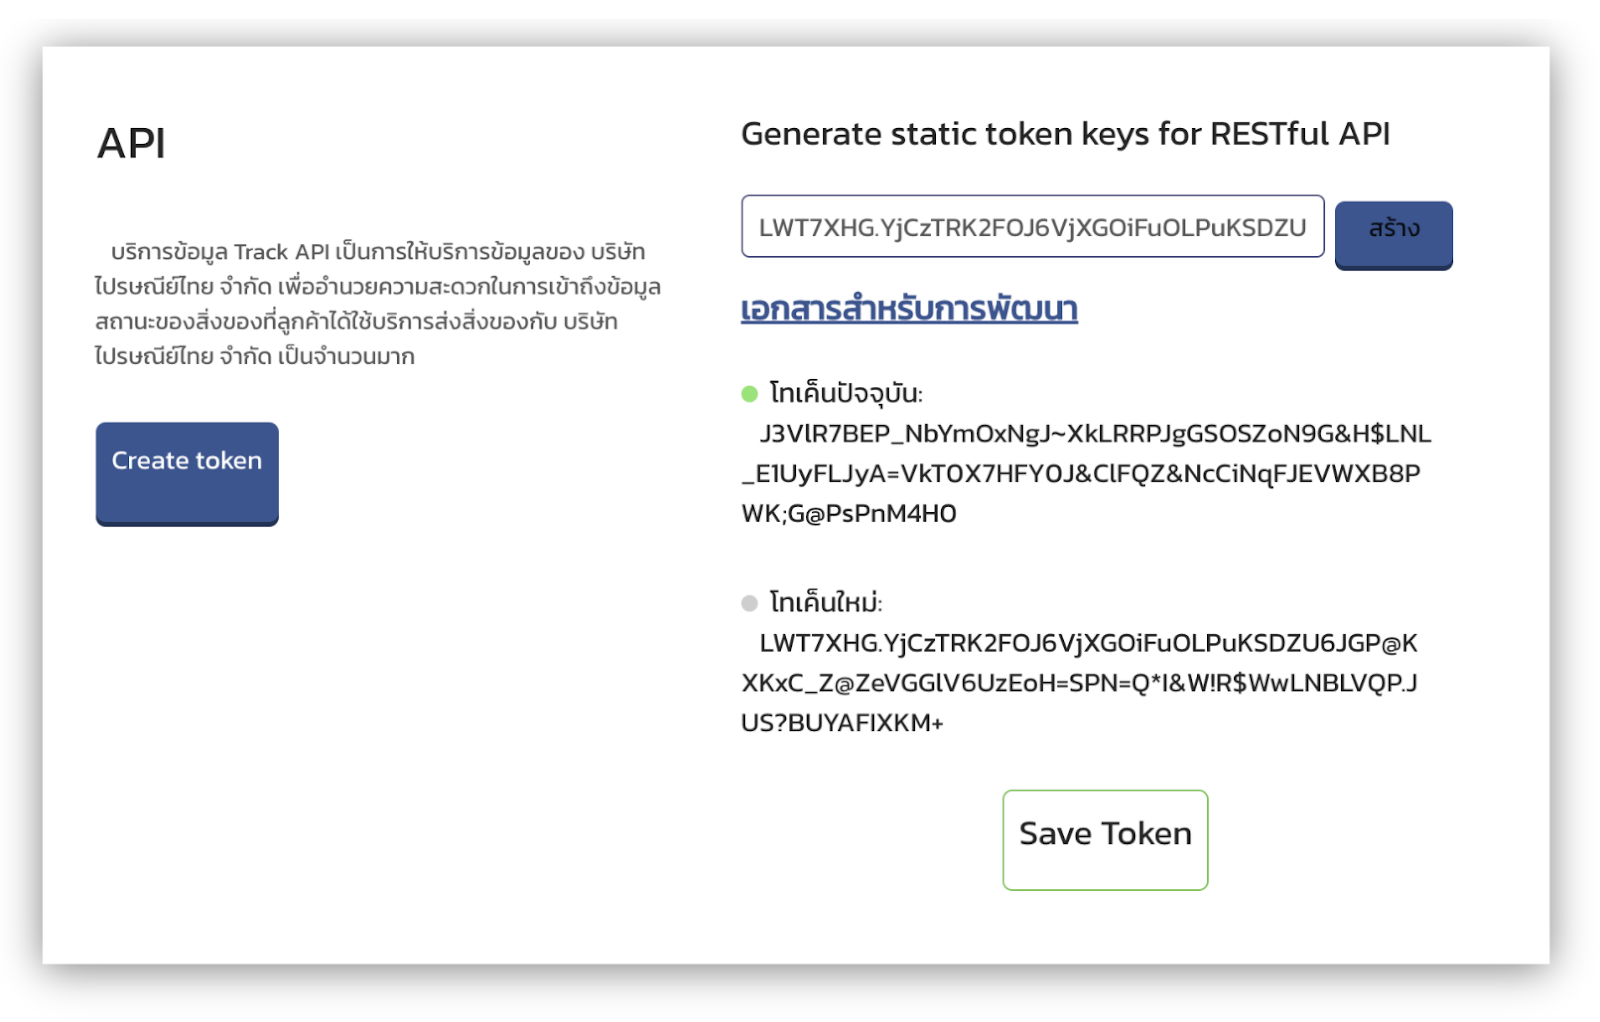
- กดปุ่ม "สร้าง" แล้ว กดปุ่ม "Save Token" เป็นอันเสร็จเรียบร้อย
ขั้นตอนนี้เราจะมาสร้าง Utility Class ที่ชื่อว่า thailandpost.js ที่จะคอยช่วยจัดการเชื่อมต่อกับ API ของ ThailandPost โดยจะจัดการสร้าง Token และ ดึงรายการสถานะการส่งของ
เพิ่ม Dependencies ที่จำเป็นสำหรับโปรเจคนี้
- เปิดไฟล์
package.jsonขี้นมา - เพิ่ม
axiosลงไปในdependencies
"dependencies": {
   "axios": "^0.21.1",
   "firebase-admin": "^9.9.0",
   "firebase-functions": "^3.14.1"
},- ในโฟลเดอร์ที่เราสร้างมา ให้เรา shell เข้าไปต่อในโฟลเดอร์ชื่อ
functionsจากนั้นสั่ง Install ตัว dependencies ที่เพิ่มเข้ามาใหม่ใน terminal ด้วยคำสั่ง
npm install- สร้างไฟล์ใหม่ชื่อ
thailandpost.jsในโฟลเดอร์เดิมที่ชื่อfunctionsและเขียนโค้ดตามตัวอย่างด้านล่าง
const axios = require("axios");

class Thailandpost {

   constructor() {
       // Token ที่ได้จาก ThailandPost
       this.token = 'xxxxxxxxx';
   }

   async getAuthToken() {
       let result = null
       await axios({
           url: 'https://trackapi.thailandpost.co.th/post/api/v1/authenticate/token',
           method: 'POST',
           headers: {
               'Content-Type': 'application/json',
               'Authorization': 'Token ' + this.token
           }
       }).then((response) => {
           result = response.data
       }).catch((error) => {
           result = null
       })
       console.log("Token is ready!");
       return result
   }

   async getItemTrack(trackNo) {
       const authToken = await this.getAuthToken()
       const params = {
           "status": "all",
           "language": "TH",
           "barcode": [trackNo]
       }
       let result = null
       await axios({
           url: 'https://trackapi.thailandpost.co.th/post/api/v1/track',
           method: 'POST',
           headers: {
               'Content-Type': 'application/json',
               'Authorization': 'Token ' + authToken.token
           },
           data: params
       }).then((response) => {
           result = response.data
       }).catch((error) => {
           result = null
       })
       return result
   }
}

module.exports = new Thailandpost();ขั้นตอนนี้เราจะมาสร้างไฟล์สำหรับเก็บข้อความตอบกลับหาผู้ใช้บนหน้า Chat
สร้างไฟล์ใหม่ชื่อ message.js ในโฟลเดอร์เดิมที่ชื่อ functions และเขียนโค้ดตามตัวอย่างด้านล่าง
exports.trackMainPayload = (postCode, trackItems) => (
   {
       "type": "flex",
       "altText": "สถานะการส่งของ",
       "contents": {
           "type": "bubble",
           "size": "giga",
           "body": {
               "type": "box",
               "layout": "vertical",
               "contents": [
               {
                   "type": "text",
                   "text": `${postCode}`,
                   "decoration": "none",
                   "size": "xl",
                   "weight": "bold"
               },
               {
                   "type": "box",
                   "layout": "vertical",
                   "contents": trackItems,
                   "spacing": "sm",
                   "margin": "md"
               }
           ]
       }
   }
})

exports.trackMainItem = (detail, bgcolor) => ({
   "type": "box",
   "layout": "horizontal",
   "contents": [
   {
       "type": "box",
       "layout": "vertical",
       "contents": [
           {
               "type": "box",
               "layout": "horizontal",
               "contents": [
               {
                   "type": "text",
                   "text": `${detail.status_date}`
               }
               ]
           },
           {
               "type": "box",
               "layout": "horizontal",
               "contents": [
                   {
                       "type": "text",
                       "text": `${detail.status_description}`,
                       "size": "sm"
                   }
               ],
               "spacing": "none",
               "margin": "md"
           },
           {
               "type": "box",
               "layout": "horizontal",
               "contents": [
                   {
                       "type": "text",
                       "text": `${detail.location}`,
                       "size": "sm"
                   },
                   {
                       "type": "text",
                       "text": `${detail.postcode}`,
                       "size": "sm"
                   }
               ],
               "spacing": "none",
               "margin": "md"
           }
       ]
   }
   ],
   "backgroundColor": `${bgcolor}`,
   "cornerRadius": "md",
   "paddingAll": "10px"
})

exports.trackNotFound = () => ({
   type: 'text',
   text: 'ไม่พบหมายเลขพัสดุที่ระบุ'
})
ขั้นตอนนี้เราจะมาสร้าง Utility Class ที่ช่วยจัดการส่วนที่เกี่ยวข้องกับ LINE ในการส่งข้อความกลับหาผู้ใช้
สร้างไฟล์ใหม่ชื่อ lineapp.js ในโฟลเดอร์เดิมที่ชื่อ functions และเขียนโค้ดตามตัวอย่างด้านล่าง
const axios = require("axios");
const LINE_HEADER = {
   "Content-Type": "application/json",
   Authorization: "Bearer xxxxxxxx"
}

class lineApp {
   async replyMessage(replyToken, message) {
       try {
           const params = {
               replyToken: replyToken,
               messages: [message]
           }
           return await axios({
               url: 'https://api.line.me/v2/bot/message/reply',
               method: 'POST',
               headers: LINE_HEADER,
               data: params
           }).then((response) => {
               result = response.data
           }).catch((error) => {
               result = null
           })
       } catch (error) {
           console.error(`Delivery to LINE failed (${error})`);
       }
   }
}

module.exports = new lineApp();- ขั้นตอนนี้เราจะสร้างฟังก์ชันชื่อ
LineWebhookในไฟล์index.jsที่ทำหน้าที่จัดการรับ Webhook ของผู้ใช้ตามโค้ดด้านล่าง
const functions = require("firebase-functions");
const thailandpost = require("./thailandpost");
const lineApp = require("./lineapp");
const msgTemplate = require("./message");

exports.LineWebhook = functions.https.onRequest(async(req, res) => {
   let event = req.body.events[0];

   if (event.type === 'message' && event.message.type === 'text') {
       const postCode = event.message.text;
       const result = await thailandpost.getItemTrack(postCode);
       let { response } = result;
       let { items } = response;
       let key = Object.keys(result.response.items);
       let payload;
       if (items[key[0]].length > 0) {
           let trackItems = [];
           items[key[0]].forEach(function(detail) {
               const bgcolor = (detail.delivery_status == 'S') ? '#ABEBC6' : '#EEEEEE';
               const item_temp = msgTemplate.trackMainItem(detail, bgcolor);
               trackItems.push(item_temp);
           });
           payload = msgTemplate.trackMainPayload(postCode, trackItems)
       } else {
           payload = msgTemplate.trackNotFound()
       }

       await lineApp.replyMessage(event.replyToken, payload);
       return res.status(200).send(req.method);
   } else {
       return res.status(200).send(req.method);
   }

});- เมื่อทุกอย่างพร้อมแล้ว ก็ deploy ฟังก์ชันผ่าน terminal ด้วยคำสั่ง
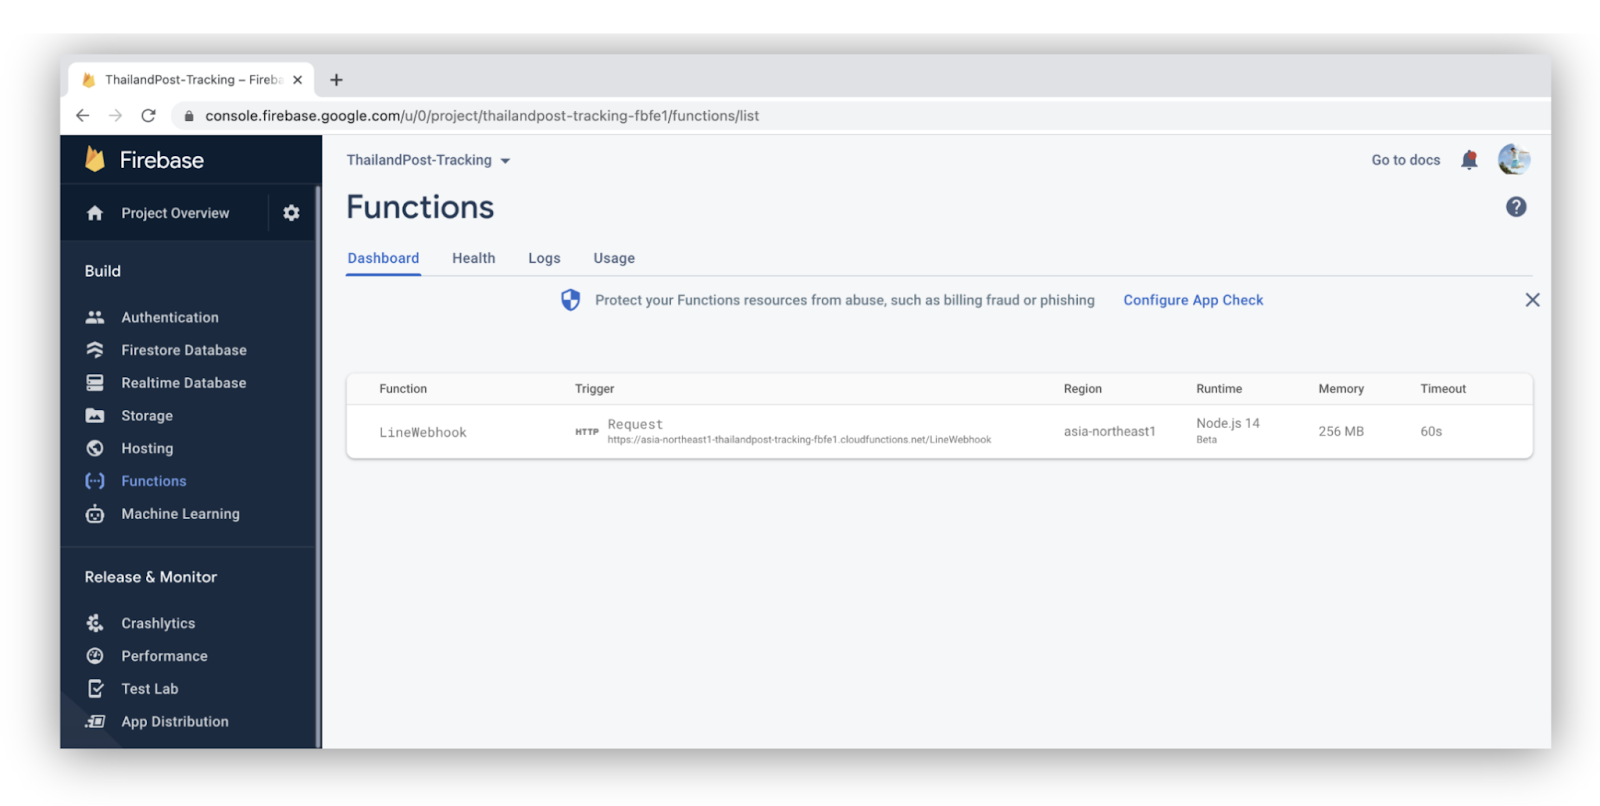
firebase deploy --only functions- หาก deploy สำเร็จเราจะได้ Cloud Functions ชื่อ LineWebhook แสดงอยู่ในเมนู Functions ใน Firebase console
ยินดีด้วย! ถึงตรงนี้คุณก็มี LINE Chatbot ที่สามารถเช็คสถานะส่งของจากไปรษณีย์ไทย ของคุณเองแล้ว!!!
สิ่งที่คุณได้เรียนรู้ใน Codelab นี้
- ✅ การสร้าง LINE Chatbot
- ✅ การสร้าง Account และการ Create Token บนเว็บ ไปรษณีย์ไทย
- ✅ การสร้าง Class ที่จัดการส่วนที่ต่อกับ API ของ ไปรษณีย์ไทย
- ✅ การสร้างโปรเจคใน Firebase
- ✅ การติดตั้ง Firebase CLI และ Cloud Functions for Firebase
- ✅ จัดการ Webhook โดยใช้ Cloud Functions และส่งผลลัพธ์เป็น Flex message กลับไปหาผู้ใช้
เรียนรู้เพิ่มเติม
- บทความ การเชื่อมต่อ LINE Bot กับ ThailandPost Rest API
- บทความ การเชื่อมต่อ LINE Bot กับ ThailandPost Webhook
- Thailand Post API Document